

The overall goal of managing incidents is for an organization to return to the normal service level as soon as possible. Incident management allows an IT organization to capture, forecast, and decide on the work undertaken by its users.
This section contains the following topics:
How the Assign Incidents Process Works
Modify the Incident Contact Information
View Project and Task Associations (Incident)
View Audit Fields for Incidents
Manage Automated Incident Processes
How Incidents are Converted into Planned Work
Demand Management provides the functionality necessary for your organization to prioritize and manage all unplanned work. Unplanned work includes incidents, ideas, or requests for enhancements that consume resources on a daily basis. Together with planned project work, unplanned work creates the total IT demand. Use Demand Management to assess the cost incurred due to unplanned work and to view resource use.
An incident is any event that does not form part of the standard operation of a service. The incident can potentially cause an interruption to or a reduction in the quality of that service. Incidents include hardware or software, and service requests.
An IT service request is a request from a user for support, delivery, information, advice, or documentation, not being a failure in the IT infrastructure. IT service requests are an important part of IT Service Management. Within Demand Management, you can create incidents to capture service requests and the associated information regarding the assignment, discussion, resolution, and time spent. This data is key to any IT department day-to-day operations. Without incidents, an organization and its users can experience unnecessary extended interruptions resulting in increased costs to the company.
Incidents consist of the following components:
Use the incident properties pages to define any view incident basics, such as its short description, category, status, urgency, and impact. In addition, you can convert the incident into a project or project task from the Incident Properties page.
Use the Associations menu to view a list of projects and project tasks from which this incident was converted.
Use this component to view a list of the resource effort on timesheets to resolve this incident.
Use this component to add notes to your incident or to view a list of notes posted to your incident.
You can use CA Clarity PPM processes to automate certain elements of demand management. For example, you can create a process that notifies the incident manager when the incident status changes to "Resolved". You can also define a process to implement your incident, such as setting the incident urgency to "High".
Your CA Clarity PPM administrator can define incident type-specific processes or global processes designed to work on a specific incident.
You can create and run processes on incidents.
For more information, see the Basics User Guide.
This component provides a way to track the history of specific activities that occur for an incident. Your CA Clarity PPM administrator, who determines which fields are audited and what information is stored in the audit trail, sets up Auditing. If Audit Trail is enabled and you have the appropriate access rights, the Audit menu displays when you open your incident. Use this menu to view a log of change, addition, or deletion records for any of the fields chosen for auditing.
For more information, see the Basics User Guide.
Before you report and manage incidents, verify if your CA Clarity PPM administrator has set up the incident category mapping. If this step is not completed, the following error message appears when you try to access incidents for the first-time:
For more information, see the Administration Guide.
An IT worker or a requester can log an incident. Resources with either role have adequate access rights to created new incidents. Once you have logged the incident, you can view and edit the incidents you have created from the Reported by Me menu. IT workers can view a list of all incidents associated with the incident category to which they are assigned from the Assigned to Me menu.
Create incidents in CA Clarity PPM, or through integrations with other systems that already capture help desk tickets, incidents, and service requests. Typically the primary data source for incidents is from other systems.
If your organization uses an existing service management vendor, use the XML Open Gateway to capture data in CA Clarity PPM. XOG and the Service Connect in-built integrations to IT Service Management (ITSM) systems support the integrations. You can use the XML Open Gateway to import incidents and any associated notes and effort. Once imported, the incidents are ready to be part of the demand management process.
For more information, see the XML Open Gateway Developer Guide.
Use the Incident List page to view incidents assigned to you, reported by you, or reported by others.
From the Incident List page, you can do the following:
Follow these steps:
The list page appears.
You can view a list of incidents to which you have rights to view on the Incident List page. Open the Incident List page to view incidents that are assigned to you, reported by you, or reported by others.
Displays the Incident List page with a list of incidents to which requestors or IT workers are assigned. If you are assigned an incident, the list also displays any incidents you report. Assigned to Me appears. Or, if you have the Incidents - Manage Category Incidents access right for at least one incident category.
You can specify how you are notified of new incidents or of incidents assigned to you. These account settings are handled on the Account Settings: Notifications page.
For more information, see the Basics User Guide.
Displays a list of incidents you report to requestors and IT managers, and any assigned to you.
Displays a list of incidents assigned to you, or reported by other resources. The list includes incidents mapped to incident categories to which you have access rights, either directly or by your association to a group.
The page appears if you have either the Incidents - Create/Edit - All access right, or the Incidents - Manage Category Incidents access right.
You can create an incident to report new incidents or work requests from Demand Management, or directly from the investment.
To create an incident, you require the following access rights for at least one incident category:
Follow these steps:
The list page appears.
The create page appears.
Defines the name of the incident. Make the name short and descriptive.
Defines the tracking number for this incident. If auto-numbering is enabled, the field is read-only.
Defines the detailed description for the incident.
Indicates a type for this incident. Select Incident or Service Request from the drop-down.
Defines the classification for this incident and helps to trace costs for unplanned work. Click the Browse icon to select the incident category for this incident.
Indicates the status for this incident. The status of a new incident is set to "New" by default when you first save it.
Select one of the following from the drop-down to change the status: New, Assigned, Work In Progress, Escalated, On Hold, Resolved, and Closed.
Defines the critical measure the incident has based on business needs. Select one of the following: Low, Medium, and High.
Default: Medium
Defines the extent to which the incident leads to a distortion of expected service levels. Select one of the following from the drop-down: Low, Medium, and High.
Default: Medium
Indicates if the priority of the incident can be overridden. Incident priority is ranked by the Incident Priority matrix based on urgency and impact selections.
This field is displayed only if you have the Incidents - Override Priority access right. Select the check box to override the priority of the incident.
Defines the order of resolving incidents based on impact and urgency. If you do not have the Incidents - Override Priority access right, the priority is system-generated and read-only. Otherwise, first select the Override Priority check box and then select a priority from the drop-down: Low, Medium, and High.
After an incident is submitted, displays the date and time of creating the incident. The field is read-only.
Indicates the date the IT worker is expected to start working on the incident.
Note: Verify that you have the Incident - Create/Edit access right to view the field.
Indicates the date the IT worker is expected to complete the work and mark the incident resolved.
Defines the estimated total amount of effort to resolve the incident.
Note: Verify that you have the Incident - Create/Edit access right to view the field.
Displays the sum of all the hours from individual effort entries for the incident. This field is read-only.
Indicates the date the incident status is set to "Resolved".
Indicates the date the incident resolution is accepted and verified for closure.
Indicates if a file relating to the incident is attached. Click the Browse icon and attach the file. You can add up to ten file attachments.
Defines the contact for this incident. By default, it is resource currently logged in.
Defines the primary contact email address.
Defines the primary contact home phone number.
Defines the primary contact work phone number.
Defines the primary contact mobile phone number.
Defines the primary contact pager number.
Defines primary contact fax number.
The process administrators use the Assign Incidents process - an incident approval process - to manage the assignment, review, and completion of incidents. By default, the process is not active. Before it can be started, the process administrator activates the process. The requestor logs an incident, the process starts automatically. The process can be customized with additional business rules with approval from the process administrator.
For more information, see the Administration Guide.
The Assign Incidents process has steps that can be triggered.
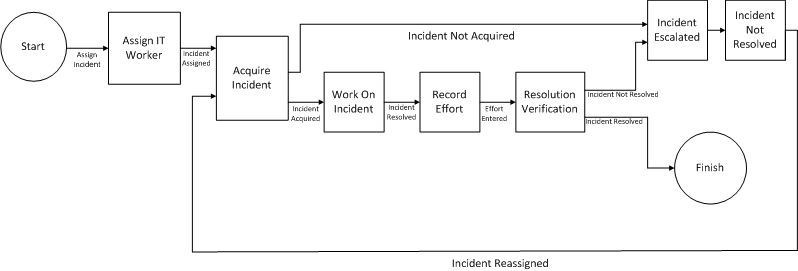
The following steps can be triggered in the process:
This step is triggered when an incident is first logged. This step triggers CA Clarity PPM to run the Assign Incidents job and, when the job has finished, to mark this step as complete. This step sends an action item to the IT worker to review the incident to which they have been assigned. Once this step is complete, the Acquire Incident step starts.
This step is triggered when either the Assign IT Worker or the Incident Not Resolved step is complete. This step sends an action item to the IT worker to review and accept the newly assigned incident. During the IT worker review of the action item, the IT worker can either accept or reject the assignment. If the assignment is rejected, the Incident Escalated step starts. If the assignment is accepted, the Work On Incident step starts.
This step is triggered when the Acquire Incident step is complete. This step sends an action item to the IT worker to work on the new assignment. The IT worker then works on the incident and then marks the action item as done. Once marked as done, the Record Effort step starts.
This step is triggered when the Work On Incident step is complete. This step sends an action item to the IT worker to record the effort spent on the incident. The IT worker then requires to record the effort and mark the action item as done. Once marked as done, the Resolution Verification step starts.
This step is triggered when the Record Effort step is complete. This step sends an action item to the requestor to verify and confirm that the incident has been satisfactorily resolved. During their review of the action item, the requestor can either approve or reject the resolution. If the resolution is approved, the process ends. If the resolution is rejected, the Incident Escalated step starts.
This step is triggered when either the Acquire Incident or the Resolution Verification step is complete. This step changes the status of the incident to "Escalated". Once this step is complete, the Incident Not Resolved step starts.
This step is triggered when the Incident Escalated step is complete. This step sends a notification to the IT manager that the incident has not been resolved and to review and reassign the incident. When the IT manager marks the action item as done, the Acquire Incident step starts.
Once the Assign Incidents process is validated and is active, it can be started from the Incident: Processes page. An instance of the Assign Incidents process is created automatically each time an incident is submitted for approval.
The Assign Incident process terminates when the Resolution Verification step is complete.
Once the IT worker has resolved the incident, open the incident and change the status to "Resolved". Then, enter a date in the Resolved Date field. Use the Incident Properties page to edit. Setting the status of an incident to "Resolved", when the Assign Incidents process is active and running, triggers a notification. The notification asks the requestor to verify and confirm the resolution.
Note: To select and save a date in the Resolved Date field, you must have the Incident - Create/Edit access right.
Once the requestor has accepted the resolution of the incident, the IT worker requires to change the status of the incident to "Closed". The status is specified on the Incident Properties page. If the Assign Incidents process is active and running, setting the status of an incident to "Closed", triggers a notification. The notification informs the requestor that the incident is closed. This process does not change the status of an incident to "Closed".
IT workers receive notifications when an IT manager assigns work on an incident. The following procedure explains how to view incident notifications.
Follow these steps:
The Action Items portlet displays with other portlets.
The number of incident notifications you have received are displayed.
The notifications page appears.
For more information, see the Basics User Guide.
Verify that all incidents are assigned to a resource. Use the Assign To field on the Incidents List page to assign and reassign incidents. The field displays on the page after you submit the incident for the first-time.
When you assign an incident, a notification is sent to the user assigned. The method of receiving notifications depends on the assigned user personal notification settings.
For more information, see the Basics User Guide.
Follow these steps:
The list page appears.
The properties page appears.
The selected resource is assigned to the incident.
You can reassign incidents that are unresolved to another user. When you assign an incident, a notification is sent to the assigned user. The method of receiving notifications depends on the assigned user personal notification settings.
For more information, see the Basics User Guide.
Follow these steps:
The list page appears.
The select resources page appears.
The confirmation page appears.
The primary contact defaults to the resource currently logged-in and includes the resource default contact information. When you assign another resource as the primary contact for the incident, the resource contact information is also updated when the page is saved.
If you change the resource contact information, the changes are saved for the incident. The resource default contact information does not change.
For more information about managing resources, see the Resource Management User Guide.
Follow these steps:
The list page appears.
The properties page appears.
You can enter or change the incident category for an incident. Incident categories help to distinguish real incidents from IT service requests.
All incidents must belong to an incident category. Incident category mapping can occur at the investment level or at the administration level. Both require particular access rights. The following procedure explains how to change the incident category for the incident.
For more information about managing resources, see the Resource Management User Guide.
Follow these steps:
The properties page appears.
You can modify or override the incident priority. An incident priority helps IT managers determine the plan in resolving incidents. The priority of an incident is a system-generated value the Incident Priority matrix determines.
Modify the incident priority by altering the Impact and Urgency fields. You can also adjust the impact and urgency values by altering the timing of the incident or by temporarily altering the affected hardware or software.
Follow these steps:
The list page appears.
The properties page appears.
During the Evaluation of Priority phase of the incident, override the incident priority in the queue.
Follow these steps:
The list page appears.
The properties page appears.
If you do not have the Incidents - Override Priority access right, the Override Priority field appears as read-only.
The priority of an incident is a function of its impact and urgency. Based on the settings on the Incident Priority matrix, the CA Clarity PPM administrator sets the priorities. Use the Incident Priority matrix to plot the impact values against the urgency values.
For more information, see the Administration Guide.
The status of an incident is its current state in CA Clarity PPM. When you first log an incident, the status of the incident is "New." As an incident is worked on, the status of the incident changes. Use the Status field to alter its state.
The following is a list of values you can set for the status of an incident:
The incident is new and not been reviewed and resolved.
The incident is open and a resource is assigned (Assigned To field).
The incident is open and the IT worker is working on the incident.
The incident is open but requires a higher-level authority to invest resources.
The incident is open. But the IT worker is awaiting information to resolve the incident.
The incident is no longer open. Either the IT worker cannot reproduce the incident and the requestor did not supply adequate information, or lost contact with the service desk. Or, the incident is closed but is pending verification from the requestor. If the Assign Incidents process is active and running, setting the status of an incident to "Resolved", triggers a notification. The notification asks the requestor to verify and confirm the resolution.
The incident is no longer open. The requestor is satisfied with the resolution of the incident. Incidents that are imported into CA Clarity PPM through the XML Open Gateway also have a "Closed" status.
Follow these steps:
The list page appears.
The properties page appears.
Incident scope can reach a point that requires handling as a project or project task. The IT worker assigned to work on the incident flags the incident for conversion and assigns the incident to a project manager.
Depending on the personal notification settings of the project manager, a notification to convert the incident into a project or project task is sent.
For more information, see the Basics User Guide.
Follow these steps:
The list page appears.
The properties page appears.
You can link directly to your timesheet to record the time you spend working on your assigned incidents. Use the Enter Time button on the incident effort page and the incident properties page.
The incident effort page displays a chronological list of the timesheet entries you recorded for this incident. The incident effort is used to calculate costs for unplanned work. The time you spend and enter for the incident does not get carried forward when the incident is converted. The incident effort and the new project or task effort represent separate activities and are time-tracked, separately.
You can enter time spent working on incidents from the incident or from CA Clarity PPM timesheets.
For more information, see the Basics User Guide.
Follow these steps:
The list page appears.
The properties page appears.
The Select Investment and Time Period page appears.
Specifies the investment to charge for the resulting cost. The investments that you can select are based on the following criteria:
Select an open timesheet period from the drop-down.
The selected timesheet for the period opens.
Use the incident associations page to view a list of the projects and project tasks associated with the incident. An association to the incident occurs any time you create a project or project task for the incident.
Follow these steps:
The list page appears.
Use the incident notes page to add and view private and public notes. Notes let you record additional information about the incident you are working on. All the notes the IT worker adds, displays in chronological order in a list. You can view and sort the list of notes and add additional notes.
All incident notes are public by default and viewable to the requestor and to the IT worker. Once a note is saved, it becomes read-only and cannot be modified or deleted. A timestamp and the name of the resource who added the note is stored with the note.
You can do the following:
Follow these steps:
The list page appears.
The properties page appears.
Defines the subject for the note.
Defines a short description of the note.
The new note appears in the list. Notes are listed in the order created. The most recent note appears at the top of the list.
For example, to sort the list by subject, click the Subject column header. When sorted, an arrow appears in the column header.
To reverse the sort order, click the column header again. Do the same to sort by the Entered By and Date Entered columns.
You can view an overview of all of the notes for a particular incident. All the additional notes display in the notes list.
Follow these steps:
Details of the note displays.
You can view all the previous and new values of fields changed, the resource who changed them, and the date of changing the values. The fields display in the bottom half of the Incident Audit Trail page.
To record audit trail, specific field property attributes require to be set up for auditing.
Contact your CA Clarity PPM administrator or see the Administration Guide for more information.
Follow these steps:
The list page appears.
The properties page appears.
The audit trail page appears.
You can create, track progress, and delete automated incident processes. Verify that the related processes are active and valid.
Note: Verify that you have the appropriate access rights to access this menu.
Follow these steps:
The list page appears.
The properties page appears.
The processes page appears.
For more information, see the Administration Guide.
Converting an incident or work request into a project or project task converts unplanned work into planned work. When incidents become planned work, they are converted into either projects or project tasks.
You can track projects and project tasks associated with the incident. Once an incident is converted, use the Incident Associations page.
If you get a notification from an IT worker to convert an incident to a project task, use the notification to link to the incident. How you are notified depends on your personal notification settings.
For more information, see the Basics User Guide.
Follow these steps:
The list page appears.
The select conversion type page appears.
The Select Project Template page appears.
The create page appears. Details from the incident page, like the name of the project, manager, start and finish dates are replicated on to the project page.
For more information, see the Project Management User Guide.
Note: If more work is required to resolve the incident, the IT project staff can reopen the incident.
If you receive a notification to convert an incident into a project task, use the action item to link to the incident. Each new project task created is added to the bottom of the hierarchy of WBS (work breakdown structure) within the project.
Only the project manager assigned to the incident can convert the incident into a project task. A task can only be associated with an existing and active project. You can convert only one incident at a time.
Follow these steps:
The list page appears.
The select project page appears.
The create page appears.
Details from the incident page, like the name of the project, manager, start and finish dates are replicated on to the task page.
For more information, see the Project Management User Guide.
Note: If more work is required to resolve the incident, the IT project staff can reopen the incident.
When an incident is converted into a project or a project task, data is carried forward with the incident to the new project. If the contact or assigned resource is not a team member of the project, data does not carry forward. Effort data is not carried forward to the project or project task during conversion. Also, any custom attributes on the Incident object do not convert to identical custom attributes on the project or task.
When you convert an incident into a project or project task, you cannot link back to the incident from the project or project task. A link exists only from the incident to the converted project or project task.
The data moved over to the project or project task is defined in the following table:
|
Incident Data Field |
Project Data Field |
Project Task Field |
|---|---|---|
|
Short Description |
Project Name |
Name |
|
Tracking ID |
Project ID |
ID |
|
Status |
Status (Unapproved) |
Status (Not Started) |
|
Detailed Description |
Description |
N/A |
|
Assigned Project Manager |
Manager |
N/A |
|
Start date |
Start Date |
Start (date) |
|
Expected End date |
Finish Date |
Finish (date) |
|
Copyright © 2013 CA.
All rights reserved.
|
|