

As a resource manager, you use the product to manage the time recording of the employee resources who report to you.
As a project manager, you use the product to manage the time recording for your project tasks.
Your resources use weekly timesheets to track their time and activities. Resources access their current timesheet, and record the actual time that they spend on the tasks that are allocated to them, usually by the hour. Resources record time for assignments, such as project tasks, incidents, indirect work, and any time they spend on other activities.
You can modify the projects and tasks that individual resources can log time against. When a resource submits a timesheet for approval, you receive an action item to review the timesheet. You approve the timesheet or return the timesheet to the resource to make corrections.
Note: Project managers receive notifications only for timesheets that contain tasks in their projects.
When you approve a timesheet, the time for each task is posted to the actuals. Project managers can compare the actual time that is recorded with the estimates and can monitor the progress of their project.
Prerequisites:
Note: For more information, see How to Submit a Timesheet.
The following process describes how a resource or project manager manages the time recording of their direct reports:
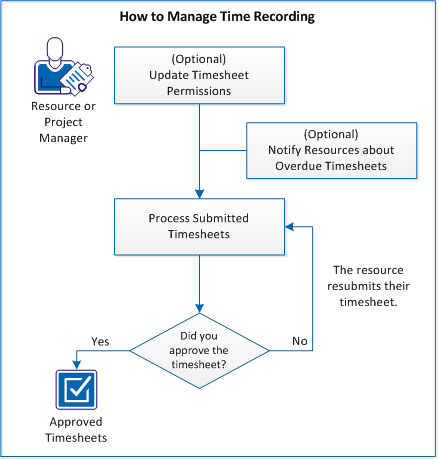
To manage time recording, follow these steps:
As a resource or project manager, you continually adjust the ability of employee resources to enter time for specific projects and tasks.
To prevent an employee resource entering time for any task:
To prevent any employee resource entering time for a project:
To prevent an employee resource entering time against a project:
To prevent an employee resource entering time against a task:
Employee resources usually submit timesheets on a weekly basis, allowing time for managers to review and approve them. If an employee does not submit a timesheet on time, you can send them a notification.
Follow these steps:
The timesheet page appears.
CA Clarity PPM sends an overdue timesheet notification to the employee.
As a project or resource manager, you review and approve the time that is recorded against project and other tasks.
When a resource submits a timesheet, the product sends a notification to review the timesheet.
Note: Project managers only receive timesheet submission notifications if the timesheet contains items that they are associated with.
Follow these steps:
The timesheet is approved and the time that is recorded against each task is added to the actuals for that task.
CA Clarity PPM returns the timesheet for corrections and notifies the resource that the timesheet is returned.
Follow these steps:
The timesheet options page appears.
The confirmation page appears.
The timesheet options page appears.
Use the following procedure to reset the timesheet options for all resources to the default settings.
Follow these steps:
The timesheet options page appears.
The confirmation page appears.
The timesheet options page appears.
|
Copyright © 2013 CA.
All rights reserved.
|
|