

As an application user, you can personalize your pages so that they display the information you need. By personalizing a page, you view only the content that is relevant to your task and you can display the content on the page in a way that best suits you.
Each CA Clarity PPM page is composed of portlets and the page content can be organized into tabs.
To personalize a page, you can:
Note: The changes you make are visible only to you.
The following diagram describes how an application user personalizes pages:
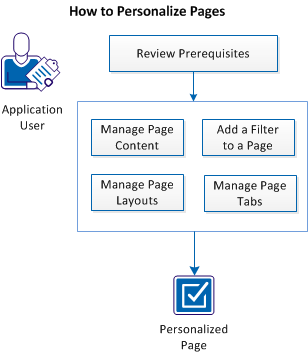
To personalize pages, perform these steps:
To successfully personalize pages, the following tasks must be completed:
Note: If you have the privileges to personalize, the related menus or icons appear on a page or a portlet toolbar.
You can manage the page content by adding or removing portlets, or restoring default portlets.
Follow these steps:
The Content page with a list of portlets already displayed on the page appears.
The new portlet is added to the page.
To remove portlets from the page or restore the default content, use the Remove or Restore Defaults buttons.
You can add a filter portlet to a page to filter the page content.
Follow these steps:
The list of filters that the page already contains appears.
The filter is added to the list of page filters for the page.
If you are adding the filter portlet to pages and you want the values in the filter to persist when you move from one page to another, select the Persist check box. Filter values will persist only across pages that use the same filter portlet.
Select the Default option for the desired page filter default. The first filter published to the page is the page filter default unless a selection indicates otherwise.
Change the layout of the page by reordering the page content.
Follow these steps:
Each option provides the number of columns and the percentage of the page given to each column. In the Row Layout option, the number of portlets you place in a row determines the percentage of space given to a portlet.
You can create your personalized workspace by managing the tabs that appear on a page and the portlets that appear on each tab.
Use the Manage Tabs page to complete the following tasks:
Add a new tab to a page, and then add the portlets you want displayed on the page. The new tabs that you add appear next as the last tab on the page.
Follow these steps:
The Manage Tabs page appears showing the list of existing tabs.
The Content page appears.
The Filter Content page appears.
The Layout page appears.
A new tab is created.
Edit the properties and content of existing tabs.
Note: You cannot edit the properties of all tabs. If the tab can be edited, it shows a link when you hover the mouse cursor over the list. You can edit the properties of custom tabs you create.
Follow these steps:
On the Manage Tabs page you can also delete selected tabs or reorder them. Use the respective buttons.
Note: You can remove the tabs that you create on a page. You cannot remove the CA Clarity PPM default tabs, or the tabs installed with the PMO Accelerator add-in.
|
Copyright © 2013 CA.
All rights reserved.
|
|