

You can show operating and capital costs separately on the financial summary page and in a detailed financial plan. You can enter the cost information in the following ways:
Financial Summary Page
The financial summary page for an investment displays high-level operating and capitalization costs for planned and budgeted costs. You can edit the amounts on the financial summary until you create a cost plan of record (POR). When you create a POR, the fields for operating and capitalization costs in the planned and budgeted cost sections of the financial summary become read-only. The POR information updates the planned cost fields on the financial summary page automatically. The latest approved budget updates the budget fields.
Detailed Financial Plan
You can create a detailed financial plan manually, or you can populate the plan automatically from tasks or team allocations. To populate from task or team allocations, Cost Type must be selected as a grouping attribute. To populate cost and budget plans automatically with capital and operating costs, use one of the following methods:
Specify an investment-level default (Capital or Operating) for all tasks. If you do not specify a cost type, the default is Operating. You can override the default at the task or task hierarchy level for individual tasks as needed. For example, you have an investment in which most tasks have operating costs, and a few tasks have capital costs. Set the investment cost type as Operating so all tasks inherit the cost type of Operating. For each task that has capital cost, edit the cost type in those specific tasks to override the default cost type.
Specify a capital cost percentage for individual team member allocations. For example, you have six team members who are assigned to a project. Alice, one of the members, has capital cost of 15 percent. Specify the capitalization percentage for Alice. The capitalization percentage is used to calculate the percentage of operating cost and capital cost for an employee allocation. When you populate from the team allocation, Alice has two lines in the cost plan. One line shows the operating percentage and the other shows units and costs per the operating percentage.
Important! The procedures in this scenario describe the product navigation with no add-ins installed. If you have an add-in such as the PMO Accelerator installed, the navigation can vary.
The following diagram describes how a financial administrator displays capital and operating costs on summary and detailed financial plans.
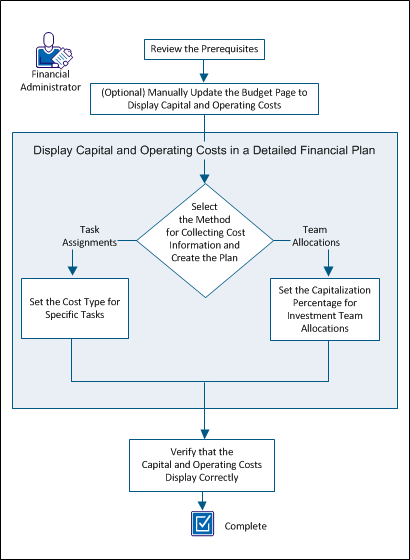
To display capital and operating costs, perform these steps:
Complete the following setup tasks before beginning the procedures described in this scenario:
To assist with high-level planning, you can manually add capital and operating amounts on the financial summary page. For example, you have a new project and must deliver high-level, planned cost estimates. You can enter estimates for operating and capital costs. Once you have created a cost plan of record (POR) or have an approved budget, these fields become read-only.
Follow these steps:
Note: If the POR does not use the Cost Type grouping attribute, the Planned Operating Cost field summarizes all costs as operating.
Specifies the amount of capital cost that is planned for the investment. If the plan has a cost POR, the values from the POR populate this field and it becomes read-only.
Specifies the percentage of total cost that comes from capital. This read-only field is automatically calculated based on the Planned Cost field value.
Specifies the amount of operating cost that is planned for the investment. If the plan has a cost POR, the values from the POR populate this field and it becomes read-only.
The percentage of total costs that comes from operating. This read-only field is automatically calculated based on the Planned Cost field value.
Note: If Cost Type is not a grouping attribute, then all values are combined in the Budgeted Operating Cost field.
Specifies the amount of capital cost that is budgeted for the investment. This field is unavailable when:
Specifies the percentage of total budget costs that come from capital. This read-only field is calculated from the Budgeted Capital Cost field value.
Specifies the amount of operating cost that is budgeted for the investment. This field is unavailable when:
Specifies the percentage of total budget costs that come from operating. This read-only field is calculated from the Budgeted Operating Cost field value.
Create the detailed financial plan to update capital and operating costs automatically from either task assignments or team allocations.
If you plan to populate your financial plan using task assignments, you can override the investment Cost Type setting at the specific task level. Set the investment default for the cost type when you create the financial plan.
For example, consider an investment with 90 tasks that break down into the following cost types: 80 operating cost tasks and ten capital cost tasks. In this case, the financial manager sets the investment Cost Type attribute to Operating. This setting automatically assigns the Operating cost type to all tasks and the 80 operating cost tasks are correctly identified. For the ten tasks that are capital cost, the financial administrator specifies the cost type at the task level to override the default setting.
Follow these steps:
The cost plans list appears.
The properties page appears showing the default values from the associated entity and investment. You can accept these default values, or you can change them.
Cost plans with information that is populated from task assignments can have some tasks with a cost type different from the default. You can indicate a cost type for a specific task that overrides the default cost type that is selected for the plan.
Example 1
The Cost Type attribute for an investment is set to Operating. However, there are some tasks or task hierarchies that require the Capital cost type. In this case, you select the Capital cost type for only those tasks. When you populate the cost plan from tasks assignments, the plan displays a breakdown of capital and operating costs by line item.
Example 2
The Cost Type attribute for an investment is set to Operating. The investment has a parent task with a cost type of Capital. The parent task has two children tasks: Task 1 has a cost type of Operating and Task 2 has no cost type selected.
In this case, Task 1 has Operating specified and Task 2 inherits the cost type Capital from its parent task. When a cost plan is created using New from Task Assignments, two rows get created, one for Operating costs and one for Capital costs.
Note: The Cost Type field does not display out-of-the-box for tasks. The system administrator must configure the Tasks view in in Studio to display the field.
Follow these steps:
Note: A child task inherits the selected value, unless it has a different cost type selected.
To show capital costs by team allocation, specify the capitalization percentage value for team members. For example, you have a team of six people who are assigned to a project. You can specify a capitalization percentage for each team member. Each member can have a different percentage. The cost plan displays the capital and operating costs for team members for whom you set a capitalization percentage.
Follow these steps:
The value is used to calculate the percentage of operating cost and capital cost for the employee allocation.
Note: The Capitalization field does not display out-of-the-box for teams. The system administrator must configure the Teams view in in Studio to display the field.
Verify that the investment capital and operating costs display on the following pages:
To view the Financial Summary page, follow these steps:
To view the Cost Plans Detail page, follow these steps:
The cost plans list appears.
When the capital and operating costs appear on both pages, you have correctly displayed this information.
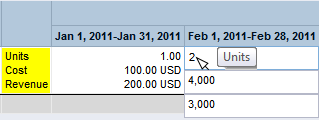
You can edit the unit and cost details in a cost plan after creating it.
You can only edit the cost plan for periods outside the freeze date defined in the entity plan defaults.
Follow these steps:
Displays the number of units for the time period.
Displays the cost for the time period.
Displays the revenue for the time period.
Make a cost plan the plan of record (POR) to prepare to submit the cost plan for budget approval.
Follow these steps:
The cost plans list appears.
A check mark appears in the Plan of Record column for the plan selected.
You can now submit the cost plan to be approved as the budget.
Creating a benefit plan and associating it with a cost plan allows you to calculate ROI or NPV on an investment. Although cost plans can go through an approval process to become a formal budget, you do not need to approve benefit plans. While a benefit plan can be associated with an unlimited number of cost plans, a cost plan can have only one associated benefit plan.
Use this procedure to create a benefit plan to associate with a cost plan.
Follow these steps:
The benefit plans list appears.
The create page appears.
Defines the name for the benefit plan.
Defines the unique identifier for the benefit plan.
Defines the time period unit that appears on the benefit plan.
Defines the first time period to include in the plan.
Defines the last time period to include in the plan.
Use this procedure to add line item details to a new benefit plan. The details you add appear under the Detail field on the benefit plans details list page. You can only define details for the time periods applicable to the benefit plan.
Follow these steps:
Add as many benefit details as needed.
The benefit plan details appear listing the details you entered.
Defines the planned benefit amount for the time period.
Defines the actual benefit amount for the time period.
Displays the difference between the actual and the planned benefit for the time period.
Displays the percentage of the benefit detail line item as it contributes to the total benefit plan.
Displays the total benefit for the benefit detail line item.
Defines the actual benefit amount for the time period.
Displays the difference between the actual and the planned benefit for the time period.
Use this procedure to edit data in an existing benefit plan. A benefit plan cannot be deleted if it is associated with a cost plan.
Follow these steps:
The properties page appears.
Defines the name for the benefit plan.
Defines the unique identifier for the benefit plan.
Displays the total benefit for the benefit detail line item.
Defines the time period unit that appears on the benefit plan.
Defines the first time period to include in the plan.
Defines the last time period to include in the plan.
The benefit plan details appear.
Defines the benefit details.
Displays the percentage of the benefit detail line item as it contributes to the total benefit plan.
Displays the total benefit for the benefit detail line item.
Displays the actual benefit amount for the benefit detail line item.
Displays the difference between the actual and the planned benefit amounts for the benefit detail line item.
Defines the planned benefit amount for the time period.
Defines the actual benefit amount for the time period.
Displays the difference between the actual and the planned benefit for the time period.
Use this procedure to associate a benefit plan with a cost plan.
Follow these steps:
The properties page appears.
The benefit plan association to a cost plan carries over to the submitted budget. This association can only be changed while the budget is in a submitted state. Once approved the benefit plan association cannot be changed.
Follow these steps:
The properties page appears.
When a cost plan is approved, it becomes the budget plan for an investment. You can submit a portion of a cost plan for approval by varying the start and end dates for the submission. Only the portion between the new start and end dates is submitted for approval.
When a cost plan is approved, it becomes a budget plan with a new version number. If there is a previous budget, it is saved separately and can be viewed but not edited.
When submitting a cost plan as a budget plan, the following rules apply:
Submit a cost plan as a budget plan to create a new approved budget, or to update the budget after updating the cost plan.
A cost plan must be designated as the POR before you can submit it for approval.
If an approved budget plan exists, and you create or update a cost plan as the new POR, you can submit the POR to merge with the approved budget plan or to completely replace the budget plan.
Follow these steps:
The cost plans list appears.
The following fields require explanation:
Defines unique ID for the budget plan. Paste the ID value in this field.
Displays the start period of the budget plan. To submit a portion of the cost plan rather than the whole plan for budget, select a different start period.
Displays the end period of the budget plan. To submit a portion of the cost plan rather than the whole plan for budget, select a different end period.
Displays the grouping attributes of the cost plan.
Note: If you want to merge the cost plan with an existing approved budget, the grouping attributes of the cost plan need to match. If they are different, you can either replace the entire budget plan, or cancel the approval request.
Specifies whether to merge the cost plan you are submitting with the approved budget, or to completely replace it.
Note: This option is hidden if you submit the first cost plan for approval. The option is set to Replace and is read-only if the grouping attributes or time periods are different from the attributes in the approved budget.
The cost plan designated as the POR is submitted as a budget plan.
Use this procedure to approve or reject a submitted cost plan as a budget.
Before approving or rejecting a budget plan, you can edit the fields in the Unit, Cost, and Revenue Details section as needed. You can also add line item details to the plan.
Note: You cannot edit an approved budget. Submit a new budget for approval to replace the old budget.
Follow these steps:
The budget plans list appears.
The budget details appear.
An approved cost plan becomes the budget plan for an investment. Because elements of an investment change, you can revise various parts of the budget, or can replace the budget entirely.
You can make two types of revisions to an approved budget plan:
Both revision types provide approval history. However, the replace feature enables you to delete line items that are no longer needed, and to revise grouping attributes and fiscal time periods.
When you submit a cost plan that revises an existing budget, you specify whether to merge or replace using the Submit Options pull-down list. This field appears only when there is at least one approved budget. If the new cost plan has a different structure than the existing budget, Replace is the only option.
When your cost plan is approved, it becomes the revised budget plan with a new version number. You can view the previous version of the budget, which is saved separately. You cannot edit either previous budget plans or the current approved budget plans.
The following diagram describes how a financial administrator creates a budget revision.

Example: Revise a Forward, Inc. Budget Plan
The following example illustrates the options for updating the budget plan throughout this scenario. Forward Inc. has a new project that is planned for later this year. Alice manages the project and has already created a cost plan (ProjectA_estimatedCP-00) with the required roles and estimated costs.
She needs the following roles:
Alice has not yet staffed the project. In her submitted cost plan, she added roles for each of the positions and populated the cost plan for the six months of the project.
When creating the cost plan, Alice used the following properties for her cost plan:
She submitted the estimates for approval as the current budget plan. Alice's product manager approved the estimated budget. The manager knows that the budget will change before the project begins.
Perform these steps to create a budget revision:
To complete all tasks in this scenario, consider the following information:
Have the following access rights:
Complete the following tasks before you begin the scenario:
After you submit a cost plan for approval, it becomes the submitted budget plan. You can edit the submitted budget plan; you cannot edit the budget plan after it is approved.
Add line items to the cost plan and merge the new lines into the budget. For example, you can add a role to a cost plan, and can submit the cost plan for approval as a merged change.
Example: Revise the Budget with a New Role
Alice determines that the new project needs a technical writer to document the online help. She adds the role of Senior Technical Writer to the cost plan, and submits the revised plan, ProjectA_estimatedCP-00, as a merged revision to the budget.
Follow these steps:
The Cost Plan Detail: Properties page appears and displays fields for each grouping attribute that appear in the cost plan. For example, if Role is a grouping attribute, then the Role field displays.
Note: For more information about populating cost plans, see the Financial Management User Guide.
Note: If the cost plan is already the plan of record, skip this step.
Note: If you receive the following message, another cost plan for the investment exists as a submitted budget plan.
Error:A submitted budget already exists.
The submitted budget plan must be approved or rejected before you can submit another plan for approval.
You have submitted a cost plan for approval that merges an added line item into the existing budget.
You can revise the time period values in a cost plan and can merge them into the existing budget plan. Merging values from one or more time periods helps you keep the budget accurate, without having to replace the entire budget.
For example, you receive incremental funding for your budget to account for increases in resource costs. You can revise the cost of the resource for only the affected months.
If you have set a freeze date in the financial entity, you can only edit the cost plan for periods after the freeze date.
Example: Append Time Periods to the Budget Plan
Alice reviews the project plans with her manager and finds she needs to add three months for a new required feature. Alice revises her cost plan by adding three months to the project and populates fields with the cost information for each resource. She submits the revised cost plan, with the ID of ProjectA_estimatedCP-00, as a merged revision with only the additional months.
Follow these steps:
Note: If the cost plan is already the plan of record, skip this step.
Note: If you receive the following message, another cost plan for the investment exists as a submitted budget plan.
Error:A submitted budget already exists.
The submitted budget plan must be approved or rejected before you can submit another plan for approval.
You have submitted a cost plan for approval that merges revisions to time periods in the existing budget.
Delete unnecessary line items and submit the cost plan as a replacement for the budget. For example, if you want to remove a line item from the budget plan, delete the line item in the cost plan. Submit the revised cost plan as a replacement for the budget plan.
Note: Select Replace to delete line items. Selecting Merge prevents the deletion and the line item remains in the submitted budget plan.
Example: Delete a Role and Replace the Budget
Several months before the project starts, Alice discovers that she must transfer the headcount of a test engineer to another project. She deletes the line item for the role for the junior test engineer from the cost plan, ProjectA_estimatedCP-00, and submits the plan for approval. Alice selects Replace to remove the line item from the budget.
Follow these steps:
Note: If the cost plan is already the plan of record, skip this step.
Note: If you receive the following message, another cost plan for the investment exists as a submitted budget plan.
Error:A submitted budget already exists.
The submitted budget plan must be approved or rejected before you can submit another plan for approval.
You have submitted a cost plan for approval that replaces the existing budget.
Choose new grouping attributes and time period types for the budget by creating and submitting a new cost plan that replaces the approved budget plan.
For example, when planning for an upcoming project, you provide an estimated budget with the roles that you think you need. Before the start of the project, you create a cost plan with the actual resources and change the grouping attributes to include Department and Location. You can then submit the new cost plan to replace the approved budget plan.
Example: Submit a New Cost Plan and Replace the Budget
Alice fills all the positions for the team and knows the cost of each resource. She has resources in two locations and wants to group by department and location. Additionally, the product manager asks that she use monthly time periods instead of quarterly. Alice creates a cost plan and adds each resource with their cost details. She makes the following selections to the properties of the cost plan:
Alice saves her changes as ProjectA_actualCP-00, and submits the new budget for approval.
Follow these steps:
Note: For more information about creating cost plans, see the Financial Management User Guide.
Note: If the cost plan is already the plan of record, skip this step.
The Submit Option field lists Replace as the only available option. You must replace the budget when the grouping attributes or the fiscal time period type are different from those selected properties for the existing budget.
Note: If you receive the following message, another cost plan for the investment exists as a submitted budget plan.
Error:A submitted budget already exists.
The submitted budget plan must be approved or rejected before you can submit another plan for approval.
You have submitted a cost plan for approval that replaces the existing budget.
After you submit the cost plan for approval, it becomes available as the submitted budget plan. You can view the status of the budget plan, as well as edit the plan if you have access rights.
Example: Edit and Verify the Submitted Budget Plan
Alice has submitted the revised cost plan for approval. The plan remains in the submitted budget plan state until her manager approves it. She verifies that her revisions have been merged into or have replaced the budget correctly. While Alice reviews the plan, she sees that the cost value for October is incorrect for one of the resources. She manually changes the value and saves her changes. Her manager approves the budget; and Alice has successfully revised the approved budget plan with her changes.
Follow these steps:
After you have verified that the submitted budget is correct and it has been approved, you have successfully revised the approved budget plan.
You can copy an existing financial plan from an investment to create a new plan.
You can also copy a financial plan when creating an investment from a template investment that includes financial plans.
For more information, see the Project Management User Guide.
The following rules apply when you copy an existing financial plan to create a new plan:
This example shows you how data is copied over from a source plan to the target plan based on the following inputs from the user:
The data from Jun 09 to Dec 09 periods from the source plan are copied to the Jan 2011 to Jun 2011 periods in the target plan.
Use the following procedure to copy an existing cost plan from an investment to create a new cost plan. You can copy the entire cost plan or only a portion of it and modify.
Follow these steps:
The list page appears.
The copy plan page appears.
Displays the source plan name.
Defines the start copy period. Data is copied to the target plan based on this start period and the target plan start period.
Default: The source plan start period.
Defines the end copy period. Data is copied to the target pan based on this end period and the target plan end period.
Default: The source plan end period.
Defines the percentage by which to scale (increase or decrease) the dollar values in the copied plan.
Example: Enter 75 percent to increase the values from the source plan by 75 percent from their original.
Default: 0%. No change in values.
Defines the target plan name.
Default: The name of the source plan prefixed with "Copy of".
Defines the target plan unique ID.
Default: The ID of the source plan prefixed with "Copy of".
Defines a description for the target plan.
Default: The source cost plan description.
Displays the fiscal period type.
Default: The fiscal period type of the source plan. You cannot change the default period type.
Defines the target plan start period.
Default: The start period of the source plan.
Defines the target plan end period.
Default: The end period of the source plan.
Displays the benefit plan associated with the source plan (if any).
Displays the system currency selected during financial setup.
Displays the grouping attributes of the plan.
Default: The grouping attributes of the source plan. You cannot change these grouping attributes.
The cost plan is copied over and the new plan appears listed on the cost plans list page.
Use the following procedure to copy an existing benefit plan to create a new benefit plan. You can copy the entire plan or just a portion of the plan. After copying the plan, you can modify it.
Follow these steps:
The benefit plans list appears.
The copy benefit plan page appears.
Displays the source plan name.
Defines the start copy period. Data is copied to the target plan based on this start period and the target plan start period.
Default: The source plan start period.
Defines the end copy period. Data is copied to the target pan based on this end period and the target plan end period.
Default: The source plan end period.
Defines the percentage by which to scale (increase or decrease) the dollar values in the copied plan.
Example: Enter 75 percent to increase the values from the source plan by 75 percent from their original.
Default: 0%. No change in values.
Defines the target plan name.
Default: The name of the source plan prefixed with "Copy of".
Defines the target plan unique ID.
Default: The ID of the source plan prefixed with "Copy of".
Displays the fiscal period type.
Default: The fiscal period type of the source plan. You cannot change the default period type.
Defines the target plan start period.
Default: The start period of the source plan.
Defines the target plan end period.
Default: The end period of the source plan.
The benefit plan properties appear displaying the newly copied benefit plan values.
The total benefit amount is broken down for the new planning periods. Zero values appear for the periods that are no longer a part of the new benefit plan.
|
Copyright © 2013 CA.
All rights reserved.
|
|
