

The release planning involves building the release backlog. The product owner identifies the high ranking product backlog items to build the release backlog. The product owner then discusses the release backlog items with the team.
The following diagram describes how a product owner performs the release planning.
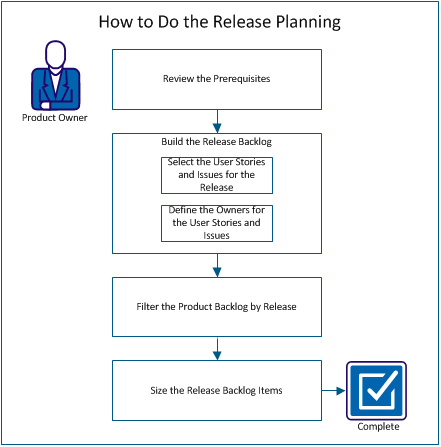
Perform these steps to plan a release:
To do the release planning, verify that the following items are set up in CA Clarity™ Agile:
The product owner identifies the high ranking product backlog items for the release and discusses the items with the team. For example, in the Parking Pass Management System, the product backlog includes the following items:
The product owner can identify the first three items in the ranking order and can associate them to the release.
Follow these steps:
The owner of a user story or issue is responsible for completing the work that is associated with the story. You can assign a user story or issue to more than one owner.
For example, Pay Parking Pass by Credit Card user story can be assigned to two software programmers. The two programmers work together to complete the user story. While one programmer writes the code for the feature, the other programmer reviews the code, and they switch roles frequently.
Follow these steps:
Filter the product backlog page to display the user stories and issues that are associated with the release. For example, in the Parking Pass Management System, filter the backlog page to display only the items that are identified for the release:
Follow these steps:
The backlog page is filtered to display the release backlog.
Sizing helps you understand the effort that is required to complete a user story. You use points as the unit to estimate the relative size of stories.
For example, the Purchase parking pass online user story takes more effort to complete than Pay parking pass by credit card user story. Assign more points to Purchase parking pass online.
Follow these steps:
Note: You can also edit the points inline on the backlog page to estimate the relative size of stories.
You have successfully completed planning a release. The team can now use the release backlog to build the sprint backlog.
|
Copyright © 2013 CA.
All rights reserved.
|
|