

A user story describes a feature or functionality requirement for the product that the team commits to deliver. You can associate a user story with only one product. As a team member, you can create a user story to track the work associated with the requirement. Include enough information in the user story for the team to provide an estimate of the work effort that is required to implement it.
For example, for the product Parking Pass Management System, create a user story named Pay Parking Pass by Credit Card. Include the details of the requirement in the user story, such as mask the field for card security code.
For example, for the product Parking Pass Management System, create user stories to provide details of the features and functionalities that are expected from the product. Some examples of the user stories include:
Become familiar with these terms before working with user stories:
Note: The user story dependency must be in the same product.
Note: When a story dependency closes, the visual cues such as the message section in the User Story Details page and icon from the Flag column in list pages disappears. The cues are visible if the story depends on other open stories.
When you create a user story, you can configure the window to remove the default fields, and add new fields or custom attributes including multi-value lookup fields. The configuration changes are not made at the system level, so apply only to the product and the user.
Note: You cannot remove the Title and Product fields.
For example, John creates a user story As a user, I can use credit card to purchase parking pass. John configures the New User Story pop-up window. You can see the field changes on all the user story pop-up windows for the Parking Pass Management System product, but not on any other product. Similarly, Carolyn cannot see the changes made by John.
Follow these steps:
Note: To edit or delete a user story, select the user story from the Backlog page, and click Details or Delete.
You can capture the functional and non-functional details of a requirement in a user story. The user story can be updated to Completed when all of its associated tasks are closed. Any team member that is associated with an active team on the product can update a user story to Completed.
For example, for the user story As a user, I can use credit card to purchase parking pass, you can add the following details:
Follow these steps:
Note: When you create a dependency, the details page for the other user story displays information about the relationship in the Dependencies section.
In the Notes and Attachments section, perform one of the following actions:
Note: To edit an issue, click the Details link for the issue. To delete the issue, click Delete.
Note: You can also add comments to issues from the Issue Details page, using the same steps.
Note: To edit or delete a task, from the User Story Details page, select the task, and click Details or Delete.
Note: The product owner or scrum master closes the user story after reviewing it and approving that it meets the acceptance criteria.
As a team member, you can collect and document issues that can affect the performance and delivery of a project. You can link the issues to user stories, and can add them to the list of backlog items.
For example, for a product Parking Pass Management System, the system does not send automated Parking Pass Expiration Message to subscribers. You can add an issue Unable to Send Parking Pass Expiration Message, and add to the list of backlog items.
Review this information before working with issues:
You can add issues and associate with releases, sprints, and teams. For example, to address the issue Unable to Send Parking Pass Expiration Message, add it to the product backlog, and assign the release, sprint, and team that will work on the issue.
Follow these steps:
Note: To view or edit the details of an issue, click Details. You can edit all attributes of an issue except the product associated with the issue. To delete an issue, select the issue from the Backlog page, and click Delete.
You can capture the functional and non-functional details in an issue, which will help the assigned team to address all the requirements. For example, you can attach the template for the message, which the team can use when setting up the alert message. You can also create smaller tasks to address the issue, and assign them to different team members.
Follow these steps:
Note: If you are an administrator or you have created the comment, you can edit or delete the comment from this page.
In the Notes and Attachments section, perform one of the following actions:
Themes are sometimes used in agile development to group related user stories together. Themes are optional for products and any team member that is assigned to the product can create them. You can select multiple themes for a user story. If a user story is assigned to multiple themes, you can see the user story listed in each Theme Details page.
Follow these steps:
Note: To edit or delete a theme from the Themes page, select the theme, and click Details or Delete. You can also add a user story from a theme.
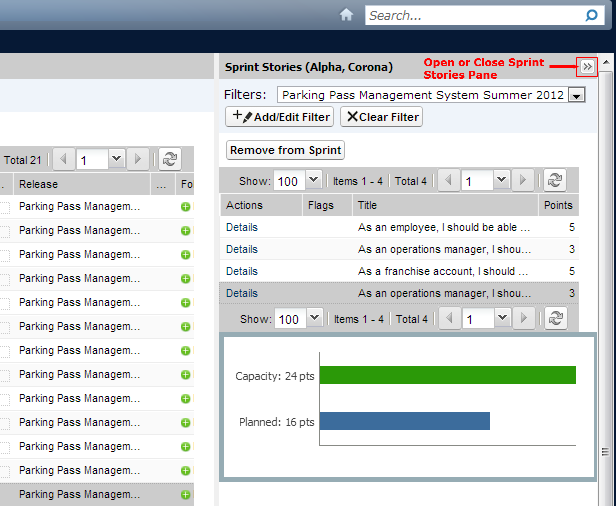
When planning the workload for a sprint, you can plan the velocity of the team. During the sprint plans, you move the user stories and issues from the release backlog to the sprint backlog. Filter the sprint backlog by team to display the velocity chart. The velocity chart shows the planned capacity against actual capacity. The chart helps the scrum team plan the number of user stories that they commit to during the sprint.
For example, in the Parking Pass Management System product, you can check the velocity chart and add more user stories to the sprint backlog. You can select the user stories that you want to complete in the current sprint, and move them to the sprint backlog.
Follow these steps:
You cannot include the same user story in both Kanban Board and Sprint because they are two different methods of planning Agile. Kanban Board is used to track the progress of a project using the Kanban method in Agile. Sprints are a series of iterations in the product development lifecycle using the Scrum method in Agile.
If you want to split a user story between teams following Scrum and Kanban, you can clone the user story. You can distribute the tasks that you want each team to handle in their respective user stories.
You can create teams to work on different projects. A team can be assigned to one or more sprints or kanban board. One or more teams can be assigned to one product. A product owner, development team, and scrum master typically form the team.
Become familiar with these terms before working with teams:
Defines the estimated total story points that a scrum team believes they can realistically complete during a sprint. The velocity displays as team capacity in the sprint backlog. This value becomes the default velocity for the team for each new sprint that they are assigned to. You can modify this value as needed by editing the sprint team on the Sprint Backlog & Charts page.
Defines the story point scale your team uses. Enter a comma-separated list of numbers.
Default: Fibonacci sequence 1 through 21 (1,2,3,5,8,13,21).
Specifies the Domain name or URL for the team.
Follow these steps:
Note: To edit or delete a team, select the team from the Teams page and click Details or Delete.
If you associate a team to a product, it is automatically assigned to any new sprint that you create for the product. You can remove the team from the default team assignments.
A team member is an active CA Clarity™ Agile user who participates in the project. Add the users to the team so that they can participate on the product.
Important! To participate on a product, a user must be a member of at least one team that is assigned to the product. As a participant, you can create and edit user stories and tasks.
Become familiar with these terms before working with team members:
Specifies the percentage of time the member is allocated to this team or product. Specify a value so that the team member is considered in the team allocation charts. Default: 100 percent.
Follow these steps:
Note: To edit or delete a team member, from the Team Details page, select the team member, and click Edit or Delete.
You can also add members to a team from the Product Details page.
You can assign a team to a sprint so that they can participate in projects.
Become familiar with these terms before working with issues:
Defines the estimated total story points that a scrum team believes they can realistically complete during a sprint. The velocity displays as team capacity in the sprint backlog.
Expected velocity does not alter general team numbers. You can accept the value that is specified on the Team Details page or can override it for the sprint by entering a new value. The new value becomes the default velocity for the team for each new sprint that the team is assigned to.
Defines the base or standard number of hours each day that all team members spend actively working for the team. This value is used in the burndown and burnup calculations.
This value does not alter general team numbers. You can accept the Hours per Day that is specified in the Team Details page or can override it for the sprint by entering a new value.
Follow these steps:
Features describe the abilities of the product. You can associate a feature with a product and can be linked to multiple requirements. You can view the planned and actual information for the feature requirements rolled up to the feature level.
Become familiar with these terms before working with features:
Defines the total planned cost for the feature. This value is a high-level estimate that can be entered and edited. When integrated with CA Clarity PPM, planned cost information comes from CA Clarity PPM and this field is read-only. This field is a way to enter and track original rough estimates directly.
Defines the total planned effort for the feature in hours. This value is a high-level estimate that can be entered and edited. When integrated with CA Clarity PPM, planned cost information comes from CA Clarity PPM and this field is read-only. This field is a way to enter and track original rough estimates directly.
You can create a feature to describe new functions and abilities of a product.
Follow these steps:
After you create the feature, edit the feature details to add complete information about all aspects of the feature.
Note: To edit or delete a feature, select the feature on features list page, and click Details or Delete.
When you create a product, you create a detailed picture of the product for future reference. You can include information about finances, customers, competing products, geographic market segment, industry market segment, and features. You can also include more in-depth information about the strengths, weaknesses, opportunities, threats, and the problems that are addressed for the product.
After you create the product, edit the product details to add more information about all aspects of the product.
Follow these steps:
Note: To edit or delete a product, select the product from the product list, and click Details or Delete.
A role defines the activity that a resource is expected to complete. For example, you need a quality analyst to test the new features in a software application. You can create roles for users to assign in CA Clarity™ Agile or you can download roles from CA Clarity™ PPM, if the two applications are integrated.
Follow these steps:
Note: You can click the Role ID link on the roles list, and edit the details on the Role Details page. To delete a role, click Delete from the Role Details page or from the roles list.
You can create a role hierarchy that groups related roles together.
An example of a role hierarchy can look like the following example:
Best Practice: You can create the number of levels you need for the hierarchy. The levels are determined as you select the parent for each role. If the hierarchy you want to create is complicated, sketch it out on paper before you start.
Follow these steps:
Sprints are a series of iterations in the product development lifecycle in which the items planned during release planning are delivered. Sprints are time bound iterations that are typically spread over two to four weeks.
If the sprint has not completed, a user with super user privileges can edit details of sprint including the start and end dates of a sprint. If you change the sprint dates, burndown and velocity is recalculated.
Become familiar with these terms before working with sprints:
Goals
Specifies the expected results for the sprint. Limits: 3000 characters
Risks
Specifies any factors that affect the success or results of the sprint. Limits: 2000 characters
Follow these steps:
Note: To edit, click the Details link for the sprint you want to work with.
Kanban emphasizes visualizing all the steps in the workflow and reducing the number of work items in progress. Kanban is implemented using a board known as the Kanban Board. The progress of a project is tracked on the Kanban Board. The Kanban Board has status lanes which correspond to the different stages in the lifecycle of a project. As the project progresses, the work items of the project move from one lane to another.
You can configure the Kanban Board to deliver the project using the Kanban methodology. The Kanban Board for a release helps track the progress of the project and identify any roadblocks. To create a Kanban Board, configure the following two attributes:
They represent the stages in the lifecycle of the project. Map the status lanes to one of the statuses of user stories.
The maximum number of user stories that you can work on at any time. You can define a WIP limit for each status lane.
For example, Michael configures a new kanban board with the following status lanes and WIP limits:
|
Status Lane |
Description |
WIP Limit |
|---|---|---|
|
Planned |
User stories ready for development. |
5 |
|
Development |
User stories under development. |
3 |
|
Test |
Developed user stories under testing. |
2 |
|
Completed |
User stories ready to close. |
5 |
Michael can pull the user stories from the backlog to the Kanban Board for the team to work on.
Follow these steps::
You can also create a Kanban Board from the Kanban List page.
Follow these steps::
The system administrator can set up users in CA Clarity™ Agile so they are eligible to participate in the product development tasks. The scrum master can then add the users to the product. The users can then add user stories and tasks to the product.
Before you add users to the product, verify that they are added in Salesforce.com as one of the following profiles:
The system administrator can add users to CA Clarity™ Agile so that they are available to participate in the product. The scrum master can add the available users to different teams, and associate to user stories and tasks.
For example, Tom is a Salesforce user, but is not added as a CA Clarity™ Agile user. So, Tom cannot participate in any user stories in the product.
Follow these steps:
Defines the name of the user you want to add.
Select if the user has access to user stories and sprints.
Select if the user has access to requirements.
The system administrator can configure notifications so that the users are notified about any changes to the products they participate in. For example, you can configure notifications for Tom so that he receives an email when new tasks are added to the user story Tom created.
Team members can edit their own details and settings for each product in which they participate. The system administrator can edit the settings for any user.
Follow these steps:
|
Copyright © 2013 CA.
All rights reserved.
|
|