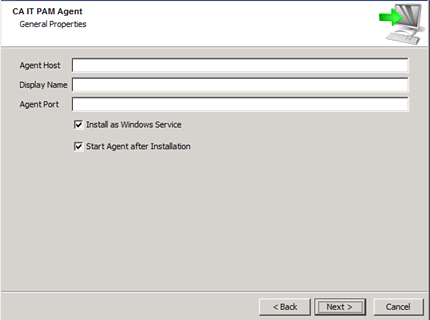
Previous Topic: Create a Software Delivery Package to Install an MSI ProgramNext Topic: Install Windows Automated Installation Kit


CA IT Client Manager Installation and Configuration

Follow these steps:

  1. Log in to the CA IT Client Manager and CA Server Automation server.
  2. Install Java JDK.
  3. Connect remotely to the CA Process Automation Manager.
  4. Click Configuration, Installation palette.
  5. Select Install Agent.
  6. Click Install.

    A message appears for you to run the application.

  7. Click Run.

    A Language Selection window opens.

  8. Select English and click OK.
  9. Click Next.
  10. Select I accept the terms of the License Agreement, and click Next.
  11. Browse to the Java Home Directory:

    C:\\Program Files\\Java\\ jdk1.7.0_51

  12. Click Next.
  13. Verify the Destination Directory, and click Next.
  14. Verify CA Process Automation Agent is the Start Menu.
  15. Verify that Create shortcuts for all users is checked. Click Next.
  16. Verify that the Domain URL points to the CA Process Automation Server. Click Next.

    IT Pam agent

  17. Verify that the Agent Host is the local server.
  18. Verify that the Display Name is what you want.
  19. Verify that the Agent Port is 7003.
  20. Select the Install as Windows Service check box.
  21. Select the Start Agent after Installation check box.
  22. Verify the Scripts Temporary Directory.
  23. Click Next. Click Finish.