

CA RiskMinder Windows Installation Guide › Upgrading to Release 3.1.01
Upgrading to Release 3.1.01
Upgrading from 1.x to 3.1.01 is a two-stage procedure. You first upgrade from 1.x to 2.2.7 and then upgrade from 2.2.7 to 3.1.01. In contrast, if you are upgrading from 2.x or 3.x, you directly upgrade to 3.1.01.
The following flow diagram shows the steps to upgrade to release 3.1.01:
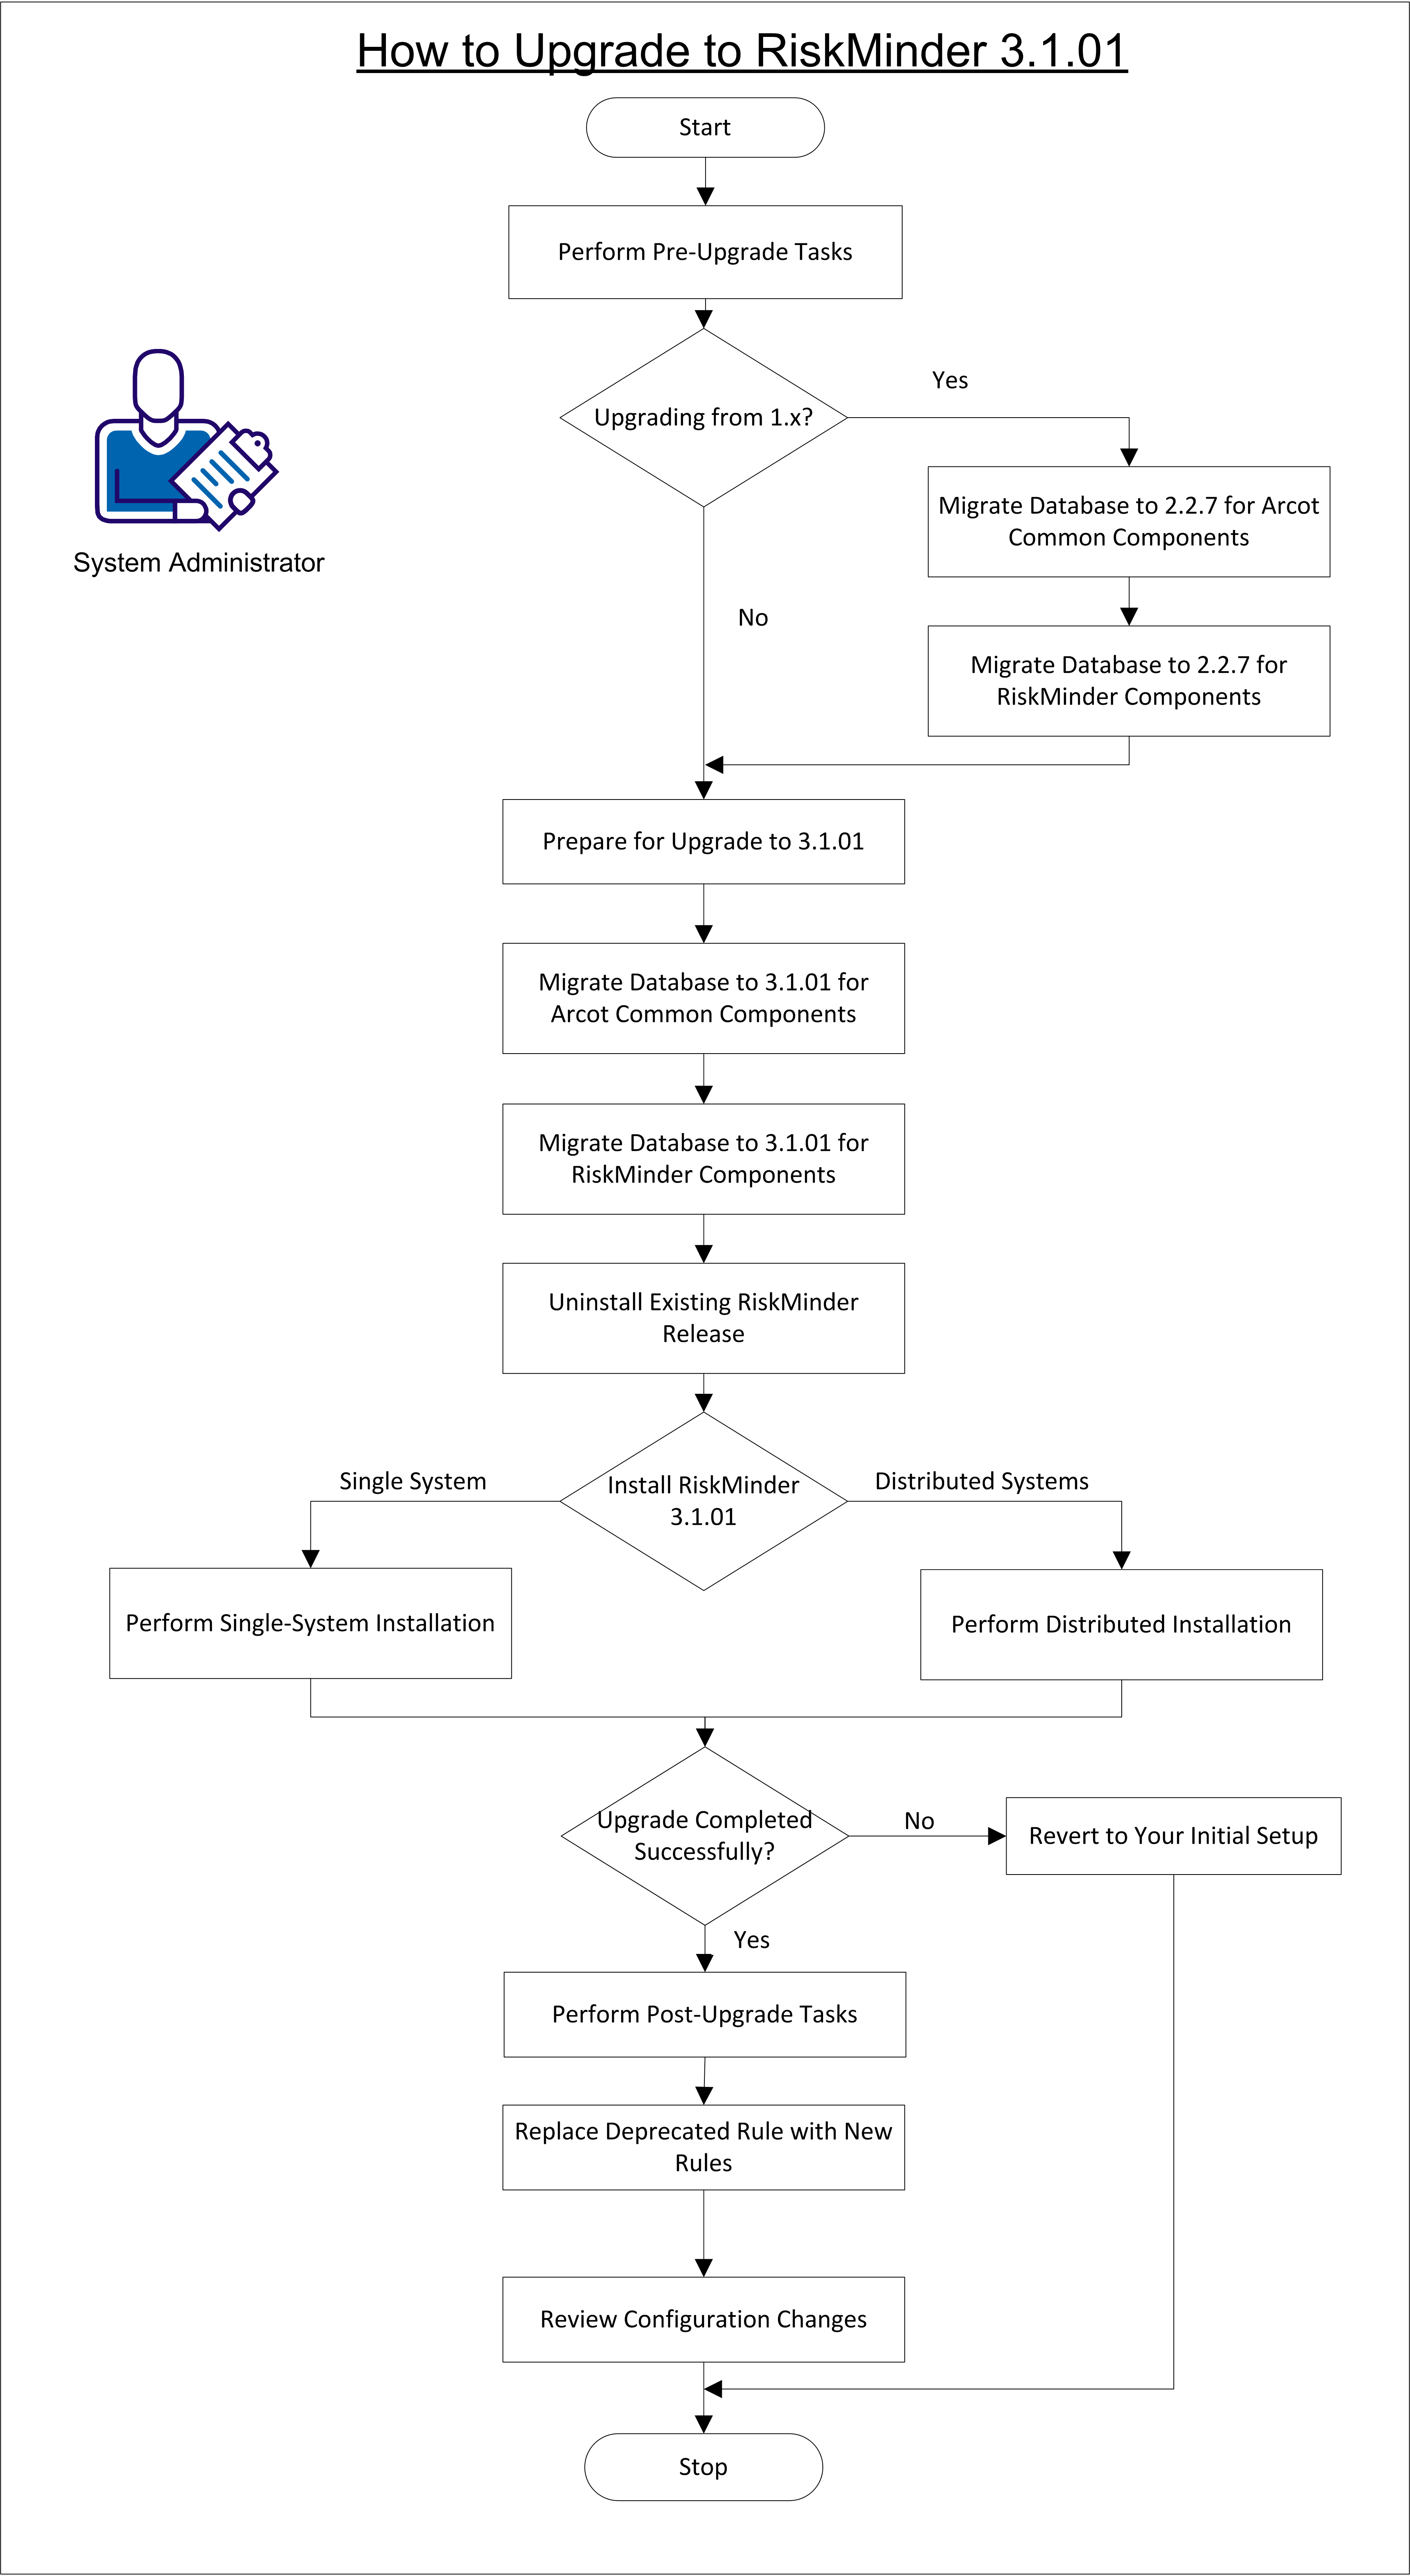
To upgrade to RiskMinder 3.1.01, perform the following steps:
- Performing Pre-Upgrade Tasks
- If you are upgrading from 1.x, then perform the following steps. Do not perform these steps if you are upgrading from 2.x or 3.x.
- Preparing for the Upgrade to Release 3.1.01
- Migrating the Database to Release 3.1.01 for Arcot Common Components
- Migrating the Database to Release 3.1.01 for RiskMinder Components
- Uninstalling the Existing Release of RiskMinder
- Reinstalling RiskMinder
- If you encounter any warnings during the Server startup and if your transactions fail, then perform the procedure described in (In Error Scenario Only) Reverting to Your Initial Setup.
- Performing Post-Upgrade Tasks
- Replacing Deprecated Rules with New Rules
- Review Configuration Changes After the Upgrade
Performing Pre-Upgrade Tasks (scenario)
Important! Perform the upgrade procedure on the system where the Administration Console is installed.
Perform the following pre-upgrade tasks before you begin the upgrade procedure:
- If you have earlier installed both CA AuthMinder and CA RiskMinder and you plan to upgrade both products, then ensure that you follow the guidelines that are given at various places in this document.
- Ensure that the account that you plan to use for the upgrade operation belongs to the Administrators group.
- If you are upgrading from RiskMinder 1.x to 3.1.01, migrate all your proposed configuration data to the production environment. Only active data is migrated and available after upgrade.
Note: If you are upgrading from RiskMinder 2.x or 3.x to 3.1.01, both proposed and active configuration data get migrated.
- From release 3.1 onward, a rule with a score of 0 no longer carries the ALLOW advice. Instead, a score of 0 implies SILENT, which means that the rule is executed but is not used for scoring. In addition, if the default score was 0 before the upgrade, then the default score is changed to 1 during the upgrade.
Note: For information about changing the score of a rule, see the administration guide for your RiskMinder release.
- Custom add-on rule types that you created in release 2.x or earlier releases are not migrated during the upgrade. The feature to create a custom add-on rule type by importing an XML file has been deprecated. If your RiskMinder deployment contains custom add-on rule types, then delete them before the upgrade.
- If the mnemonic or name of an existing rule is the same as the mnemonic or name of a rule that is newly introduced or modified by the upgrade, then the upgrade fails. The same issue is encountered if the name of an existing rule is the same as the name of a new rule. To avoid this issue:
- Use the administration console to compare the mnemonics of your existing rules with the mnemonics of the rules that are newly introduced or modified by the upgrade.
The following table lists the rules that are newly introduced or modified by the upgrade:
|
Rule Name
|
Rule Mnemonic
|
|
Unknown DeviceID
|
UNKNOWNDEVICEID
|
|
Device MFP Not Match
|
MFPMISMATCH
|
|
User Not Associated with DeviceID
|
USERDEVICENOTASSOCIATED
|
|
Unknown User
|
UNKNOWNUSER
|
- If the mnemonic of an existing rule matches the mnemonic of a new rule, delete the existing rule and then re-create it. While you re-create the rule, give it a different mnemonic. The system allows the rule name to be the same for two different rules but it is recommended that you change the name of the existing rule to avoid confusion.
Note: For information about deleting and creating rules, see the administration guide for your current RiskMinder release.
- In release 2.x, you can have a rule, ruleset, or miscellaneous rule configuration refer to another rule, ruleset, or miscellaneous rule configuration. This feature is not available in release 3.1. Perform the following steps for each rule, ruleset, or miscellaneous rule configuration that refers to another rule, ruleset, or miscellaneous rule configuration:
- Log in to the Administration Console as a GA or OA.
- If you have logged in as the GA and you want to perform this procedure for a system ruleset, click the Services and Server Configurations tab.
- If you have logged in as the GA or OA to perform this procedure for a single organization:
Activate the Organizations tab.
Click the Search Organization link under Manage Organizations.
Click the Search button on the Search Organization page to display the list of organizations.
Click the name of the organization.
Click the RiskFort Configuration tab.
- Under the Rules Management section on the side-bar menu, click the link for the rule, ruleset, or miscellaneous rule configuration that refers to another rule, ruleset, or miscellaneous rule configuration.
- Select Use Own.
- Select Copy from an Existing Ruleset.
- From the Ruleset Name list, select the ruleset to which this rule, ruleset, or miscellaneous rule configuration was referring.
- Click Save.
- Migrate the changes to the production environment.
Note: For detailed information about migrating the changes to the production environment and refreshing the cache, see the CA RiskMinder Administration Guide.
- The upgrade process is supported only in the offline mode. Shut down the following gracefully:
- RiskFort Server
- Case Management Queuing Server
- Any application servers where Administration Console and User Data Service are deployed
- If Administration Console is open, close it.
- Open the %ARCOT_HOME%\conf\arcotcommon.ini file in a text editor, and then perform the following steps:
- Ensure that the primary database details are correct. The upgrade tool uses the database that is configured in this file for the upgrade.
- If you have configured a backup database, then disable the backup database by commenting out the lines containing the following properties in the arcot/db/backupdb section of the arcotcommon.ini file:
- URL.1
- AppServerConnectionPoolName.1
- Username.1
- Include the following section in the arcotcommon.ini file:
[arcot/crypto/device]
HSMDevice=S/W
- Save and close the arcotcommon.ini file.
- Ensure that you have JDK 1.5 or later installed on the system where you plan to upgrade.
- Ensure that the database on which you plan to upgrade is available throughout the upgrade process.
- Ensure that the database on which you plan to upgrade is disabled for replication.
- Back up the database containing the RiskMinder schema.
- If you require multibyte character or internationalization support in RiskMinder and if your database does not currently support multibyte data, then migrate the database to a character set that supports multibyte data. For more information, see "Configuring Database Server" in the CA RiskMinder Installation and Deployment Guide for Microsoft Windows.
- Consider the requirements such as rollback segment size, based on data volume, before running the upgrade tool.
- Ensure that you have the database privileges that are required to upgrade RiskMinder. For the complete list of privileges, see Prerequisites for Upgrading to RiskMinder 3.1.01.
- If you have stored your user details in an LDAP repository in the previous release, ensure that the LDAP server is available throughout the upgrade process.
- Ensure that the ARCOT_HOME environment variable is set to the directory where RiskMinder is installed.
- Copy the contents of your existing ARCOT_HOME directory to a new directory.
Here, ARCOT_HOME refers to the base directory that contains the entire directory structure that was created by the existing RiskMinder installation. Typically, ARCOT_HOME is install_location/arcot/.
ARCOT_HOME_BACKUP refers to the backup directory into which you copy the contents of the existing the ARCOT_HOME directory. If you encounter any errors during upgrade, use the ARCOT_HOME_BACKUP directory to revert to the initial setup.
Upgrading the Database to Release 2.2.7 for Arcot Common Components
Note: Perform the tasks in this section only if you are upgrading from release 1.x. If you are upgrading from release 2.x or 3.x, you can ignore this topic.
Important! If you installed CA AuthMinder with CA RiskMinder and you have completed the upgrade to CA AuthMinder release 7.1.01, then do not migrate the database for Arcot common components. This step has already been performed during the AuthMinder upgrade process.
Migrate the database to the release 2.2.7 state for Arcot common components.
Follow these steps:
- Copy the Upgrade directory to a temporary location on the system where you plan to upgrade.
This directory contains the following zip files that are applicable for this migration path:
- arcot-common-upgrade-0.x-1.0.zip
- arcot-riskfort-upgrade-1.x-2.2.7.zip
- Copy the arcot-common-upgrade-0.x-1.0.zip file to the ARCOT_HOME directory.
- Extract the contents of the arcot-common-upgrade-0.x-1.0.zip file in this directory.
- Navigate to the following directory:
%ARCOT_HOME%\dbscripts\<db_type>
Here, db_type can be mssql or oracle.
- Run the arcot-db-config-for-common-1.0.sql script.
Note: In the case of Microsoft SQL Server, if you run the database script from the command line using SQLCMD, then specify the –I option to set the QUOTED_IDENTIFIER connection option to ON and the -x option to disable variable substitution.
- Navigate to the following directory:
%ARCOT_HOME%\dbscripts\<db_type>\upgrade-scripts\
Here, db_type can be mssql or oracle.
- Run the arcot-upgrade-for-common-1.0.sql script.
Note: In the case of Microsoft SQL Server, if you run the database script from the command line using SQLCMD, then specify the –I option to set the QUOTED_IDENTIFIER connection option to ON and the -x option to disable variable substitution.
- Copy the JDBC JAR that is compatible with your database to the following directory:
%ARCOT_HOME%\java\lib
- Back up the existing ArcotAccessKeyProvider.dll file if it is in <JAVA_HOME used by APP_SERVER>\jre\bin. Then, copy the %ARCOT_HOME%\native\win\<32bit-or-64bit>\ArcotAccessKeyProvider.dll file to <JAVA_HOME used by APP_SERVER>\jre\bin.
- Set the PATH variable to include the directory where ArcotAccessKeyProvider.dll is copied.
- Copy the file %ARCOT_HOME%\java\lib\arcot-crypto-util.jar to <JAVA_HOME used by APP_SERVER>\jre\lib\ext\.
- Navigate to the %ARCOT_HOME%\tools\upgrade directory.
- Run the upgrade-common.bat tool.
- To ensure that the common database upgrade operation was run successfully, see the %ARCOT_HOME%\logs\upgrade-common.log file.
Migrating the Database to Release 2.2.7 for RiskMinder Components
Important! Perform the steps in this section only if you are upgrading from release 1.x. If you are upgrading from release 2.x or 3.x, you can ignore this procedure.
After you migrate the database for Arcot common components, migrate the database to the release 2.2.7 state for RiskMinder components.
Follow these steps:
- Copy the arcot-riskfort-upgrade-1.x-2.2.7.zip file to the ARCOT_HOME directory.
- Extract the contents of the arcot-riskfort-upgrade-1.x-2.2.7.zip file in this directory.
- Navigate to the following directory:
%ARCOT_HOME%\dbscripts\<db_type>\upgrade-scripts
Here, db_type can be mssql or oracle.
- Run the SQL script corresponding to your current release of RiskMinder, as listed in the following table.
|
Current RiskMinder Release
|
SQL Script to Run
|
|
1.5.1 or 1.5.1.x
|
arcot-riskfort-upgrade-1.5.1.8-2.2.7.sql
|
|
1.6 or 1.6.0.x
|
arcot-riskfort-upgrade-1.6.0.3-2.2.7.sql
|
|
1.7 or 1.7.0.x
|
arcot-riskfort-upgrade-1.7.0.3-2.2.7.sql
|
- Navigate to the following directory:
%ARCOT_HOME%\dbscripts\<db_type>\upgrade-scripts\
Here, db_type can be mssql or oracle.
- Run the arcot-post-upgrade-for-common-1.0.sql script.
This script ensures the following configurations:
- The user ID for Master Administrator is changed from MASTER_ADMIN to MASTERADMIN.
- The password for the MASTERADMIN account is master1234!
- The organization that MASTERADMIN belongs to is MASTERADMIN. This feature is useful when you filter reports.
- The Administrators group is configured with WebFort User/Password authentication. Administrators belonging to this group must continue to use the same user name and password.
- Group2 is the initial Default Organization.
Preparing for the Upgrade to Release 3.1.01
This section describes the steps that you must perform to prepare your setup for upgrading to 3.1.01.
Follow these steps:
- If application server connection pooling was being used in your existing RiskMinder deployment, navigate to the %ARCOT_HOME%\bin directory, and update the securestore.enc file by running the following command for the primary database:
DBUtil -pi <DB_username> <DB_password>
Note: To determine whether database connection pooling is being used, open the %ARCOT_HOME%\conf\arcotcommon.ini file. Check the value of the AppServerConnectionPoolName parameter.
- If SSL has been configured for the connection with the database, navigate to the %ARCOT_HOME%\bin directory and set the TrustStore password using DBUtil, as follows:
DBUtil -pi TrustStorePath.1 <truststore-password>
Note: To determine whether SSL has been configured, check the value of the TrustStorePath parameter in the arcotcommon.ini file.
Migrating the Database to Release 3.1.01 for Arcot Common Components
Migrate the database to the release 3.1.01 state for Arcot common components.
Follow these steps:
- Copy the Upgrade directory to a temporary location on the system where you plan to upgrade.
This directory contains the following zip files that are applicable for this migration path:
- arcot-common-upgrade-1.0.x-2.0.zip
- arcot-riskfort-upgrade-2.x-3.x-3.1.01.zip
- Copy the arcot-common-upgrade-1.0.x-2.0.zip file to the ARCOT_HOME directory.
- Extract the contents of the arcot-common-upgrade-1.0.x-2.0.zip file in this directory.
Note: Click Yes if you are prompted to overwrite any existing files.
- Navigate to the following directory:
%ARCOT_HOME%\tools\common\upgrade\
- Extract the contents of the arcot-common-db-upgrade.zip file in this directory.
- Copy the database JAR file corresponding to your database to the %ARCOT_HOME%\tools\common\upgrade\lib directory with the exact name, as follows:
- ORACLE: ojdbc.jar
- SQL Server: sqljdbc.jar
- Locate the JAVA_HOME used by the existing installation and ensure that you use the same JAVA_HOME to run the upgrade tool.
- Set the PATH variable to include the directory where ArcotAccessKeyProvider.dll is copied.
Important! If you are upgrading from release 3.x to 3.1.01, do not perform the remaining steps of this procedure. Instead, directly proceed to the next section.
- At the command prompt, change your working directory to:
%ARCOT_HOME%\tools\common\upgrade\
- Run the arcot-common-upgrade-framework.jar file by using the following command:
java [JVM_Options] -jar arcot-common-upgrade-framework.jar [--log-file <log-file-name>] [--log-level <log-level>][--commit-batch-size <batch_size>] [--product-name common] [--prompt][--mst]
The following table describes the options that are supported by this JAR file.
|
Option
|
Description
|
|
JVM-Options
|
The following JVM options are required only if LDAP organizations are configured:
|
|
log-file
|
Specifies the path to the log file:
- If you do not provide any value, the arcot_common_upgrade.log file is created in the %ARCOT_HOME%\logs\ directory.
- If you provide an absolute path, the log file is created at the given location.
- If you provide a file name, the log file is created in %ARCOT_HOME%\logs\ with the given file name.
|
|
log-level
|
Specifies the log level. If you do not provide any value, the upgrade log level is set to INFO.
|
|
commit-batch-size
|
Specifies the number of transactions to be issued to the database before a COMMIT statement is issued.
|
|
product-name
|
Specifies the name of the product for which the upgrade is run. If you do not specify the product name, the product name is assumed to be common. Possible values are:
|
|
prompt
|
Prompts whether to proceed further after each phase of the upgrade process is completed successfully. The upgrade process happens in the following phases:
- Pre-upgrade: Involves performing various DDL and DML operations to migrate the database schema.
- Upgrade: Involves migrating the data to the new schema.
- Post-upgrade: Involves cleanup or follow-up actions that are required to be performed after the upgrade.
- Verification: Involves the verification of whether the upgrade is successful.
This option You can choose to run the upgrade tool later to continue from where it stopped. If this option is not specified, the upgrade tool runs without any prompting until the upgrade process is completed.
|
|
mst
|
Refers to the Monitoring Sleep Time. If you specify this option, the upgrade tool prints diagnostic messages describing the progress made during upgrade after sleeping for the specified duration (in minutes.) The default value is two minutes.
|
- If you are upgrading from release 1.0.x, then check for the following line in the %ARCOT_HOME%\logs\arcot_common_upgrade.log file:
Upgrade for common from version 1.0.x to version 2.0 run successfully.
The presence of this line in the log confirms that the database was upgraded successfully.
Migrating the Database to Release 3.1.01 for RiskMinder Components
After you migrate the database for Arcot common components, migrate the database to the release 3.1.01 state for RiskMinder components.
Follow these steps:
- Extract the contents of the arcot-riskfort-upgrade-2.x-3.x-3.1.01.zip file in the ARCOT_HOME directory.
- Navigate to the following directory:
%ARCOT_HOME%\tools\common\upgrade\
- Run the following command:
java -jar arcot-common-upgrade-framework.jar --product-name riskfort
See the table in Migrating the Database to Release 3.1.01 for Arcot Common Components for a description of the command options.
- Depending on the release that you are upgrading from, locate one of the following lines in the arcot_common_upgrade.log file in the %ARCOT_HOME%\logs directory:
Upgrade for riskfort from version <your-RiskMinder-release> to version 3.1.01 run successfully.
For example, if you upgraded from release 3.0, then locate the following line:
Upgrade for riskfort from version 3.0 to version 3.1.01 run successfully.
The presence of this line in the log confirms that the database was upgraded successfully.
Uninstalling the RiskMinder Server
Uninstall the existing release of RiskMinder. Also uninstall the RiskMinder components that are installed on the application server.
Note: If the instructions given in this section do not match the uninstallation options available in your existing RiskMinder installation, follow the uninstallation instructions that are given in the installation guide for your existing release of RiskMinder.
Follow these steps:
- Uninstall the existing release of RiskMinder as follows:
- Ensure that the following components have been shut down gracefully:
- RiskFort Server
- Case Management Queuing Server
- Any application servers where other RiskFort components are deployed.
- Ensure that the Administration Console is not open.
- Ensure that all INI and other files that are related to the RiskMinder configuration are closed.
- On the desktop, click Start, Settings, Control Panel, Add/Remove Programs to open the Add or Remove Programs window.
- From the Currently installed programs list, select Arcot RiskFort, and click Change/Remove.
The Uninstall Arcot RiskFort window appears.
Note: You can also uninstall RiskMinder by running Uninstall Arcot RiskFort.exe available in the <install_location>\Arcot Systems\Uninstall Arcot RiskFort\ directory.
- Select Complete Uninstall.
Note: You may have to wait for a few minutes for the uninstallation process to complete.
After the software is uninstalled successfully, the Uninstallation Complete screen appears with a success message.
- Click Done to exit the wizard and complete the uninstallation process.
- If you have installed CA AuthMinder and CA RiskMinder and you are deleting both products, delete any files that are left over in the ARCOT_HOME directory.
- Undeploy the Administration Console, User Data Service, and Sample Application Web applications from the application server. For detailed information, see the application server documentation.
Copyright © 2013 CA Technologies.
All rights reserved.
|
|