

Previously you set the class boundary. Now you need to tie the boundary to the interior to allow the configuring of the appliance initialization and startup. This allows your appliance to execute its own virtualized environment and boot its own operating system, application services, and other required software.
An appliance is not required to use any of these services. Only the exterior boundary, which is implemented by APK and described in the Set Class Boundary section.above, is what defines an appliance as far as CA AppLogic is concerned. The interior boundary services are provided to help adapt an existing generic service, such as a firewall, mail server, or Web server program, for use as a self-contained virtual appliance running in CA AppLogic.
This section contains the following topics:
Startup and Hooks
The most important aspects of tying an interior to the boundary are performed during the appliance startup. During the appliance boot process, the APK has two functions:
For example, early in the configuration process, the APK performs the following:
The applogic_init_config file allows you to change which aspects of the OS configuration are auto-configured by APK. For additional information, refer to customize appliance behavior in Linux appliances or Windows appliances.
The Appliance Instance Descriptor contains OS-specific information, such as device names of all network interfaces and disk volumes. When you add this specific appliance class to an application, you make an instance of that class with the specific values for the configurable properties and connections to other appliances and/or to the outside world. This specific configuration, in its entirety, is passed to the virtual appliance, when it is started.
Appliance Startup Script
After the early configuration completes and the essential OS starts, the Appliance Startup Script begins. This optional script allows you to tailor the appliance boundary properties to meet the specific functionality of your software product in the appliance. The APK provides one configuration file and one hook for the script. The file location is OS-specific. For example, the file is located in /etc/sysconfig/ for Posix-style operating systems, such as Linux and BSD, and in \applogic\config\ for Windows operating systems.
The files are:
In addition, the appliance can use OS-provided startup functionality, such as sys5 initi in Linux or service control manager in Windows.
Appliance-Specific Startup Check Script
After the appliance specific startup completes, the APK optionally executes the appliance-specific startup check script. The script, if present, verifies the appliance started and returns a success or failure message to the grid controller. If script returns an error, the appliance startup check stops and sends the failure message. if no script is returned or the script returns with no error, the appliance startup check sends a successful start.
Appliance Instance Descriptor
The Appliance Instance Descriptor contains OS-specific information, such as the device names of all network interfaces and disk volumes. When you add this specific appliance class to an application, you make an instance of that class with specific values for the configurable properties and connections to other appliances and/or to the outside world. This specific configuration, in its entirety, is passed to the virtual appliance, when it is started.
When you configure and start an application, the corresponding instance descriptor contains information similar to this:
property weight: integer, value=37 # appliance was configured with specific value
volume data:  dev=/dev/sdc, mount=/opt # configured, appears as /dev/sdc # to the operating system
volume cache: disconnected # optional, app designer chose not to configure it
Terminals
Terminals are specialized network interfaces that are used only for connections between appliances, such as interacting with appliances in the same application. The APK automatically configures the terminal network, if an IP address is included. The appliance cannot change the IP address.
The APK makes the terminals display like host names to make it easy to integrate with existing software. You can view the terminal configuration and mapping in the Appliance Descriptor File and/or in the APK utility. The utility gives you a terminal name when you provide the IP address.
The terminal types are:
IN is the host name. If you try to resolve the host name IN, you will get the IP address of your own terminal. This is useful when configuring the interface for servers to listen on. For example, the HTP Load Balancer (HALB) accepts requests to dispatch on its IN input terminal and control requests on its CTL terminals. This is the only way HALB will work.
Output is the most frequently used terminal. The name of the Output terminal can be used in the inside of the appliance as the hostname. This allows a connection when talking to other connected appliances. The APK maps the name of the terminal to the IP address of the input connected to the output of the IP address. For example, web6 can refer to the database host to connect to the database. You can use mysql –h –db to connect to the mysql database to web6. When you use the fs terminal as a hostname, the fs terminal will resolve the IP address of the nfs server in a NAS appliance.
In addition, you can create an alias for the hostname. The APK then maps the alias to the IP address. This is useful in cases where a hostname is hard coded in the software package.
Gateway output terminals are used to connect to multiple hosts, typically through a net gateway appliance. This is unlike the regular output terminals that connect to a single host name or service, When an appliance has a gateway terminal configured on its boundary, the APK automatically configures that interface to be the default gateway for the appliance as well as its DNS server.
To access services through a gateway output, use the IP address or hostname of the target. For example: wget actp://wordpress.com/latest .tar .gz
In most appliances, the gateway output terminals are used to access any network, such as the corporate network. The name of the gateway output terminal resolves to the IP address of the gateway or router that is provided by the appliance connected to the gateway output. The name can also be used as the name of a DNS server. For example, dig @net google.com Net is the name of the gateway output terminal and dig resolves the IP address.
Raw Interfaces
Unlike terminals that communicate with appliances in the same application, raw interfaces communicate outside an appliance -- including talking with other appliances as well as the outside world.
Raw interfaces are very similar to virtual network interfaces in virtual machines and to a NIC in traditional servers. Their IP addresses are assigned as part of an application configuration. In addition, the APK automatically configures the IP addresses on the raw interfaces, then configures the netmask and gateway as well as the NAS servers based on the IP address.
Raw interfaces support up to four IP addresses. A single raw interface on an appliance becomes the default gateway and can be used to access the external network. The appliance cannot use an IP address other than the ones that configured on the application. For easy access, these IP addresses display on the grid dashboard. Any packages containing an invalid IP address are dropped.
Although the APK automatically configures the netmask and gateway, this functionality can be disabled using the APK config_extif command. When disabled, the appliance start up scripts are expected to configure the network settings for the raw interface using the assigned settings located in the appliance instance descriptor file. When you disable the raw interfaces, auto configuration is useful when the appliance has more than one raw interface and the appliance wants to control the routing and name resolution.
When a raw interface is placed on a specific VLAN, the VLAN tagging is handled automatically. The appliance should expect and send packages without 802.19 VLAN tags.
Versions of CA AppLogic prior to version 3.5 supported only a single raw interface called External. This interface did not require a connector to an external interface. It was configured through properties. This legacy raw interface is supported only for backward compatibility and should not be used for new appliances.
Since the APK does not automatically configure the legacy raw interface, you must use appliance startup scripts. .The network settings, such as the IP address, netmask, gateway, and DNS server, are typically configured through the Properties settings. The IP address is enforced based on whether you define the IP address as an IP owned property. In an IP owned property, the IP address is verified as being in the allowed range and will not allow the interface to use any other IP address. Up to four IP-owned properties can be defined.
If the appliance has no IP-owned properties, the IP address of the legacy raw interface are not verified or enforced. This should be used with caution because it can allow IP address hijacking. It is supported only for backward capability. Support may be dropped or disabled in future versions.
The default raw interface sends events and provides SSH and web console access into the appliance.
Volumes
Each volume configuration on the appliance boundary is provided to the appliance as a block device. The APK auto mounts all volumes in the appliance file system. using the mount points provided in the boundary configuration.
The auto mount capability can be disabled using the apk_config_automount option. For additional information, refer to the Customize Appliance Behavior in Linux or Windows.
By default, volumes are mounted in the appliance file system in the following locations:
To better support legacy virtual machine images, most volumes have a single partition per volume in, although the APK understands multi-partition volumes as well.
Notes:
By convention, network file systems are mounted under:
Events
Appliances send events to indicate significant event changes as well as report unusual occurrences. For example, the APK reports Startup Success or Failure events by printing a message to stderr. After startup, you can send additional information or warning messages using the VME event generator utility. The VME event generator utility is a user-mode utility that generates specific events during the appliance boot process and at runtime. For additional information, refer to the vme:Event Generator section.
Key Events
Start completion is the most important and only required event that the appliance must send. On completion and startup, a managed appliance sends a Started Okay message that indicates the appliance has been configured, started successfully, and is now ready to perform its functionality.
If the appliance submits a Start Failed, it indicates the appliance configuration and/or startup has failed and provides a description message with the reason for failure. The reason for the failure is stored in the grid log. You can view the message by using log list or the Log tab on the dashboard.
When using the APK, the vme utility is called automatically by the APK, based on the returned status of the AppLogic script. That script, if present, should return an exit code of 0, if the appliance starts correctly or non-zero if the appliance fails. The error message prints to stderr. The APK only sends the last line of text printed by the applogic_appliance script to the grid log. Other text printed to stderr is stored in a temporary file on the appliance boot disk. If the script prints nothing, but returns a failure status, the APK sends a generic Failed to Start text message.
You can use the vme binary to start or fail directly managed appliances. After startup, the vme binary can send additional information or warning messages during the appliance operation. For additional details, refer to the vme:Event Generator section.
Most appliances complete the startup in a predictable and short amount of time. However, sometimes an appliance may need to perform a lengthy procedure that does not fit in the boot timeout or within a predictable amount of time. In this instance, an appliance may request additional time to complete the process. For example: a database server that discovers the database needs repairs or a NAS appliance discovers the files need repairs.
If the appliance needs to execute a lengthy path using outside services, that requirement can require an unpredictable amount of time. To do that, the appliance submits a maintenance event. If issuing the event puts the appliance in maintenance starting mode, the application can provide an almost indefinite amount of time start. In this mode, the appliance provides periodic, incremental updates on the logic and percentage of startup completed at intervals of 1 second and 1 minute until timeout. If the appliance does not indicate progress, the appliance is considered hung or failed and the startup timeouts.
Once the maintenance operation completes, the appliance completes its startup by indicating a Started Successfully or Failed event and provides a reason.
The appliance can send log messages to the grid log when the appliance detects an unusual condition. To send events to the grid log, the appliance uses grid_log and the text displays in the VME with the message log_text. The appliance should use this event sparingly and only for important events that could have grid scope impact, such as an IP address conflict. The appliance should not send all sys logs or periodic events to the grid log to keep from clogging the log.
An appliance that detects a catastrophic or highly important event could submit an alert event. This causes a message to display on the dashboard and, if configured, an email sent to the grid administrator. Appliances should send a grid alert for events, such as an IP address conflict, failover events, database verification errors, and stop or recover events.
An appliance should use the grid alert event only in exceptional occurrences and should not indicate periodic events. The grid controller may suppress an appliance that sends too many or too frequent events.
Performance Counters
Each appliance running the ccad (counter collection agent) daemon allows for custom counters to be defined and collected by third party utilities. This ability is a named extension interface and provides appliance creators with the option to monitor appliance-specific counter data through the standard MON user interface.
To monitor custom counters, add the counters definitions to the ccad configuration and feed the actual counter values to ccad. The custom counters have to be defined in a UDL format in the optional /etc/ccad.conf configuration file. When you make changes to the configuration, the ccad daemon must be restarted for the changes to take effect.
Here is a simple example configuration:
counters Apache
   {
   pace = 1000
   pipe = /tmp/cca
   counter Total_Accesses
      {
      name        = "Total hits"
      desc        = "Total number of hits"
      units       = "#"
      type        = "MAX"
      }
   counter Total_kBytes
      {
      name        = "Total bytes"
      desc        = "Total number of bytes"
      units       = "bytes"
      type        = "MAX"
      }
   counter BusyWorkers
      {
      name        = "Active requests"
      desc        = "Number of active requests"
      units       = "#"
      type        = "MAX"
      }
   counter IdleWorkers
      {
      name        = "Idle servers"
      desc        = "Number of idle servers"
      units       = "#"
      type        = "MAX"
      }
   }
You test the appliance and clean up the appliance volumes. You can place your appliance in a catalog. Catalogs allow you to package multiple appliance classes into a library easily. The catalog contains appliances that you use in various applications, such as a healthcare database management application or a help desk application.
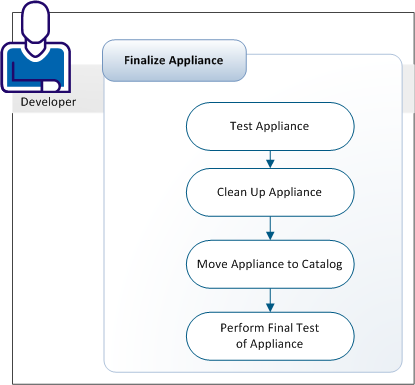
You test the appliance to verify that the configuration works as planned.
Follow these steps:
The Start Application window displays.
On the appliance, the start indicator displays.
When the appliance starts, the green running indicator displays.
To view error details, click Yes in the Prompt dialog. The details display in the dynamic canvas.
To view the complete set of logs, select the Logs tab. The set of log files display.
You can remove files, such as log files or directories, added by the software installation and not required to run the appliance.
Follow these steps:
> /var/log/lastlog
rm -f ~/.bash_history
history -c
You are now ready to move the appliance to the catalog.
You can move your appliance to the catalog to share or instantiate the appliance. Sharing your appliance allows you or other developers to use the appliance as a building block in their application.
Follow these steps:
The appliance is added to the catalog.
The Modify Boundaries window displays.
Select the Volumes tab and verify that all volumes of type Common (typically named usr) are marked as read-only and shared. The Common type shares the common volume between all instances of the appliance.
If you do not want to share the appliance volume, change the volume type to instantiable.
Click OK and repeat these steps, as needed.
You can perform a final test of the appliance to view your appliance from the viewpoint of other developers using your appliance.
Follow these steps:
The Start Application window displays.
On the appliance, the start indicator displays with a progress bar.
When the appliance is started, the running indicator displays.
The final test of the appliance is complete.
The appliance is now a reusable appliance accessible by other developers.
|
Copyright © 2013 CA Technologies.
All rights reserved.
|
|