

The Class Editor property sheet allows you to define and modify the boundary of an assembly class.
CA AppLogic has different class editors for simple appliances and for assemblies. It automatically selects the appropriate class editor based on the type of appliance you edit. The class editor for simple appliances is described in Class Editor - Simple Appliances.
To access the Class Editor property sheet, select your assembly appliance, then right-click menu and select Modify Boundary or View Boundary. In addition, you can select the assembly appliance, then select Appliance in the toolbar and select Modify Boundary or View Boundary.
Notes:
The General tab describes the appliance class as a whole and also contains some advanced settings.
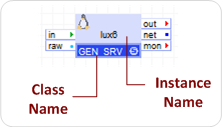
Class name. Defines the name of the appliance class. This name is shown in the bottom left side of each appliance shape on the canvas. If the appliance is placed in a catalog, the class name is also shown in the catalog. The name is a single word, case-sensitive, alphanumeric ([A-Za-z0-9_]).
The name of the instance is automatically generated when you drag the icon on the canvas. You can change the instance name. The name is a single word, case sensitive, consisting of alphanumeric characters and underscore ([A-Za-z0-9_]); the name must be unique within the containing assembly.
Unlike the class name, the instance should name the role of the appliance. For example, in the catalog, the TomCat Application Server has an instance name of srv. In addition, the instance name should not have numbers or attributes, such as srv64. The name should be the role, not the class.
The name and instance name template display on the icon as shown below:
The first instance of the appliance uses the specified value, while subsequent instances use the name defined here, plus a numeric suffix. If no instance name is specified, the class name is used as the prefix for all appliances.
The appliance hostname is derived from the instance name. For information on disabling the default behavior of changing the hostname to a string derived from the instance name of the appliance, refer to the Customize Linux Appliance Behavior or Customize Windows Appliance Behavior.
Category of the appliance. The category is a short alphanumeric phrase describing the group (category) of appliances within a catalog that the appliance belongs to. If the appliance is placed in a catalog, all appliances from the same category are grouped together in a section.
Free text description of the appliance. Typically the description contains definition of the appliance's function, some distinguishing details (separating an appliance from other similar appliances).
URL where class documentation can be found for the assembly.
The following attributes determine the visual appearance of the appliance shape:
The color of the appliance shape, as shown on the canvas and in the catalog.
The width of the appliance shape when shown on the canvas.
Tips:
The following attribute determines special and diagnostic features for the appliance class.
Specify subordinate that is to serve as the default login console for the assembly.
This is a numeric value that enables diagnostic or other special features of CA AppLogic for the appliance class; this setting affects all instances of the appliance. For a list of available codes and precautions when using them, see Field Engineering Codes. In short, do not enable this option unless directed by a support engineer.
Comma-separated list of name=value pairs that can be used for billing purposes. Please do not use. This is reserved for future use.
You use the Interfaces tab to define network interfaces, such as terminals and external raw interfaces, for the appliance. The appliance uses these terminals to interact with other appliances.
The appliance terminals are named network interfaces, through which the appliance interacts with other appliances in the same application. The terminals have direction -- input or output . The terminal direction determines whether the appliance originates connections or accepts connections. You can also define external raw interfaces on this tab.
Each input terminal can have many appliances connected to it. Each output terminal can be connected only to a single appliance.
Name of the terminal, representing the role of the interface within the appliance. It is a single word, case-sensitive, alphanumeric ([A-Za-z0-9_]). Terminal names are usually lowercase and short - 3 to 4 characters, so that they fit in the appliance terminal shape).
Type of the connection: input, output, or raw. The direction determines whether the appliance originates connections (client-side of most protocols) or accepts connections (server-side of most protocols). The direction determines only where the connection originates from. The appliance can pass data in and out of any terminal.
Optional terminal attributes that can be set on the terminal: ![]() The mandatory attribute (denoted by an exclamation point) marks the terminal as required to connect for normal operation of the appliance. Typically inputs are non-mandatory and outputs are mandatory.
The mandatory attribute (denoted by an exclamation point) marks the terminal as required to connect for normal operation of the appliance. Typically inputs are non-mandatory and outputs are mandatory. ![]() The switch-sides button makes the terminal appear on the other side of the appliance shape. It is useful for feedback terminals whose connection direction goes opposite to the general left-to-right flow. This attribute affects only the visual appearance, it has no runtime impact.
The switch-sides button makes the terminal appear on the other side of the appliance shape. It is useful for feedback terminals whose connection direction goes opposite to the general left-to-right flow. This attribute affects only the visual appearance, it has no runtime impact. ![]() The info button shows information about the interior connection of the terminal -- if the terminal is already connected in the assembly interior, pressing this button may show you the protocol and other attributes of the terminal inside the assembly. If no information is shown, then the terminal is either not connected or there is an unresolved error.
The info button shows information about the interior connection of the terminal -- if the terminal is already connected in the assembly interior, pressing this button may show you the protocol and other attributes of the terminal inside the assembly. If no information is shown, then the terminal is either not connected or there is an unresolved error.
The order of the terminals in the list, and in the appliance shape, can be modified by selecting a terminal entry in the list and using the up and down arrow buttons on the right side of the list. This is especially useful for appliances that have more than one terminal on one of the sides.
Important: If a terminal is marked as mandatory and then it is not connected, the application will not start. This helps ensure that configuration constraints are met and prevents many configuration errors from happening. CA AppLogic will report the name of the appliance and the terminal that failed the check, so that you can easily locate and fix it.
The Volumes tab allows you to configure the set of volumes required for the operation of the appliance. The volumes defined on this tab are known as boundary volumes, as they are the only volumes visible to those, who use the appliance.
The boundary volumes are always placeholder volumes that you will redirect to volumes of the appliances in the assembly.
For each volume, the following fields are defined:
Logical name of the volume within the appliance. This name represents the role of the volume for the appliance class. It is a single word, case-sensitive, alphanumeric ([A-Za-z0-9_]).
A set of important volume options described below.
The mandatory attribute (denoted by an exclamation point) makes the placeholder volumes required (currently all volumes are required, so this attribute is not used).
Notes:
The Properties tab defines the properties that will be available on the appliances of this class. Properties are named configuration parameters for the appliance.
The properties of the assembly defined on this tab are known as boundary properties. These are the only properties that are visible on the assembly appliance from outside to those, who use it.
The set of properties on an appliance class reflects the specific needs of the class. CA AppLogic passes the property values to the appliance without interpretation.
Name for the property. The property name uniquely identifies a property within the appliance. The property names are used to set property values in the Instance Settings property sheet.
Default value for the property. This value will be used, if no value is specifically defined for the property in an appliance instance. Most properties should have defaults. You can leave the default value empty, in which case the default is an empty string. You can also disable the default value by making the property mandatory (see below).
Optional property attributes include the following:
Mandatory
Use the mandatory attribute (exclamation point) to mark the property as required to be set specifically on each appliance instance, making it so that the property has no defaults. Having a lot of mandatory properties makes it hard to use the appliance, so keep them to a minimum. Mandatory properties should be used only in cases where no default can be defined. For example, the target host name in output gateways.
Hidden
Use the hidden attribute to protect the value of properties that contain sensitive data, such as passwords. When you remove the hidden attribute from a property, it clears the previously set value of that property in the affected appliance, or assembly boundary to which it is redirected.
Note: This attribute only applies to string type properties.
In addition, pressing the info button ![]() provides a summary of the property attributes, including the property type, default, constraints and other attributes. This information is available only if the property is redirected inside the assembly.
provides a summary of the property attributes, including the property type, default, constraints and other attributes. This information is available only if the property is redirected inside the assembly.
Note: You can arrange the property order in the list by using the up and down buttons on the right side of the list. We recommend using the property order to make configuration more intuitive: Group the more important properties at the top; arrange the properties in the order in which it will make sense to configure them (for example, IP address, netmask and then gateway).
Assemblies have fewer attributes required on their properties than simple appliances because most of the required information is defined automatically when the property is redirected inside the assembly. This includes the type of the property, and any other constraints on its value.
If you plan to add your assembly to a catalog, you should add in this list all properties that you want to propagate to subordinate appliances, and then redirect the properties of the subordinate appliances to these boundary volumes. This way you will be able to configure different property values on each instance of the assembly. Properties that are not propagated to subordinates are ignored.
Important: If a mandatory property is not set or a property value constraints are not met, the application will not start. This helps ensure that configuration constraints are met and prevents many configuration errors from happening. CA AppLogic will report the name of the appliance and the property that failed the constraint check, so that you can easily locate and fix it.
If you try to delete a property and you see the error You cannot delete this property because it is parameterized, this means that the property has a value set on the instance of the appliance (or application). Before you can delete the property, you need to clear any explicit value configured into the property. If you are editing the class of an appliance, close the Class Editor property sheet; right-click on the appliance, click Properties, and restore the property's value to its default (see Instance Settings). If you are editing the application class, close the Class Editor property sheet; right-click on the Editor canvas, click Application Configuration, select the Properties tab and restore the property's value to its default (see Application Configuration). After that, go back to the class editor and delete the property.
The notes tab shows free-form notes that are set on the assembly class. You can edit the notes by double clicking on the text window.
The Note editor/viewer is based upon TinyMCE, a platform independent web-based Javascript HTML WYSIWYG editor control released as Open Source under LGPL by Moxiecode Systems AB.
The following text formatting options are available from the toolbar:
Bold text that is selected or text to be typed.
Italicize text that is selected or text to be typed.
Create numbered list.
Create unordered bulleted list.
Insert or modify a hyperlink. To insert a hyperlink, type and highlight the text that is to comprise the hyperlink and then click on the Insert/edit Link button. A dialog is displayed where you can enter the URL to which the link is to refer and optional text This option is also available from the right-click menu.
Remove a hyperlink leaving the text. This option is also available from the right-click menu.
Note: In some browsers, the cut, copy, and paste operations from the right-click menu are not available. Text may be cut, copied and pasted using CTRL-X, CTRL-C, and CTRL-V respectively.
|
Copyright © 2013 CA Technologies.
All rights reserved.
|
|