

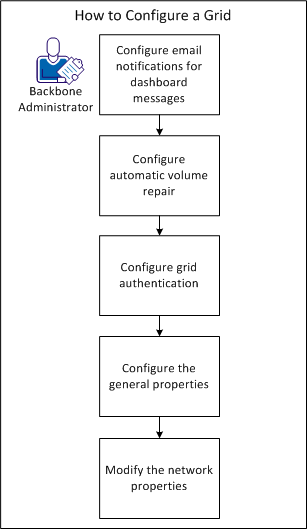
As a Backbone Administrator, you want to configure a grid after installation. This configuration includes setting up email notifications on the dashboard, automatic volume repair, grid authentication, and grid properties.
The following diagram shows how a BFC Administrator configures a grid:
The product can send email notifications for added and changed dashboard messages of a minimum severity. The product can also send a summary email notification that contains all current dashboard messages that have changed recently marked as such.
Follow these steps:
The Grids page appears and shows the state of the grid. For example, the grid is running, stopped, failed, failed - running, needs attention, or requires reboot.
The Servers tab for the grid appears.
The Edit Grid Parameters dialog appears.
For example, smtp_srv=mail.widget.com.
Specifies the server (mail transfer agent) that you want to use for sending messages.
Specifies a comma-separated list of e-mail address destinations for the notifications.
Specifies the e-mail address that you want to use as the sender address. Set this address to one that the configured SMTP server recognizes (such as smtp_srv). However, clearly indicate that the message originates from an automated service.
For example, info-noreply@mygrid.com.
Specifies the e-mail address that you want to use in the Reply-to: header. If you do not specify this parameter, the product uses the from_email value.
Specifies the minimum severity of messages that trigger e-mail alerts immediately. Valid values include (lowest to highest severity) progress, info, or alert.
Default: Alert (only the highest-priority events send notifications as e-mails).
Specifies the subject line that you want to use in the immediate e-mail alerts. You can use the strings {$account}, {$name}, {$controller}, {$id} and {$time} in the text. The configured values for account_id, grid, controller_name, (or controller_ip, if no hostname is set), and the event ID and timestamp replace the strings.
Default: 'Critical alert from grid {$name} ({$controller})'
Specifies the minimum time interval (in minutes) for sending status summaries. The product sends status summaries for grid status changes at intervals no shorter than the value you specify, even if status changes occur more frequently. The value is rounded internally to the next 5 minute multiple. If you set summary_interval to 0, the product disables e-mail summaries.
Default: 0
Specifies the subject line for use in e-mail status summaries. You can use the strings {$account}, {$name}, {$controller}, and {$time} in the text. The configured values for account_id, grid, controller_name (or controller_ip, if no hostname is set) replaces these strings and the event timestamp.
Default: 'Notification summary from grid {$name} ({$controller})'
message create 123TEST severity=alert text="This is a test dashboard message."
You receive an email that contains this dashboard message.
The automatic volume repair exposes various settings that you can configure, such as how often to perform various operations. The product stores these settings in /etc/applogic/applogic.confg on the grid controller in the volume_maintenance section.
Follow these steps:
Indicates how often the repair daemon queries the product for the list of degraded volumes on a grid.
Indicates how often the repair daemon processes its internal list of degraded volumes.
Indicates the timeout that a required server becomes available before the product initiates a volume repair on alternate servers.
Indicates the suspend time for maximum volume repair. We recomment that you do not modify this setting because it can let users suspend volume repairs for long periods of time. These time periods can cause data loss because the volume may not be repaired.
Indicates the suspend time for default volume repair if you do not specify a value on the vol repair --suspend command.
Indicates the amount of time for which the product retains historical volume repair data.
Indicates the maximum number of volume repair failures on a particular volume with the last repair_failure_period seconds. This value precludes starting the repair again (next day).
Indicates the time during which repair_failure_max failures must occur to preclude starting the repair again (next day).
Indicates the delay after grid controller booting (and 3tvolmaintd started) before 3tvolmaintd queries the product for a list of degraded volumes on a grid.
Note: Volume repairs do not start automatically until after 3tvolmaintd retrieves the list of volumes from the product. However, you can trigger 3tvolmaintd manually with the vol check command. You can also initiate volume repairs with the vol repair command.
/user/local/applogic/bin/3tvolmaintd_init restart
Note: You can restart the volume maintenance daemon at any time without affecting any running applications or volume repairs.
You can specify additional authentication settings for CA AppLogic as Local, LDAP, or Active Directory. This setting determines how CA AppLogic uses Role Based Access Control to authenticate a user upon login.
Note: If you select LDAP as the authentication method, then a global user is only recognized in the global directory service if its entry uses one of the following basic object classes for a person:
In addition, a group in the global directory service is only recognized if its entry uses one of the basic object classes for a group (groupOfNames and groupOfUniqueNames).
Follow these steps:
The Grids page appears. The state of the grid can be running, stopped, failed, failed - running (grid create failed but left the servers running), needs attention, and requires reboot.
The Servers tab for the grid appears.
Options are Local, LDAP, and Active Directory.
IP Address or Resolvable Domain Name of Directory Server.
Port number used to access the directory service.
Indicates whether to use Transport Layer Security (TLS) to access the directory service using an encrypted connection.
User Base Distinguished Name.
Group Base Distinguished Name.
Directory field containing User ID.
Directory field containing Group ID.
The period in seconds since a global user last authenticated with the global directory service during which the user may authenticate locally in the event the global directory service is unavailable.
You can specify the grid name, description, and the IP address of the grid controller.
Follow these steps:
The Grids page appears. To modify a grid, the current state must be 'running'.
Note: You can hover your mouse over the state icon to review the current state of the grid. Click the state icon to display detailed status information for the grid.
The Servers tab for the grid appears.
Grid name.
Host name for the grid controller.
Password for the controller that runs when the grid controller is not accessible.
Re-type the recovery controller password.
IP address for the grid controller (for example, 209.79.213.111 ).
Note: You can review metadata backup information on this page, including the status and time of the most recent backup.
Your changes are saved and the grid reboots.
You can specify the IP ranges to allocate for the grid. You first specified these ranges when you installed the BFC software.
Note: When you add a new IP range to a grid from the BFC, you do not need to reboot the grid or the controller. When the page refreshes, the new IP addresses display on the dashboard.
Follow these steps:
The Grids page appears. The state of the grid can be running, stopped, failed, failed - running (grid create failed but left the servers running), needs attention, and requires reboot.
The Servers tab for the grid appears.
If more than one network is available, select the network. If only one network is available this field is read-only.
IP range for the grid.
The Start, Stop, and Scope fields auto-populate based on the network you select. You can change these fields as needed.
First IP in the IP range for the grid.
Last IP in the IP range for the grid.
Indicates if the range is public or private for external networks.
Public: Indicates that the IP range be public application IP addresses.
Private: Indicates that the IP range will be private (non-routable) IP addresses.
You have successfully configured a grid and you can perform maintenance tasks.
|
Copyright © 2013 CA Technologies.
All rights reserved.
|
|