

The Canvas is the drawing area where you assemble your application by dragging elements from the catalog palette, selecting instances, and re-routing connections.
As you assemble your application, the Canvas displays the components of an application with their interface connections. Components can be either Appliance Instances of classes defined in a catalog or Singleton Classes.
Dynamic Canvas
The dynamic canvas allows you to monitor component state changes including:
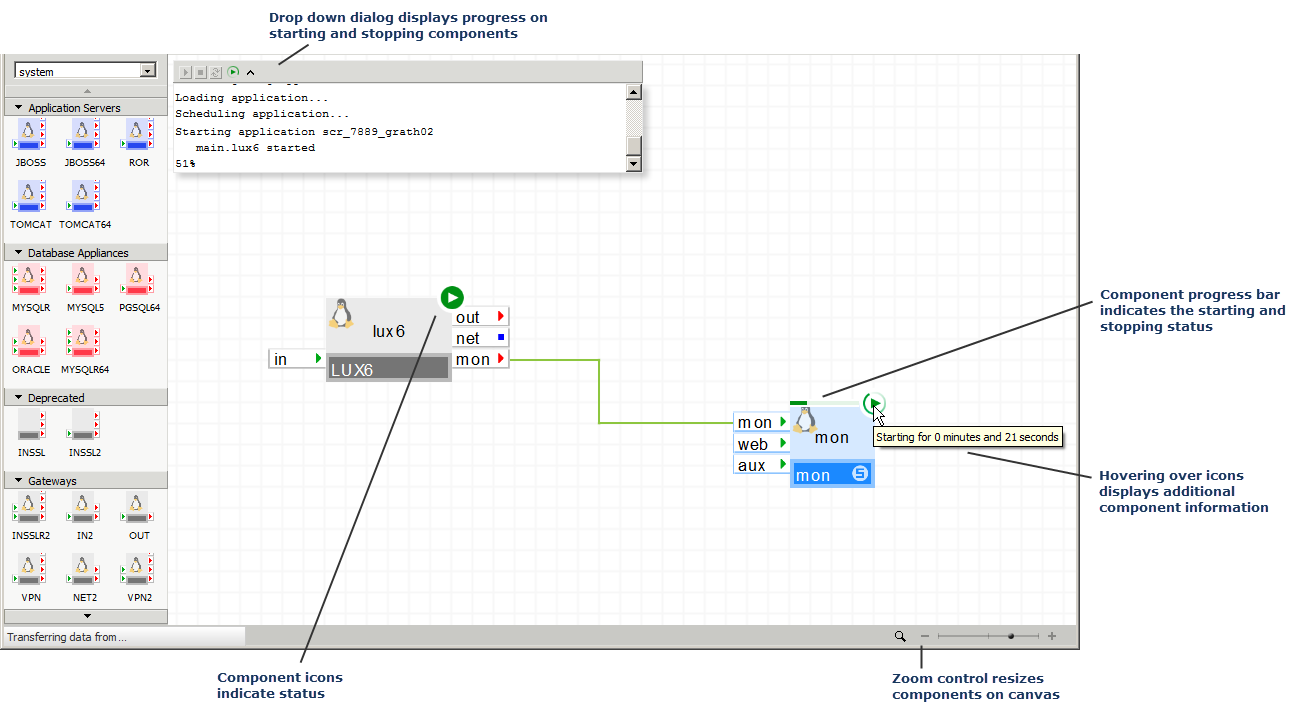
The application status displays as a badge in the upper left corner of the canvas. If an application action has been performed from an Infrastructure Editor session, the status display area is expandable by clicking the arrow head.
In addition, you can perform the following application actions using those control buttons. These buttons are disabled if you do not have control access to the application:
When the application is in any state, except stopped, each of its components is also decorated with a status badge that indicates the component’s state.
The status badges for applications and components are:
![]() Start
Start
![]() Standby
Standby
![]() Stopped
Stopped
![]() Error
Error
![]() Starting
Starting
![]() Stopping
Stopping
While an application is starting or stopping, a progress bar displays the duration of the starting or stopping operation.
Accessing Operations
In addition, you can access the following operations by right-clicking the canvas to display the sub menu:
Canvas Operations
Application Access Operations
Application Editing Operations
Application Documentation Operations
Editor Zoom Control
You can use the zoom control to zoom in and out of the canvas to view complex configurations that are difficult to see at normal size. The zoom control allows you to:
To view the zoom options, click the zoom magnifying glass and select the option.
You can also use the mouse wheel to increase or decrease the zoom. Clicking near the center divider of the zoom slider resets the zoom to 100%.
Note: Internet Explorer is not supported.
Accessing Operations
In addition, you can access the following operations by right-clicking the canvas to display the sub menu:
Canvas Operations
Application Access Operations
Application Editing Operations
Application Documentation Operations
The status bar shows the names of the currently selected appliances and a progress indicator for some of the longer operations (such as loading or saving an application).
You can create an instance of an appliance -- a subordinate within the assembly -- by simply dragging an appliance shape from a catalog palette onto the canvas. Once you create the instance, you can move its shape freely anywhere on the canvas.
The shape consists of the following visual elements:
You can configure the instance settings of the new appliance by double-clicking on the appliance. The Instance Settings property sheet displays for the instance.
You can change the class name of a subordinate by SHIFT-dragging the new class form the catalog onto the existing subordinate. For example, replacing a WEB5 with WEB64. However, the following limitations apply:
Note: If the existing subordinate is not connected to any other instance, the class name of the subordinate may be changed regardless of the number and names of its terminals.
You can also perform the following operations on it by right-clicking menu on the appliance:
Singleton classes are used to create new custom appliances that are derived from existing appliance instances. A singleton class is created by branching an instance of an appliance. For additional information on creating a singleton, refer Branching Classes.
Singleton classes are designated by S in the lower right corner. Singletons can be freely modified; all modifications are preserved across application starts and stops (unlike appliance instances where CA AppLogic may re-instantiate their volumes and any changes made to those volumes would be lost). In addition, the singleton class and its volumes are a permanent part of the application. If the application is copied or migrated to another grid, the singleton class and its corresponding volumes are also copied or /migrated with the application.
If an appliance does not have the S in its lower right corner, the appliance is an appliance instance. Any changes, such as modifying the boot volume, that are made to an appliance instance can be lost.
Once you have a few instances, you can also connect them. Appliances can be connected by connecting their interfaces, such as ctl, in, http, and fs.

In an application, the connections display as follows:

You can use the following types of interfaces:
For additional information on the types of interfaces, refer to the Application Architect Guide or the Appliance Developer Guide.
The cursor provides hints as to which connections are allowed. When you move the mouse cursor over a connection, the connection line highlights to help identify the connection line from other connection lines on the canvas. Many outputs can be connected to a single input. Each output, however, can be connected to exactly one input. It is even possible, but rarely useful, to connect the output of an appliance to an input of the same appliance.
When multiple outputs are connected to a single input, the Infrastructure Editor reduces visual clutter by joining the connections with as few lines as possible. Whenever a connection joins an existing connection, a small dot indicates the joining of connections.
You can route the connections manually by dragging their corners up/down or left/right. Once you position the cursor on a connection corner, a visual clue displays indicating the directions that are allowed. You can also add a segment to the connection route. This allows you to make a route that passes around another appliance.
You can perform the following operations over a connection by right-clicking the connection to display the sub menu:
For more information about what the connections mean at runtime and the benefits of using connections, refer to the Overview Guide.
You can select one or more appliances to perform operations.
Select Appliance
Before performing operations on an appliance, you must select it by clicking on the appliance.
Add Appliance to the appliance group
You must add the appliance to the currently selected appliance group.
Click the appliance while holding the Ctrl key.
The appliance is added.
Note: Drawing a rectangle on the canvas around several appliances selects all the appliances in that rectangle.
The Infrastructure Editor displays the current selection with dashed line. Once you select multiple appliances, you can do the following:
You can add one or more notes or annotations to the application such as describing usage of various appliances in its architecture.
The following describes how to work with an annotation:
|
Copyright © 2013 CA Technologies.
All rights reserved.
|
|