

Reference Information › Appliance Catalog Reference Guide › System Catalog › Database Appliances › MYSQLR, MYSQLR64 - MySQL Database Appliance Suitable for Replication › N-tier Application Running on Different Facilities (Suitable for Load Balancing and Failover)
N-tier Application Running on Different Facilities (Suitable for Load Balancing and Failover)
The following diagram shows a typical usage of the MYSQLR64 appliance in a web application running in more than one facility. With this setup you can have two or more identical applications running in different facilities with the database being replicated to all applications in master-master setup. This is useful in two cases:
- geographical load balancing - setup 2 (or more) such applications so that users can use the application that is closest to their geographical region for better response times (load balancing is done with DNS)
- failover - setup 2 (or more) such applications so if the whole facility where one application is running goes down (or the application itself goes down), the other applications can be used to prevent downtime.
Master application

Slave application
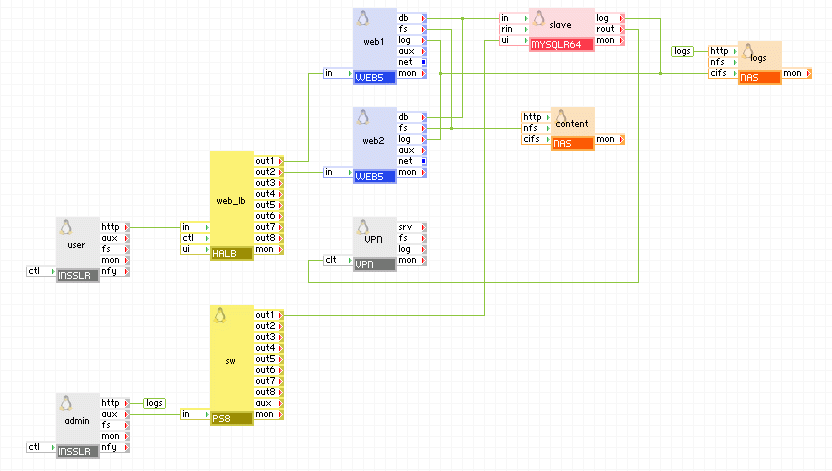
Appliances in use:
- user - input gateway for user requests
- admin - input gateway for log files access
- sw - redirect port 8080 from admin to ui on master or slave
- vpn - input for the remote application to connect to the master=/=slave appliance to replicate the database
- web_lb - web load-balancer for user requests
- web1, web2 - web servers with active content (for example, CGI scripts)
- master - MYSQLR64 configured to be a master
- slave - MYSQLR64 configured to be a slave
- content - storage for database error log files, web content and web logs
- logs - storage for database error log files
Client request arrive on the user gateway. The gateway forwards the requests to the web_lb load balancer, which directs the request to one of the web servers web1 and web2. The web servers access the master database. The master appliance connects to the remote (slave) application, the only difference being the server_id of slave and the network setup) to replicate the database. The remote application connects to the master appliance through the vpn gateway which is configured to allow connection only from the vpn gateway of the remote application. The master and slave appliances in the two applications are running in master-master setup so they always have identical data.
Example property configuration (properties that are not listed should be left to their default values):
Web access to master and slave is available via admin gateway on port 8080.
master
|
Property name
|
Value
|
Notes
|
|
auto_create
|
1
|
Create the database if the volumes are empty.
|
|
error_log_filename
|
master-db.error
|
Name of error log file that is to be stored on the logs data volume.
|
|
error_log_level
|
error
|
Error logging level
|
|
server_id
|
1
|
Master server (not mandatory to be 1, should be different from server_id on the slave)
|
|
rpl_mode
|
master
|
Write binary logs to have replication
|
master vpn
|
Property name
|
Value
|
Notes
|
|
mode
|
server
|
Operate as a server.
|
|
tunnel
|
certificates
|
Using SSL certificates.
|
|
tcp_ports
|
3306,22
|
Allow ports needed by MYSQLR64.
|
|
ip_addr
|
master_vpn_ip
|
IP address of the VPN in the master application.
|
|
remote_host
|
slave_vpn_ip
|
IP address of the VPN in the slave application.
|
slave
|
Property name
|
Value
|
Notes
|
|
auto_create
|
1
|
Create the database if the volumes are empty.
|
|
error_log_filename
|
slave-db.error
|
Name of error log file that is to be stored on the logs data volume.
|
|
error_log_level
|
error
|
Error logging level
|
|
server_id
|
2
|
Slave server (not mandatory to be 2, should be different from server_id on the master)
|
|
rpl_mode
|
slave
|
Connect to master
|
slave vpn
|
Property name
|
Value
|
Notes
|
|
mode
|
client
|
Operate as a client.
|
|
tunnel
|
certificates
|
Using SSL certificates.
|
|
auth_path
|
"client1"
|
Path to the SSL certificate file.
|
|
ip_addr
|
slave_vpn_ip
|
IP address of the VPN in the slave application.
|
|
remote_host
|
master_vpn_ip
|
IP address of the VPN in the master application.
|
The remote application is an exact copy, the only difference is the network setup of the user, admin, and vpn appliances, connection(s) between the vpn appliance and master=/=slave, and the server_id of the master=/=slave appliance (it should be unique).
Migrating From MYSQLR to MYSQLR64 (and vice versa)
If you need to migrate from MYSQLR to MYSQLR64 (and vice versa), you should not only use the volumes from the 32-bit appliance on a 64-bit one (or vice versa) as this could cause data corruption. The recommended way to do this is by dumping the database on the old appliance, transferring the dumped file to the new appliance, and then import the database into the new appliance.
The same procedure can be used to migrate a database from an older database appliance (MYSQL, MYSQL5, MYSQL64) or a mysql database not running on a CA AppLogic® appliance.
To migrate the database:
- (optional) Prevent access to the old database - this is optional and it is only to help ensure that the database is not modified while it is being dumped. One way to do this would be to start the appliance with nothing connected on its input terminals.
- Dump all databases on the old appliance. Verify you have enough space on the data volume before doing this (you can always resize the data volume if there is not enough space). This is done by starting the appliance, log into the appliance and execute the following command:
- mysqldump --all-databases --lock-all-tables | gzip > /mnt/data/my_dump.sql.gz
- Stop the application.
- Create a new application volume that is going to store the database for the new appliance (ext3-snapshot). Verify the volume is large enough to hold the database dump file (/mnt/data/my_dump.sql.gz) and the database itself.
- Transfer the database dump file to the newly created volume (below is only one way of copying the database using 2 filers setup with external internet access; if this is not suitable for your configuration, the database may also be copied using scp from the grid to an external server and then back to the destination volume):
- Manage each volume separately using two filers (one for each volume) using the vol manage command. Be sure to pass the external IP information on the vol manage command line so each filer can access each other to copy the database between the two volumes. See the vol manage help for more information about how to specify the external network settings.
- In the filer for the source volume, execute the following: cat /etc/ssh/ssh_host_rsa_key.pub >> /root/.ssh/authorized_keys
- In the filer for the destination volume, execute the following: scp -pr -i /etc/ssh/ssh_host_rsa_key IP_address_to_source_filer:/mnt/vol/my_dump.sql.gz /mnt/vol/.
- After the database is copied, you may exit from both filers.
- Edit the application and add a new instance of MYSQLR/MYSQLR64, parameterize it, connect it and assign the newly created volume to the new instance. At this point the old MYSQLR/MYSQLR64 instance may be deleted from the application (however you may want to keep it around for backup purposes until you can verify that the database was transferred correctly to the new instance).
- Import the database - Start the new appliance, log into it and execute the following command:
- zcat /mnt/data/my_dump.sql.gz | mysql
- The database is now transferred and the appliance is ready for use.
Notes
Be aware of the following:
- MYSQLR64 performance is optimized for the MyISAM storage engine which is used by default. If you want to enhance the performance for Innodb or simply fine tune the MYSQL service for your application, see the Custom Configuration section for details on how to add configuration parameters to the existing configuration. This feature is available in MYSQLR64 1.6.1 or later.
- MYSQLR64 uses only asynchronous replication (synchronous replication is not supported by MySQL).
- MYSQLR64 detects replication errors within 2 minutes and notifies the user by posting a message on the grid's dashboard. The user can then use the MYSQLR64 GUI to fix the issue (no automated recovery is provided by MYSQLR64).
- When MYSQLR64 is started, there is a message written to the appliance log file stating that chmod failed to modify the owner for the mysql log file. This is to be expected and does not affect the operation of the MYSQLR64 appliance.
- The theoretical maximum number of MYSQLR64 appliances in a single replication is 10. As data is replicated in a circular way, increasing the number of MYSQLR64 appliances will increase the time it takes for slaves to update their databases. The actual maximum of appliances in a replication may be lower depending on your application, load and needs (instant update of slaves may not be critical in some scenarios like data backup).
Important! When creating users for the database, verify all users are created with no restrictions on the host they connect from. For example:
mysql> GRANT ALL PRIVILEGES ON *.* TO 'monty'@'%'
    ->     IDENTIFIED BY 'some_pass' WITH GRANT OPTION;
- Volume requirements
- The data volume size should be 100MB or more - currently, the InnoDB engine is enabled and it occupies about 22MB on the data volume. In this version, there is no way to disable this, even if you don't use InnoDB for data storage.
- The data volume should not be formatted with any file-system as it will be used to build an LVM volume (the volume should be unformatted). If you use a volume that is formatted with any file-system (possibly with files from an old MYSQL appliance), the appliance will fail to start to prevent you from deleting your files.
- 20% of the space of the data volume is allocated for initiating/fixing replication, this leaves 80% of the volume space for database storage.
- When using MYSQLR64 in replication scenarios either as master, slave or master_and_slave, you must provide a binlogs volume. Binary logs are rotated on 100MB and kept for 2 days after rotating, after that they are deleted. If the appliance is also running as slave, relay logs are also stored to the binlogs volume .You will need at least 500MB binlogs space to run master-master replication. The actual size depends on the intensity of MySQL update/insert queries that are executed, you`ll need a few GB binlogs volume for a normal operation of an application.
- The appliance connected to MYSQLR64 is responsible for creating its own database and tables if they do not exist. Alternatively, you can manually copy the initial database on the data volume.
- The appliance or server connected to MYSQLR64's in input should have the MySQL client library to access the MySQL server and submit requests. All virtual servers provided in the appliance catalog have the MySQL client library installed, including the generic LINUX server.
- References:
- http://www.mysql.com -- MySQL's website
- http://dev.mysql.com/doc/refman/5.0/en/index.html -- MySQL 5.0 documentation
MYSQLR Troubleshooting
MYSQLR Appliance Freezes Upon Restart
Starting with MYSQLR 1.6.2, you can set/change a password for the root database account. However, the MSYQLR appliance has a few root accounts with different hostnames. When setting/changing a password, you should always use the root@% account. The root@% account is the account that appliances connected to the in terminal of MYSQLR will authenticate against. The other root accounts are used only from local users and a password should never be set for them as doing so will cause the MYSQLR appliance to fail to start.
Note: If you leave the root@localhost account without a password, it is not a security issue because this account can only be used by local users on the appliance and anyone who has access to the appliance can change the password.
Recover a MYSQLR appliance that fails to start after changing the root database password
To recover an appliance that fails to start due to changing the database root password, perform the following steps:
- Start the appliance or application in debug mode.
- Appliance Start Command
-
comp start main.MYSQLR --debug
- Application Start Command
-
app start --debug
You should be able to login to the appliance a few seconds after you start the appliance. It is not necessary to wait for the appliance to time out.
- Login over SSH to the appliance and perform the following commands:
mysql -p -e "update mysql.user set Password='' where User='root'"
mysqladmin -p flush-privileges
mysql -e 'update mysql.user set password=PASSWORD("NEWPASSWORD") where User="root" and Host="%"'
mysqladmin flush-privileges
- Restart the appliance to verify that it boots, and that mysql connections on the 'in' terminal for user root require a password.
Copyright © 2012 CA.
All rights reserved.
|
|