

|
|
|
Requirements change management (RCM) provides the ability for the product owner to manage an approval process for drafting and updating requirements. RCM provides an optional process that helps the product owner review and approve, or reject, requirements created by a Requirement Owner.
As the system administrator, you set up the approval process for requirement drafts and then enable or disable change management for requirements from the CA Agile Vision and CA Product Vision Administration menu.
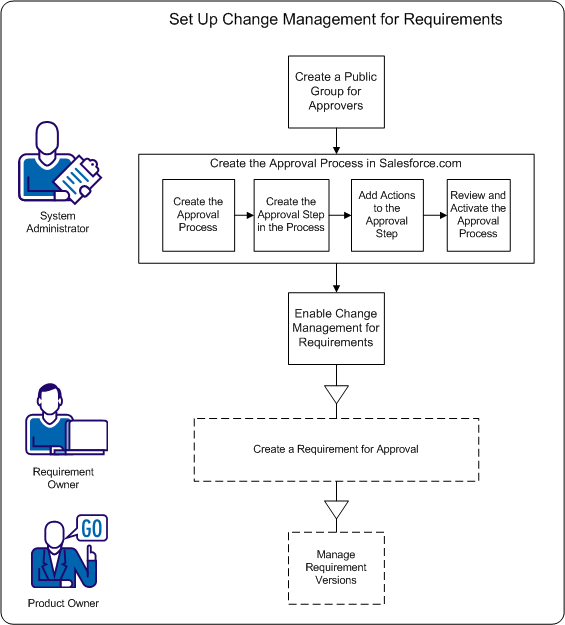
Use the following processes to complete these tasks.
When using RCM, users must use an approval process to finalize or update a requirement. The process defines what happens when requirement owners submit requirements and approvers either approve or reject requirements.
In the following process, you set up an approval process in Salesforce.com. This approval process contains one defined step, with two actions, to approve or reject the requirement.
Note: The approval process requires a public group to be available for the submitters and approvers. If you have not enabled a public group, complete the following preliminary step.
Enable the Customer Portal and Create a Public Group.
Setting up the approval process includes the following procedures:
Before you set up the approval process, enable the customer portal and set up a public group for the users that are submitters for requirements.
Important! There are two methods for completing this task. The method you use depends on your force.com license.
Note: If you have already created a public group, skip to the Create the Approval Process for Requirement Change Management step.
Follow these steps:
You have created the public group for requirement owners that submit approval requests.
Important! Each time you create a new user, add the user to this group.
After you deploy the release package, configure the approval process for requirements objects.
Important! Configure only the fields and options that are listed in these steps. The other fields and choices keep their default values.
Follow these steps:
The Salesforce.com setup page opens.
The Unique Name field displays the name that you entered.
The Lookup pop-up dialog opens.
The What Would You Like To Do Now? page opens.
Important! Chose the following option to complete the procedure successfully.
In the next section you specify details about the step in which the requirement draft gets approved or rejected.
In the previous section, you created the approval process and then opened the New Approval Step page.
In this section, you specify the name of the step and details such as how many approvers can be specified.
Important! Configure only the fields and options that are listed in these steps. The other fields and choices keep their default values.
Follow these steps:
The Unique Name field is automatically set to Final_Version_Review and the Step field is set to 1.
Optional: you can add up to nine more approvers to the list.
You can repeat these steps to add Default Approver 3 - 10.
The What Would You Like To Do Now? page opens.
The Requirement: Change Management Process page opens.
In this section, you specify each action that occurs for the requirement when:
Important! The choices defined in these steps are required.
At the end of the previous section, you opened the Requirement: Change Management Process page. This page shows the entire approval process and has sections in which you define the submission and approval step actions. Using the following diagram and the procedure that follows, update each section. The numbers correspond to the steps in the procedure.
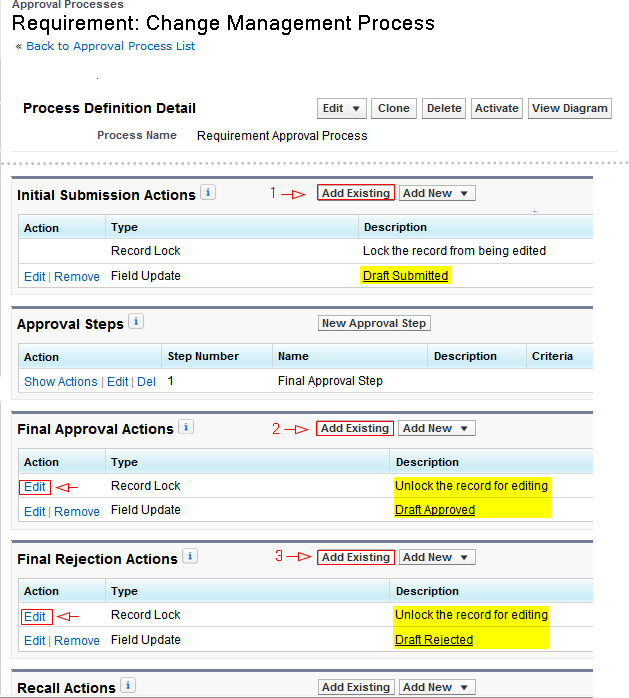
Follow these steps:
The Approval Processes page reopens.
The approval process for requirements is now ready for review and activation.
Important! Review the actions and make sure that everything is correct. In next section, you activate the approval process and the step and actions cannot be changed.
| Copyright © 2012 CA. All rights reserved. | Tell Technical Publications how we can improve this information |