

CA Strong Authentication Windows Installation Guide › Plan the Deployment › Deployment Overview for Fresh Install
Deployment Overview for Fresh Install
This section briefly outlines the steps for deploying CA Strong Authentication:
Deployment of CA Strong Authentication involves the steps as outlined in this illustration:
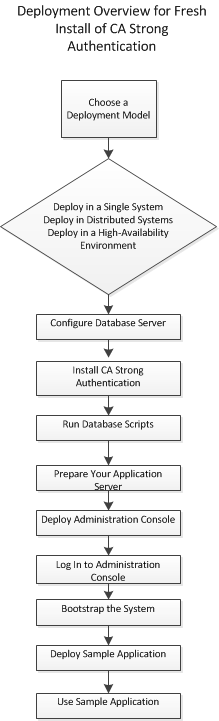
- Choose a deployment model that suits your business needs. CA Strong Authentication can be installed on a single system or across multiple systems.
See "Deployment Model" for more information.
- Configure the database server where you plan to seed the CA Strong Authentication schema:
- See "Configuring Microsoft SQL Server" for more information about configuring the MS SQL Server database.
- See "Configuring Oracle Database" for more information about configuring the Oracle Database.
- See "Configuring IBM DB2 Universal Database" for more information about configuring the IBM DB2 database.
- See "Configuring MySQL" for more information about configuring the MySQL database.
- Install CA Strong Authentication:
- See "Deploying CA Strong Authentication on a Single System" for single-system deployment.
- See "Deploying CA Strong Authentication on Distributed Systems" for distributed-system deployment.
- Run SQL scripts in the database to create the CA Strong Authentication schema and set initial configuration values:
- See "Running Database Scripts" for single-system deployment.
- See "Running Database Scripts" for distributed-system deployment.
- Copy required files and JARs on your application server. CA Advanced Authentication and the User Data Service use these files for proper functioning:
- See "Preparing Your Application Server" for more information about copying the files for single-system deployments.
- See "Preparing Your Application Server" for more information about copying the files for distributed deployments.
- Deploy CA Advanced Authentication:
- See "Deploying CA Advanced Authentication" for more information about deploying CA Advanced Authentication for single-system deployments.
- See "Deploying CA Advanced Authentication" for more information about deploying CA Advanced Authentication for distributed-system deployments.
- Log in to CA Advanced Authentication as Master Administrator and initialize CA Strong Authentication:
- See "Logging In to CA Advanced Authentication" and "Bootstrapping the System" for more information about initializing CA Advanced Authentication for single-system deployments.
- See "Logging In to CA Advanced Authentication" and "Bootstrapping the System" for more information about initializing CA Advanced Authentication for distributed-system deployments.
- Start the CA Strong Authentication Server and verify that the service has coming up correctly:
- See "Starting CA Strong Authentication Server" and "Verifying the Installation" for more information about starting the CA Strong Authentication Server for single-system deployments.
- See "Starting CA Strong Authentication Server" and "Verifying the Installation" for more information about starting the CA Strong Authentication Server for distributed-system deployments.
- Deploy and run the Sample Application to test CA Strong Authentication installation:
- See "Deploying Sample Application" and "Using Sample Application" for more information about doing this in a single-system environments.
- See "Deploying Sample Application", "Configuring Sample Application for Communication with CA Strong Authentication Server", and "Using Sample Application" for more information about doing this in a distributed environment.
- (Optional) Deploy User Data Service (UDS) only if you want to use directory service as user repository:
- See "Deploying User Data Service" for more information about deploying and starting UDS for single-system deployments.
- See "Deploying User Data Service" for more information about deploying and starting UDS for distributed deployments.
Copyright © 2014 CA Technologies.
All rights reserved.
|
|