

To install the CA Risk Authentication components, use the CA Risk Authentication 8.0 InstallAnywhere Wizard. This wizard supports Complete and Custom installation types.
Note: To install and configure CA Risk Authentication on a single computer, use the Complete option when you run the installer.
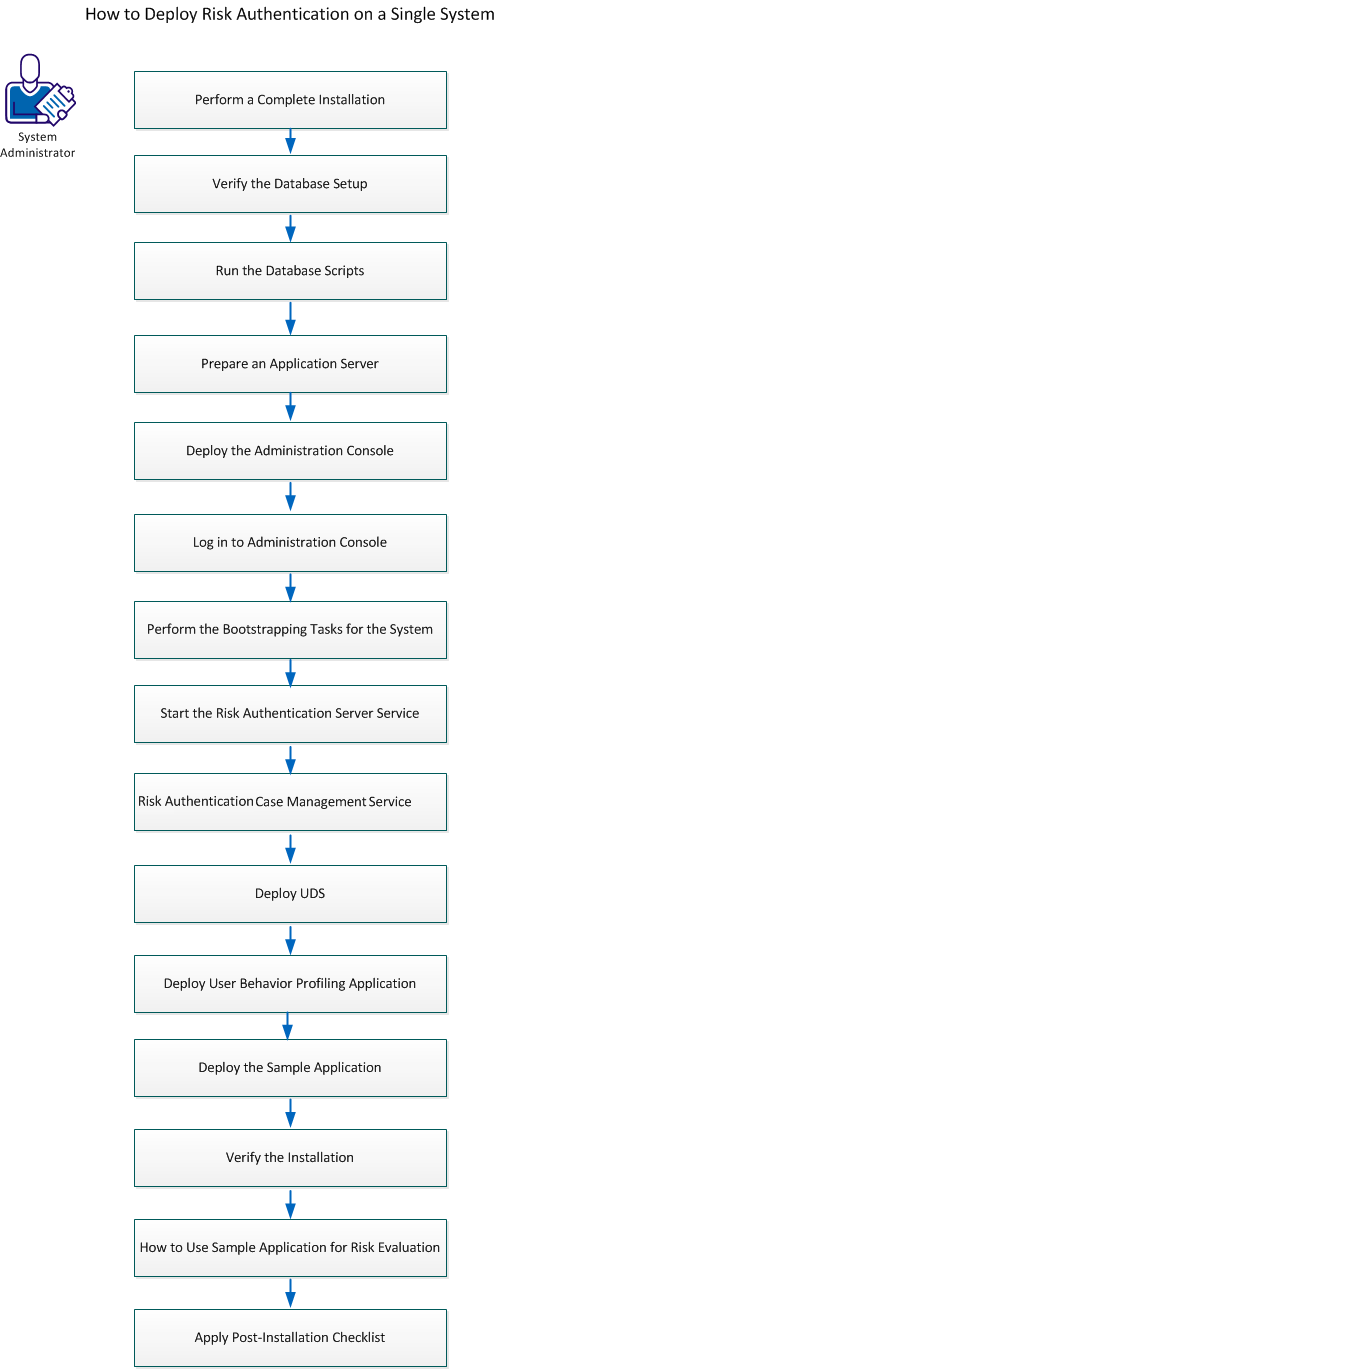
The following illustration shows the tasks to perform for installing CA Risk Authentication 8.0:
Perform the following tasks:
Important!
Consider the following points while installing CA Risk Authentication on a single system:
This section contains the following topics:
Perform a Complete Installation
How to Prepare an Application Server
Perform the Bootstrapping Task for the System
Start the CA Risk Authentication Server Service
Start the CA Risk Authentication Case Management Service
Deploy User Data Service [USD]
Deploy User Behavior Profiling Application
How to Use the Sample Application for Risk Evaluation
Apply the Post-Installation Checklist
To install CA Risk Authentication use a single user account for installation from the Administrators group. Otherwise, the critical steps in the installation, do not complete successfully, though the installation may complete without any errors.
Perform a Complete installation to install all of the components of the CA Risk Authentication package. These components include CA Risk Authentication Server and the scripts that are required for setting up the database.
Follow these steps:
Note: If you are executing the installer with root login, then a warning message appears. Enter Y to continue, or enter N to quit the installation. If you have exit the installer screen, then run the installer again.
Enter y to accept the acceptance of License Agreement and to continue with the installation.
Note: If you press n, then a warning message is displayed and the installation is stopped.
The installer now checks if other CA products exist on the system.
If the installer detects an existing CA product installation (an existing ARCOT_HOME), then:
Note: The installation directory name that you specify must not contain any spaces. If it does, then some CA Risk Authentication scripts and tools may not function as intended.
Note: If you are using a SQL database, verify that the ODBC Driver version you are using is the same as the one mentioned in Preparing for Installation.
Note: CA Risk Authentication is certified to work with Oracle Real Application Clusters (Oracle RAC). To use Oracle RAC on CA Risk Authentication Installation, select Oracle Database in this step, perform the next step (Step 7), and then perform the steps in Configuring CA Risk Authentication for Oracle RAC (W).
Based on your database choice the following screens get displayed:
Defines the value by which the installer creates the DSN. CA Risk Authentication Server then uses this DSN to connect to the CA Risk Authentication database. The recommended value to enter is arcotdsn.
Specifies the host name or IP address of the CA Risk Authentication datastore.
Default Instance
Syntax: <server_name>
Example: demodatabase
Named Instance
Syntax: <server_name>\<instance_name>
Example: demodatabase\instance1
Specifies the database user name. The user must have the create session and DBA rights.
Note: The User Name for the Primary and Backup DSNs must be different.
Specifies the password associated with the User Name. This password is specified by the database administrator.
Specifies the name of the MS SQL database instance.
Specifies the port number at which the database listens to the incoming requests.
Default Port:1433
Specifies the value by which the installer creates the DSN. CA Risk Authentication Server then uses this DSN to connect to the CA Risk Authentication database. The recommended value to enter is arcotdsn.
Specifies the database user name for CA Risk Authentication to access the database. This name is specified by the database administrator.
The user must have the create session and DBA rights.
Note: The User Name for the Primary and Backup DSNs must be different.
Specifies the password associated with the User Name you specified in the previous field. This password is specified by the database administrator.
Specifies the Oracle System Identifier (SID) that refers to the instance of the Oracle database running on the server.
Specifies the port at which the database listens to the incoming requests..
Default: 1521
Specifies the host name or IP address of the CA Risk Authentication datastore.
Syntax: <server_name>
Example: demodatabase
Specifies the value by which the installer creates the DSN. CA Risk Authentication Server then uses this DSN to connect to the CA Risk Authentication database. The recommended value to enter is arcotdsn.
Specifies the host name or IP address of the CA Risk Authentication datastore.
Default Instance
Syntax: <server_name>
Example: demodatabase
Named Instance
Syntax: <server_name>\<instance_name>
Example: demodatabase\instance1
Specifies the database user name for CA Risk Authentication to access the database. This name is specified by the database administrator.
The user must have the create session and DBA rights.
Note: The User Name for the Primary and Backup DSNs must be different.
Specifies the password associated with the User Name you specified in the previous field. This password is specified by the database administrator
Specifies the name of the MySQL database instance.
Specifies the port at which the database listens to the incoming requests.
Default: 3306
Specifies the password for the Master Key which is used to encrypt the data stored in the database.
Default Value: MasterKey
Note: If you want to change the value of Master Key after the installation, then regenerate securestore.enc with a new Master Key value. See Changing Hardware Security Module Information After the Installation for more information.
(Optional) Specifies if you will use a Hardware Security Module (HSM) to encrypt the sensitive data. If you do not select this option, then, by default, the data is encrypted by using the Software Mode.
Identifies the password to connect to the HSM.
Specifies one of the following HSMs:
Set the following HSM information:
Shared Library: The absolute path to the PKCS#11 shared library corresponding to the HSM.
For Luna (cryptoki.dll) and for nCipher netHSM (cknfast.dll), specify the absolute path and name of the file.
Storage Slot Number: The HSM slot where the 3DES keys used for encrypting the data are available.
Note: The HSM parameter values are recorded in arcotcommon.ini, which is available in <install_location>\Arcot Systems\conf\. To change these values after installation, edit this file, as discussed in Configuration Files and Options.
Click Next.
After the preceding tasks are completed successfully, the Installation is complete.
You may have to wait for a few minutes (for the installer to clean up temporary files) until the prompt reappears.
Note: After the installation is completed, perform the post-installation tasks that are discussed in Performing Post-Installation Tasks.
After installation, you can access the installation log file (Arcot_RiskFort_Install_<timestamp>.log) in the <install_location> directory. For example, if you had specified the /opt directory as the installation directory, then the installation log file is created in the /opt directory.
If the installation fails for some reason, then error messages are recorded in this log file.
|
Copyright © 2014 CA Technologies.
All rights reserved.
|
|