

|
|
|
Protection settings for the information to be backed up helps ensure that the backup data is reliably protected (copied and saved) against any form of data loss.
Note: To view a video related to these Backup Settings, see Manage Backup Settings.
Specify the protection settings
The Backup Settings Protection dialog opens.
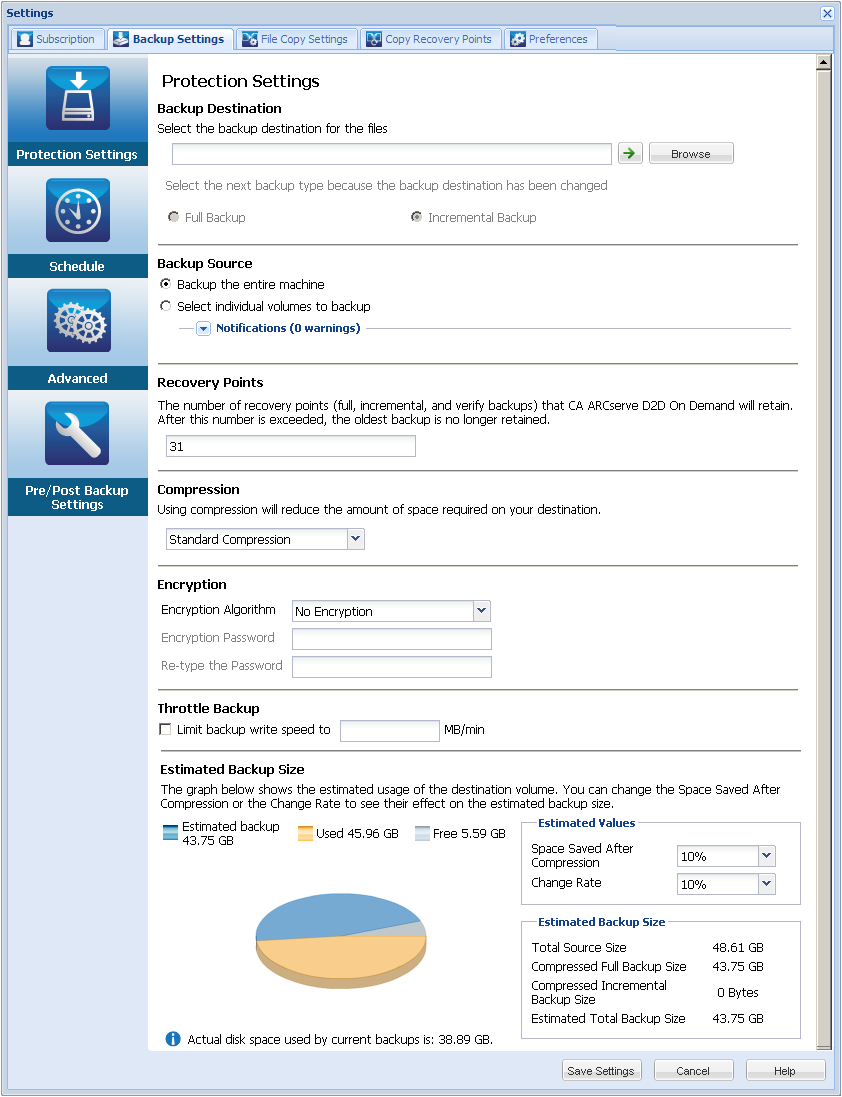
You can specify a local path (volume or folder), or remote shared folder (or mapped drive) for the backup location, or you can browse to a backup location.
Click the green arrow icon button to verify the connection to the specified location.
For example, if you are attempting to back up your entire local machine which consists of Volumes C, D, and E; and also specify Volume E as your destination, CA ARCserve D2D On Demand will only back up Volumes C and D to Volume E. Data from Volume E will not be included in the backup. If you want to back up all local volumes, you must specify a remote location for your destination.
Important! Verify that your specified destination volume does not contain system information or else it will not be protected (backed up) and your system will fail to recover after Bare Metal Recovery (BMR) if necessary.
Note: Dynamic disks are restored at disk level only. If your data is backed up to a volume on a dynamic disk, you will not be able to restore this dynamic disk during BMR.
The next backup performed will be a Full Backup. The new backup destination does not have any dependency on the old backup destination. If you continue with a full backup, the previous location is no longer needed for backups to continue. You can select to keep the old backup for any restores or delete it if you do not want to perform any restores from there. It will not affect future backups.
The next backup performed will be an Incremental Backup. The next incremental backup to the new destination is performed without copying all the backups from the previous destination. However, for this option, the new location is dependent on the previous location because the changes will include just the incremental data (not the full backup data). Do not delete the data from the previous location. If you change the backup destination to another folder, and attempt to perform an incremental backup and the former backup destination does not exist, the backup will fail.
You can back up the entire machine or selected volumes.
Lets you back up the entire machine. All volumes on the machine will be backed up.
Note: If you select the full machine backup option, CA ARCserve D2D On Demand automatically discovers all disks/volumes attached to current machine, and include them in the backup.
For example, if a new disk is attached to the machine after the backup setting is configured, you will not need to change the backup settings and the data on the new disk will be protected automatically.
This volume filtering capability lets you specify to back up only the selected volumes. You also have the option to Select/Unselect all listed volumes.
Note: If some volumes are selected explicitly for backup, only the selected volumes are backed up. If a new disk/volume is attached to the machine, you must manually change the volume selection list to protect the data on the new disk/volume.
When you select this option, a listing of all available volumes will be displayed, with the corresponding volume information and notification messages.
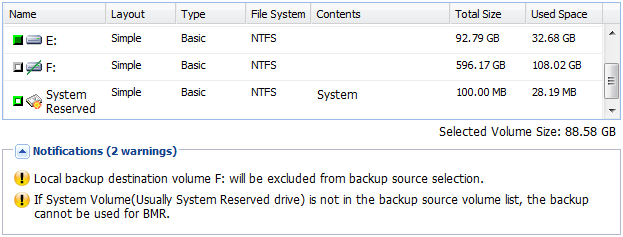
The notification messages will be displayed for any of the following conditions:
If the specified backup destination is located on the local volume, a warning message is displayed to notify you that this volume will not be backed up.
If system/boot volume is not selected for backup, a warning message is displayed to notify you that the backup will not be usable for BMR.
If the application data files are located on a volume that is not selected for backup, the application name and database name are displayed for reference.
Specifies the number of recovery points (backup images) retained.
When the specified limit is exceeded, the earliest (oldest) incremental child backup is merged into the parent backup to create a new baseline image consisting of the "parent plus oldest child" blocks. This cycle of merging the oldest child backup into the parent backup repeats for each subsequent backup, allowing you to perform infinite incremental backups, while maintaining the same retention count.
Note: If your destination does not have sufficient free space, you may consider reducing the number of saved recovery points
By default the retention count is set to 31 recovery points.
Note: The maximum number of recovery points is 1344.
Specifies the type of compression to be used for backups.
Compression is often selected to decrease disk space usage, but also has an inverse impact on your backup speed due to the increased CPU usage.
The available options are:
No compression will be performed. This option has the lowest CPU usage (fastest speed), but also has the highest disk space usage for your backup image.
Some compression will be performed. This option provides a good balance between CPU usage and disk space usage. This is the default setting.
Maximum compression will be performed. This option provides the highest CPU usage (lowest speed), but also has the lowest disk space usage for your backup image.
Notes:
Data encryption is the translation of data into a form that is unintelligible without a deciphering mechanism. CA ARCserve D2D On Demand data protection uses secure, AES (Advanced Encryption Standard) encryption algorithms to achieve maximum security and privacy of your specified data.
The available format options are No Encryption, AES-128, AES-192, and AES-256. (To disable encryption, select No Encryption).
For example, if you change the algorithm format and submit a customized incremental or verify backup manually, it will automatically be converted to a full backup.
For example, if you change the encryption password and submit a customized incremental or verify backup manually, it will automatically be converted to a full backup.
Note: Encryption settings do not have to remain the same for your backups. You can change these settings at any time, including after several backups of the same data.
You can specify the maximum speed (MB/min) at which backups will be written. You can throttle the backup speed to reduce CPU or network utilization. However, by limiting the backup speed, it will have an adverse effect on the backup window. As you lower the maximum backup speed it will increase the amount of time of perform the backup. For a backup job, the Job Monitor on the CA ARCserve D2D On Demand homepage will display the average Read and Write speed of the job in progress and the configured throttle speed limit.
Note: By default, the Throttle Backup option is not enabled and backup speed is not being controlled.
Displays the estimated usage of the destination volume.
For more information about using these estimated backup calculations, see Estimate Future Backup Space Requirements.
You can use estimated values to calculate the approximate overall backup size based on the number of recovery points.
This value indicates how much disk space is saved after compression.
For example, if the data size of a volume is 1000 MB, and after backup the compressed data size is 800 MB, then the Space Saved After Compression is estimated to be 200 MB (20%).
This value indicates the typical data size of an incremental backup.
For example, if an incremental backup data size is 100 MB, and the full backup data size is 1000 MB, the change rate is estimated to be 10%.
With the Estimated Values defined, CA ARCserve D2D On Demand calculates and displays the estimated backup size required based on the configuration of the backup destination and the recovery points. The pie chart also displays the amount of used space and free space.
Displays the estimated values for Total Source Size, Compressed Full Backup Size, Compressed Incremental Backup Size, and Estimated Total Backup Size.
Your backup protection settings are saved.
| Copyright © 2012 CA. All rights reserved. | Tell Technical Publications how we can improve this information |