

Arcserve Backup lets you recover CA ARCserve Unified Data Protection backup data at file level granularity from Arcserve Backup media. Use these steps when you want to recover individual files, folders, directories, and so on from Arcserve Backup media to CA ARCserve Unified Data Protection nodes.
The steps listed below describe how to perform the following recoveries:
Note: The following steps describe how to submit restore jobs using the Restore by Session method. The process of restoring CA ARCserve Unified Data Protection data nodes using the Restore by Tree method is identical to that of all other types of data. For more information about the Restore by Tree method, see "Restoring Data."
Follow these steps:
From the Quick Start menu, click Restore.
The Restore Manager window opens.
The backup sessions appear in the Session tree.
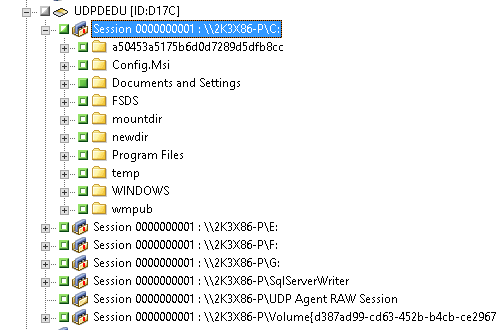
Expand the nodes that you want to recover and locate the session from which you want to recover data at file level granularity.
Next, click the check boxes next to the files, folders, or directories that you want to recover, as illustrated by the following screen:
The Destination options appear.
The Schedule options appear.
Note: For more information, see Global Restore Options.
The Restore Media dialog opens to display a list of the media that is required to perform the operation.
The Session User Name and Password dialog opens.
If the CA ARCserve Unified Data Protection session is protected by a session password then the CA ARCserve Unified Data Protection session password is required. (The CA ARCserve Unified Data Protection session password is the password that was given in the [assign the value for rps for your book] plan for the respective CA ARCserve Unified Data Protection sessions backed up to tape).
The Submit Job dialog opens.
The job is submitted.
|
Copyright © 2014 Arcserve.
All rights reserved.
|
|