Introducing CA ARCserve Backup Agents and Options › Using Options › CA ARCserve Backup UNIX and Linux Data Mover › Best Practices › Best Practices for Protecting Oracle Data › Log Files You Can Use to Analyze Failed Jobs
Log Files You Can Use to Analyze Failed Jobs
CA ARCserve Backup provides you with a variety of log files that you can use to analyze failed jobs.
As a best practice, you should review the log files in the following sequence:
- From the Job Status Manager, analyze the results of the job in the Job Log and the Activity Log.
- Analyze the following debug log files located on the CA ARCserve Backup server:
<ARCSERVE_HOME>\log\tskjob<Job_No>_<Job_ID>.log
<ARCSERVE_HOME>\log\tskjob<Master_Job_No>_<Master_Job_ID>_<Child_Job_ID>.log
<ARCSERVE_HOME>\log\tskjob00_<Staging_Master_Job_ID>_<Migration_Job_ID>.log
- (Optional) Analyze the Tape Engine log file located in the following directory on the CA ARCserve Backup server:
<ARCSERVE_HOME>\log\tape.log
- (Optional) Analyze the Database Engine log file located in the following directory on the CA ARCserve Backup server:
<ARCSERVE_HOME>\log\cadblog.log
- Analyze the Common Agent log file located on the data mover server. The Common Agent log file is located in the following directory on the data mover server:
/opt/CA/ABcmagt/logs/caagentd.log
- (Optional) If you are backing up data that resides on a data mover server, analyze the Device Agent log file located in the following directory on the data mover server:
/opt/CA/ABdatamover/logs/dagent.log
- (Optional) If you are backing up data that resides on a data mover server, and the Device Agent log indicates that a hardware error occurred, analyze the Device SnapIn module log located in the following directory on the data mover server:
/opt/CA/ABdatamover/logs/SnapIn.log
- If the agent running on the data mover server is a file system agent, analyze the Agent log file located in the following directory on the data mover server:
/opt/CA/ABuagent/logs/uag.log
- If the agent running on the data mover server is the Agent for Oracle, analyze the following log files located on the data mover server:
/CA/ABoraagt/logs/oraclebr.log
/opt/CA/ABoraagt/logs/oragentd_JobNO1.log
/opt/CA/ABoraagt/logs/oragentd_JobNO1_JobNO2.log
/opt/CA/ABoraagt/logs/cmdwrapper.log:
/opt/CA/ABoraagt/logs/ca_backup.log:
/opt/CA/ABoraagt/logs/ca_restore.log
$ORACLE_HOME/admin/(name of database)/udump/sbtio.log
How to Configure UNIX and Linux Data Mover and the Agent for Oracle in an Oracle RAC Environment
To configure the agent for oracle in a Real Application Cluster (RAC) environment, you must install and configure the Agent for Oracle and UNIX and Linux Data Mover on at least one node that is integrated with an Oracle RAC environment. The node must be able to access all archive logs. You can install the Agent for Oracle and UNIX and Linux Data Mover on more than one node in the RAC, and each node in the RAC must also have access to all archive logs.
CA ARCserve Backup lets you configure the Agent for Oracle in an RAC environment to back up and restore data to data mover servers using the following configurations:
With the above configurations, CA ARCserve Backup can connect to any available node in your RAC environment to back up and restore Oracle RAC databases.
Configure the Agent for Oracle in an Oracle RAC Environment Using the Real Host Name
CA ARCserve Backup lets you configure the Agent for Oracle using the real host name for each node in your Oracle RAC environment.
Configure the Agent for Oracle in an Oracle RAC environment using the real host name
- To back up Oracle databases to tape libraries connected to data mover servers, verify that the tape libraries are shared with the primary server and the nodes that you want to back up.
- Install the Agent for Oracle and UNIX and Linux Data Mover on the nodes.
- Register the data mover servers with the primary server. For more information, see How to Register the Data Mover Server with the Primary Server.
Note: As a best practice, you should register all nodes that contain Oracle databases in an RAC environment exclusively with one primary server.
After you install the Agent for Oracle and UNIX and Linux Data Mover on the nodes, Setup prompts you to register the node (data mover server) with the primary server. In this scenario, you can register the real host name of the nodes with the primary server. Optionally, you can register the data mover server with primary server later by executing the following command on the data mover server:
# regtool register
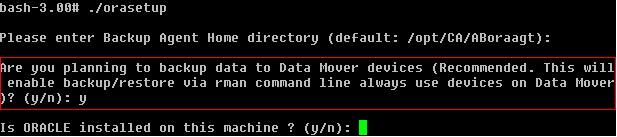
- To configure the Agent for Oracle, execute orasetup on the data mover server.
# ./orasetup
Note: The orasetup script is stored in the Agent for Oracle installation directory on the data mover server.
- When orasetup prompts you to back up data to the local data mover server, specify y as illustrated by the following screen:
- When orasetup prompts you to specify the name of the Oracle RAC instance, specify the real instance ID as illustrated by the following screen:

- Follow the prompts and specify the required data to complete orasetup.
Configure the Agent for Oracle in an Oracle RAC Environment Using the Virtual Host Name
CA ARCserve Backup lets you configure the Agent for Oracle using the virtual host name for each node in your Oracle RAC environment.
Configure the Agent for Oracle in an Oracle RAC environment using the virtual host name
- To back up Oracle databases to tape libraries connected to data mover servers, verify that the tape libraries are shared with the primary server and the nodes that you want to back up.
- Install the Agent for Oracle and UNIX and Linux Data Mover on the nodes.
- Log in to the CA ARCserve Backup primary server.
Open the Hosts file located in the following directory:
%WINDOWS%\system32\drivers\etc\
- Verify that the Hosts file contains the virtual host name/virtual IP address pair for each node where you installed the Agent for Oracle.
Note: If the Hosts file does not contain the virtual host name/virtual IP address pair for each node, execute the following command to verify that the primary server can communicate with the Oracle RAC node through virtual host name.
ping <virtual hostname>
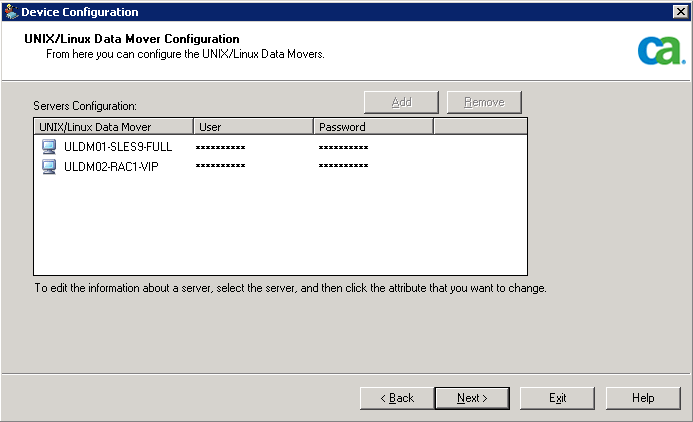
- Open Device Configuration.
Register each node in your Oracle RAC environment with the primary server using the virtual host name of the node. For more information, see Register the Data Mover Server with the Primary Server Using Device Configuration.
Note: If the node was registered with the primary server using the physical host name, click Remove to unregister the node and then click Add to register the node using the virtual host name.
- To configure the Agent for Oracle, execute orasetup on each data mover server.
# ./orasetup
Note: The orasetup script is stored in the Agent for Oracle installation directory on the data mover server.
- When orasetup prompts you to back up data to the local data mover server, specify y as illustrated by the following screen:
- When orasetup prompts you to specify the name of the Oracle RAC instance, specify the real instance ID as illustrated by the following screen:
- Follow the prompts and specify the required data to complete orasetup.
- Browse to the Agent for Oracle installation directory on the data mover server.
Open the configuration file named sbt.cfg and modify the following:
- Remove the comments from SBT_DATA_MOVER and set the value to the virtual host name using the following syntax:
SBT_DATA_MOVER=<VIRTUAL_HOSTNAME>
- Remove the comments from SBT_ORIGINAL_CLIENT_HOST and set the value to the virtual host name using the following syntax:
SBT_ORIGINAL_CLIENT_HOST=<VIRTUAL_HOSTNAME>
- Add SBT_SOURCE_NAME to the configuration file and set the value to the virtual host name using the following syntax:
SBT_SOURCE_NAME=<VIRTUAL_HOSTNAME>