

This process explains how an experienced CA 2E Application Developer can use CA 2E web service support with enhanced array support to make an invocation and retrieve an order. This process includes the order header and multiple order detail lines.
Important! The coding examples are designed to illustrate enhanced array support and are not production-ready. For example, the examples do not contain any user-added error handling.
As an experienced CA 2E Application Developer, you want your result to be a deployable 2E Web Service that uses Enhanced Array Support to return multiple-instances of data in a single invocation. In this scenario, we use an Order Header and Order Detail file, and the order has a single order header and multiple detail lines.
The following illustration shows how you complete the process:
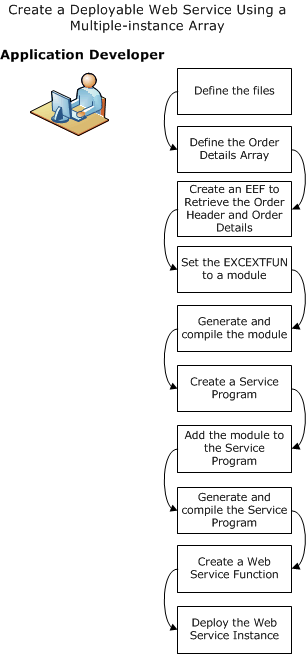
Follow these steps:
Note: This procedure uses individual *MOVE ARRAY statements. As you become familiar with the process, the *MOVE ARRAY, *ALL function helps make your work more efficient.
We assume the following basic file definitions for the process:
Note: The field types are not critical to this scenario, so you can define field type as you see fit.
Order Header Files
If your screen shows the Order Header File as:
Order header			Known by			Order Number

Order header			Has			Customer Name

Order header			Has			Order Date
Then the Order Header Records look like this example:
|
Order Number |
Customer Name |
Order Date |
|---|---|---|
|
10001 |
John Doe |
123111 |
|
10002 |
Jane Doe |
022811 |
Order Detail File
If your screen shows the Order Detail File as:
Order detail			Owned by			FIL Order Header

Order detail			Known By			FLD Line Number

Order detail			Refers to			FIL Product

Order detail			Has			FLD Quantity
Then the Order Detail Records look like this example:
|
Order Number |
Line Number |
Product Code |
|
|---|---|---|---|
|
10001 |
1 |
BH |
101 |
|
10001 |
3 |
IP5 |
103 |
|
10002 |
1 |
BH |
201 |
|
10002 |
3 |
LH |
203 |
Note: Product code refers to the product file. For example, LH refers to Little Hammer and BH refers to Big Hammer.
Product File
FIL Product                   Known by         FLD Product code

FIL Product                   Has              FLD Product description

FIL Product                   Has              FLD Product price date

FIL Product                   Has              FLD Product price
|
Product code |
Product description |
Product Date |
Product Price |
|---|---|---|---|
|
BH |
Big Hammer |
20010101 |
23.45 |
|
LH |
Little Hammer |
20101010 |
18.97 |
|
IP5 |
Ice Pick |
20020202 |
299.00 |
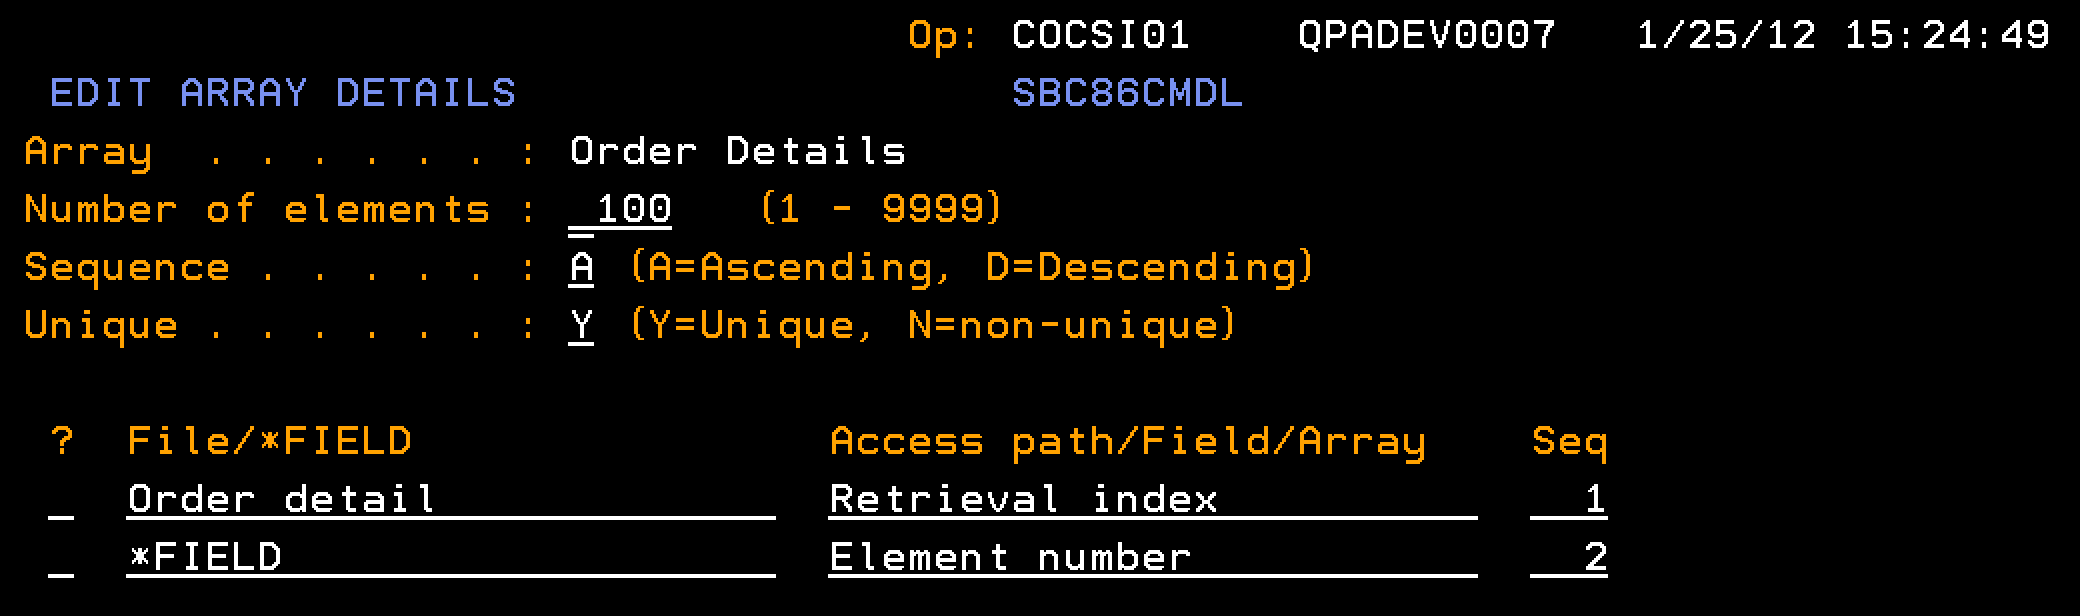
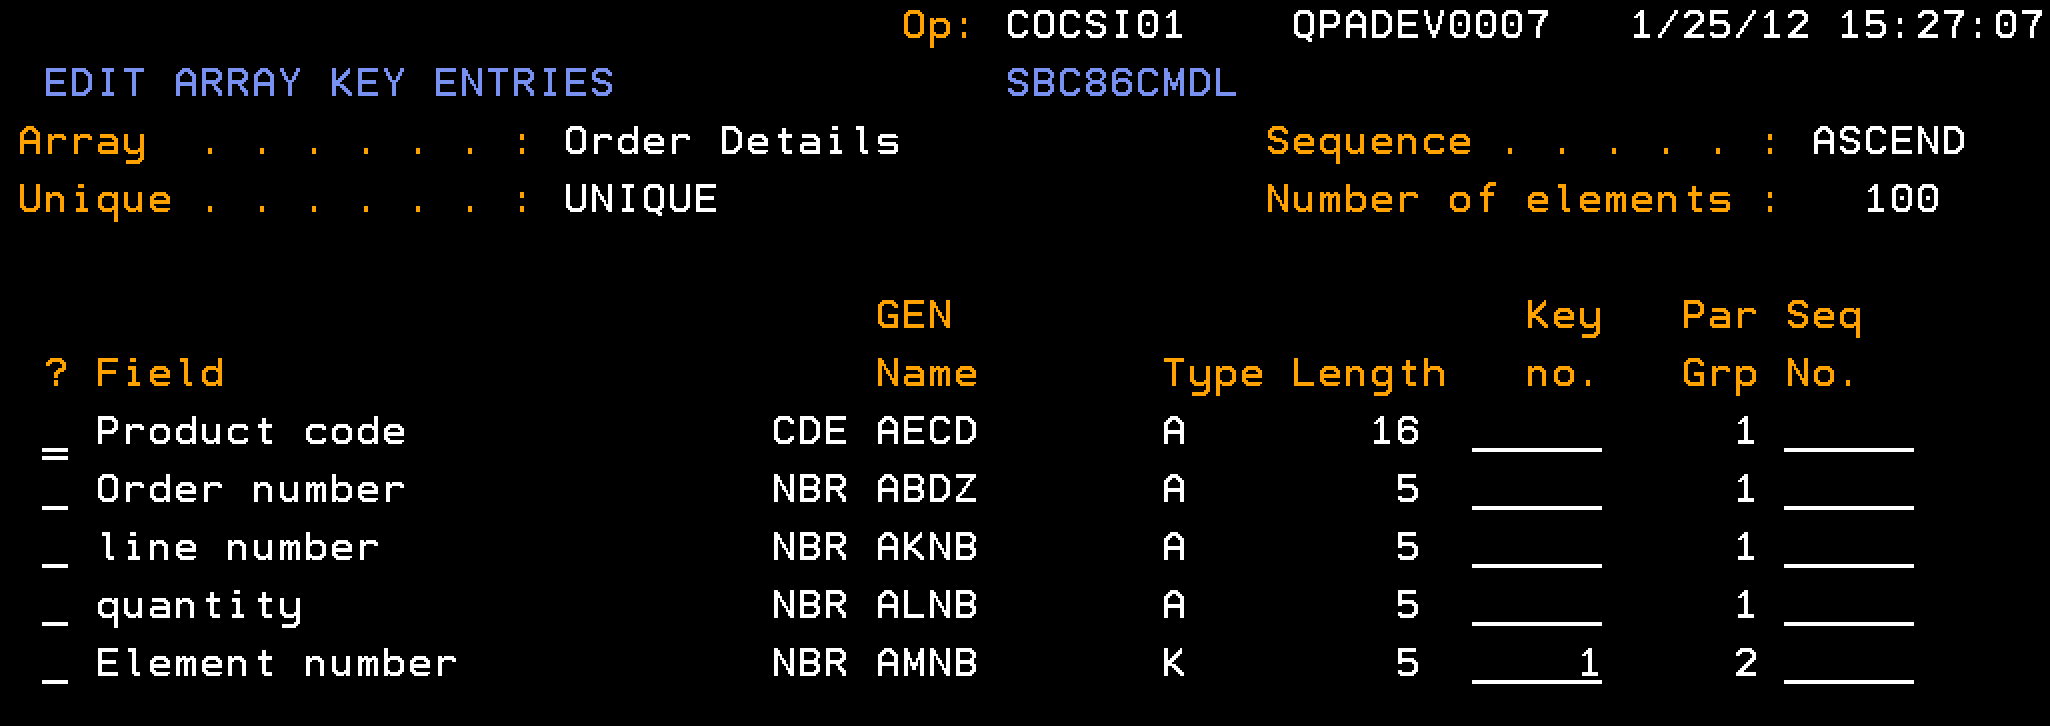
We assume the following array definition for the process.
Note: The Element number field should be of type NBR.
Follow these steps:
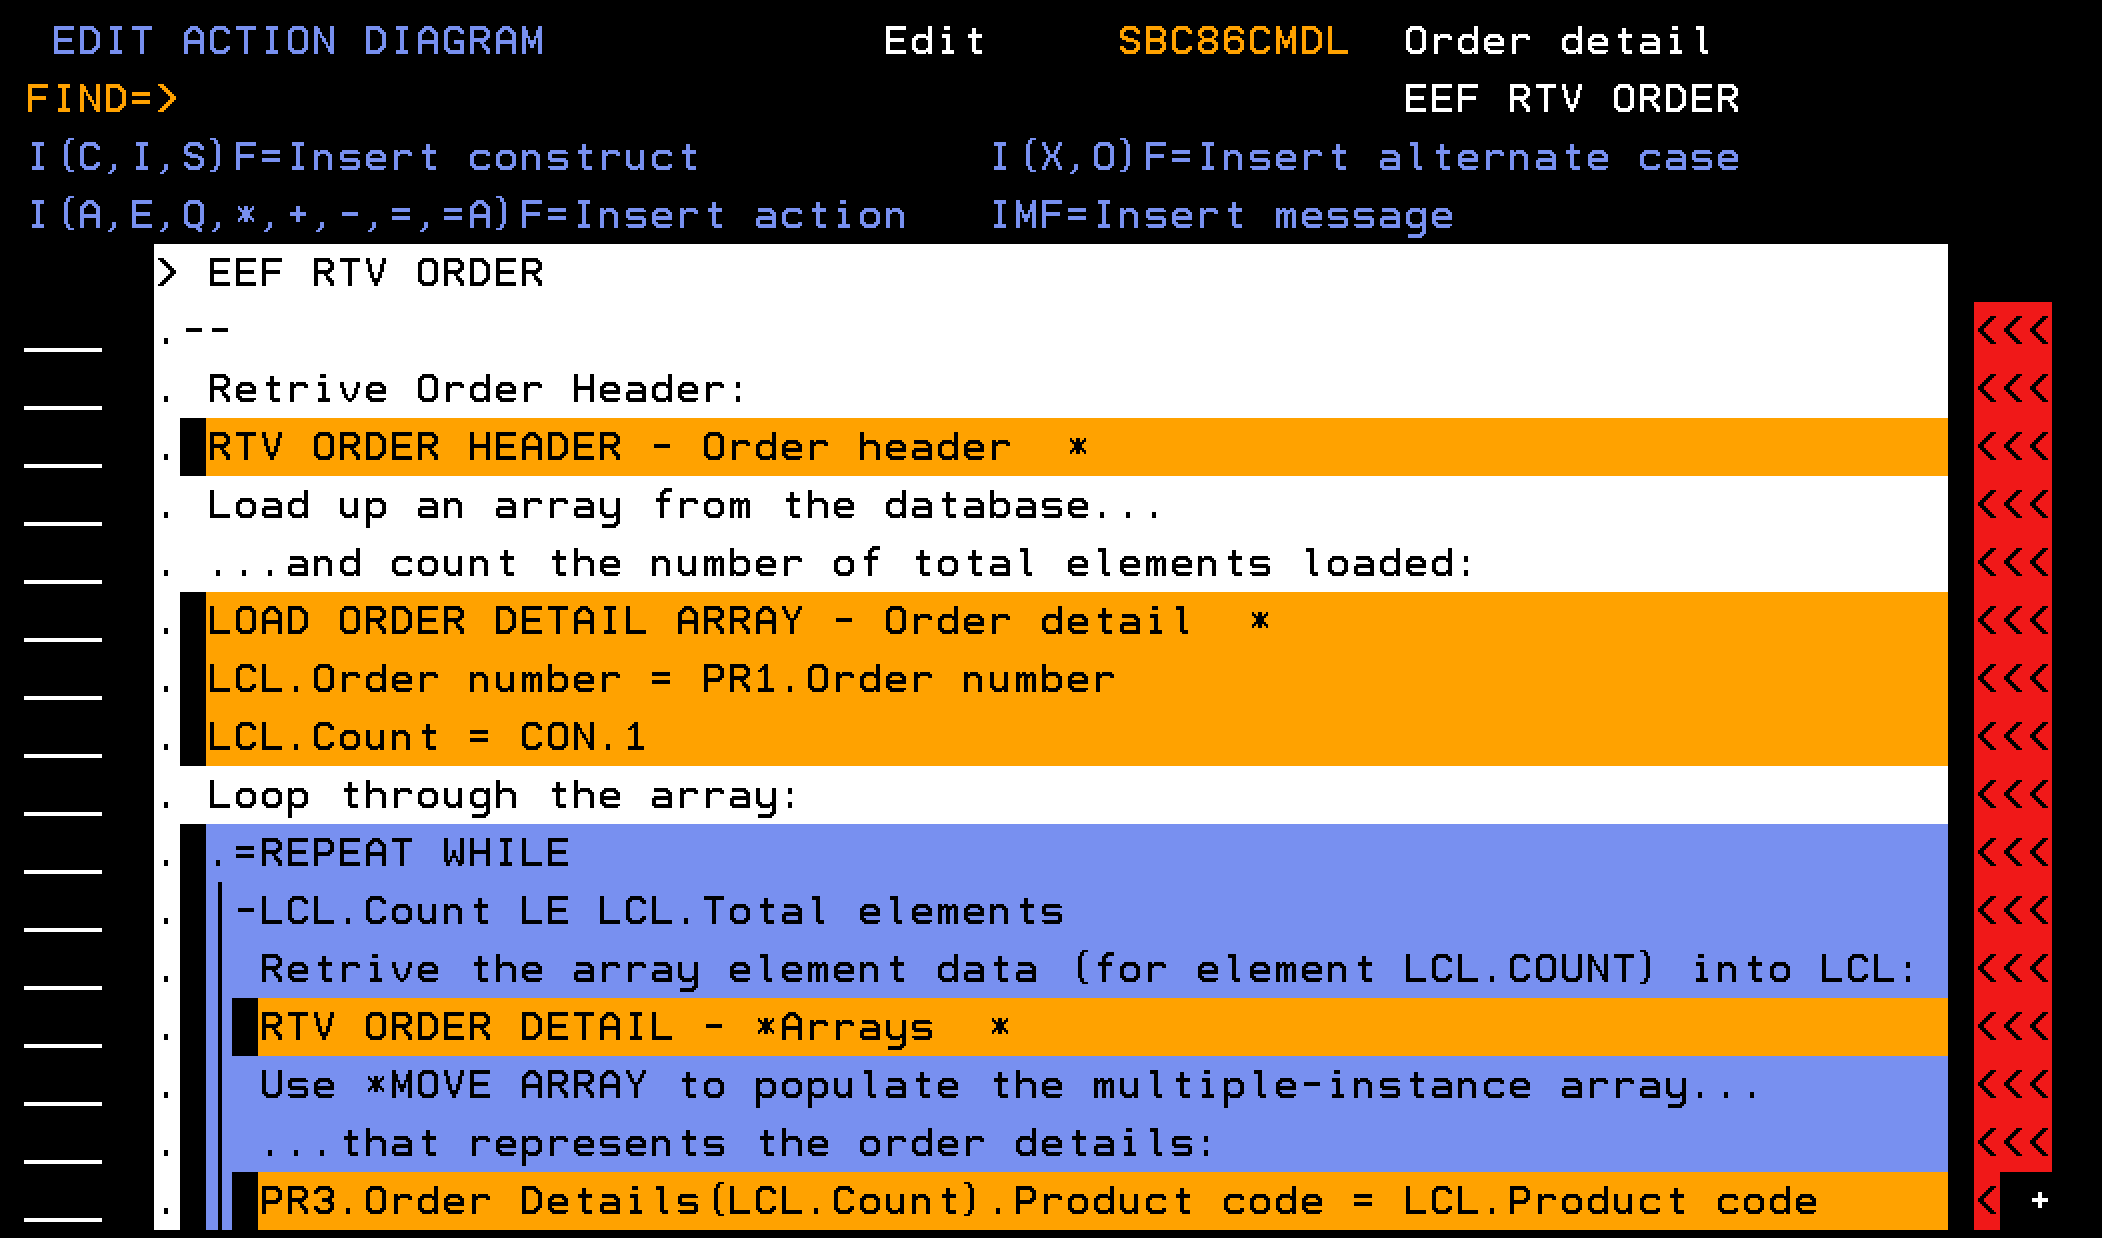
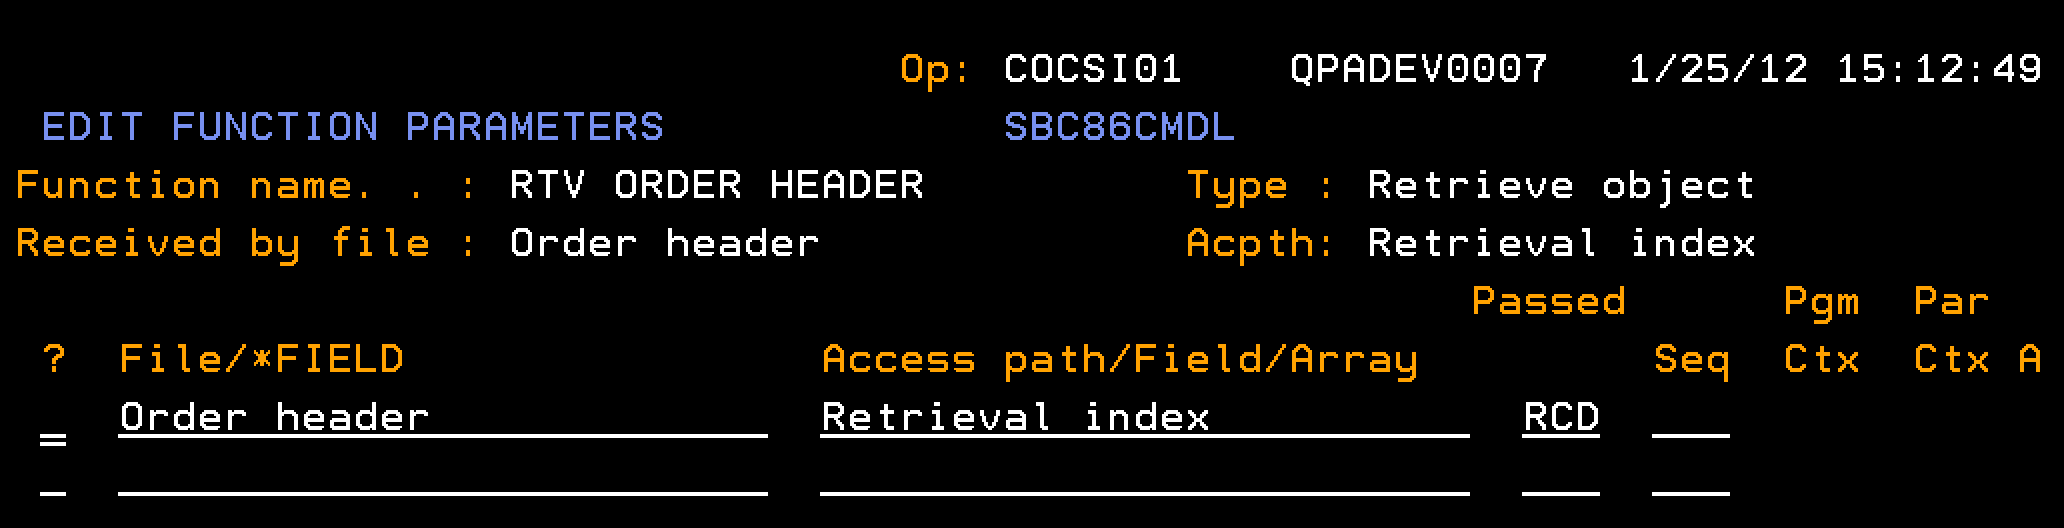
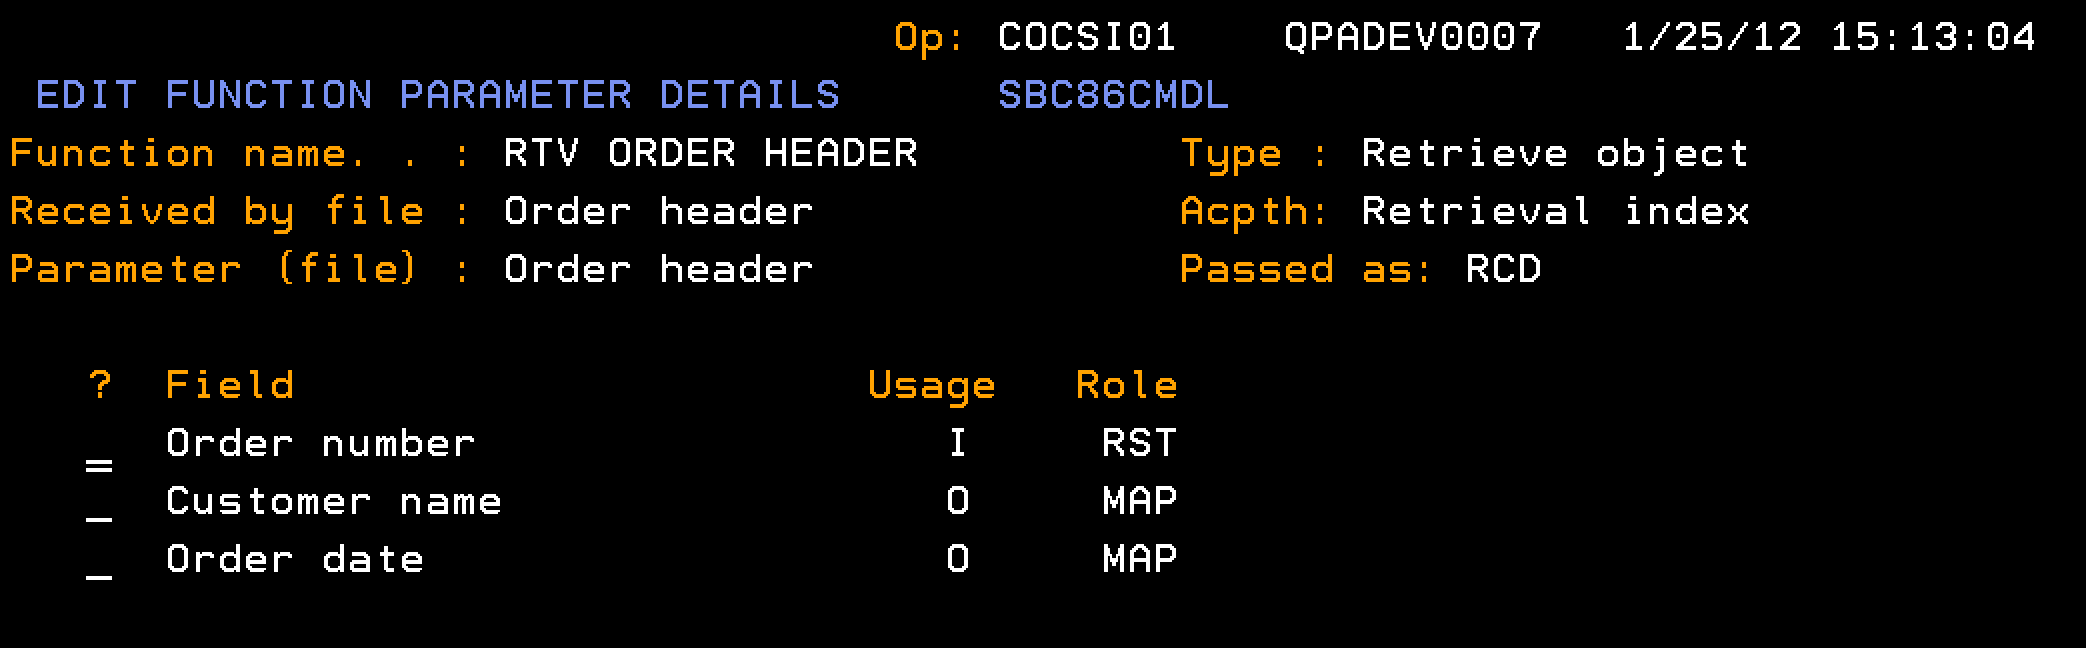
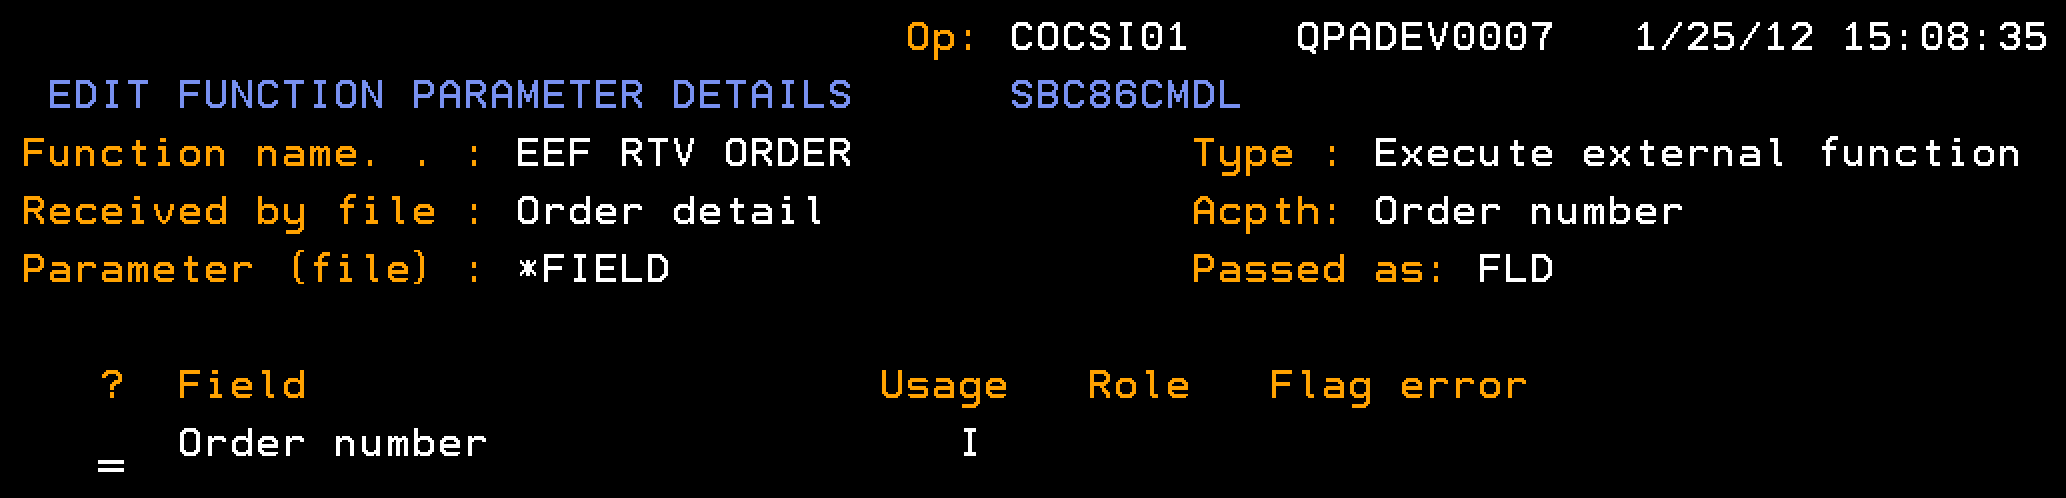
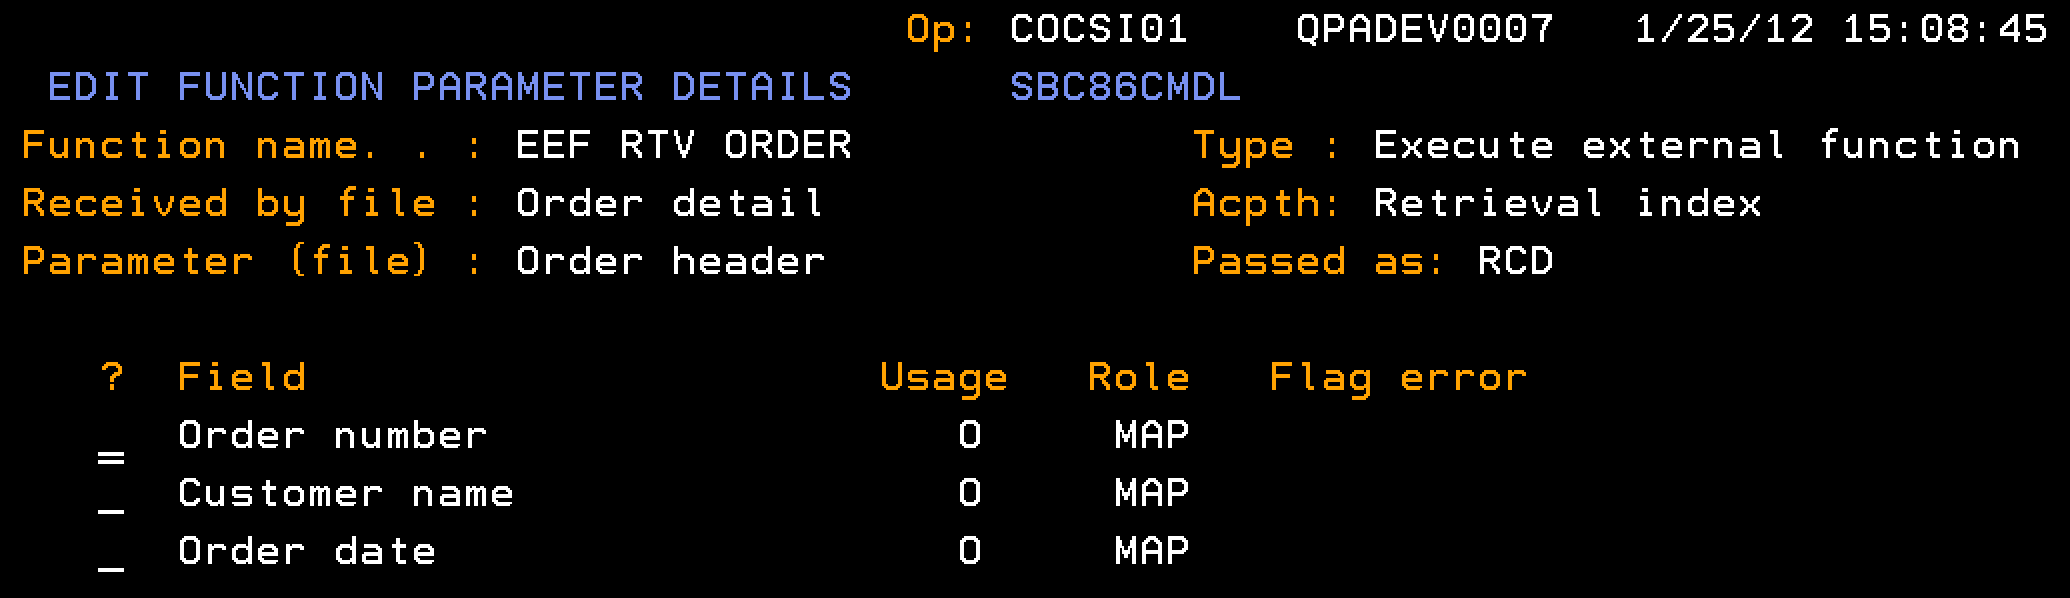
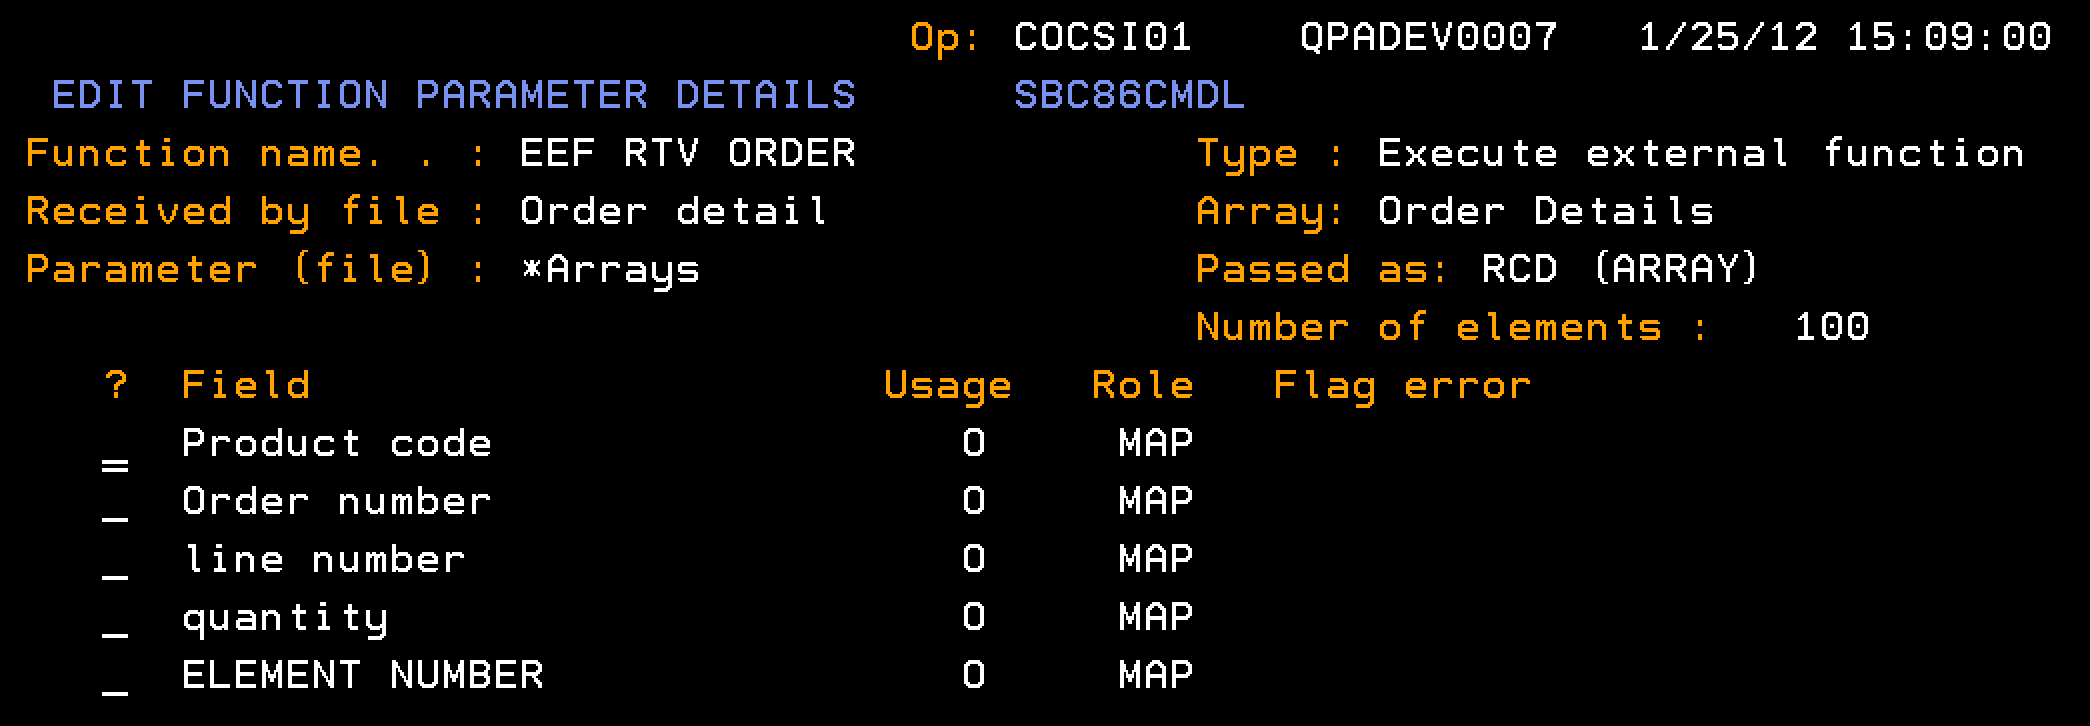
The function EEF RTV ORDER, EXCEXTFUN type, based over the Order Detail file takes an input parameter of an order number and returns order information as output parameters as follows:
This section describes how to define the EXCEXTFUN to include parameter interface and action diagram business logic, including calls to other functions. After you complete the steps in this section, your Action Diagram should match these example screens:
Important! As a CA 2E developer, you need to understand the architectural distinction between the two mechanisms to manipulate array data, despite the ability to use a common structural definition:
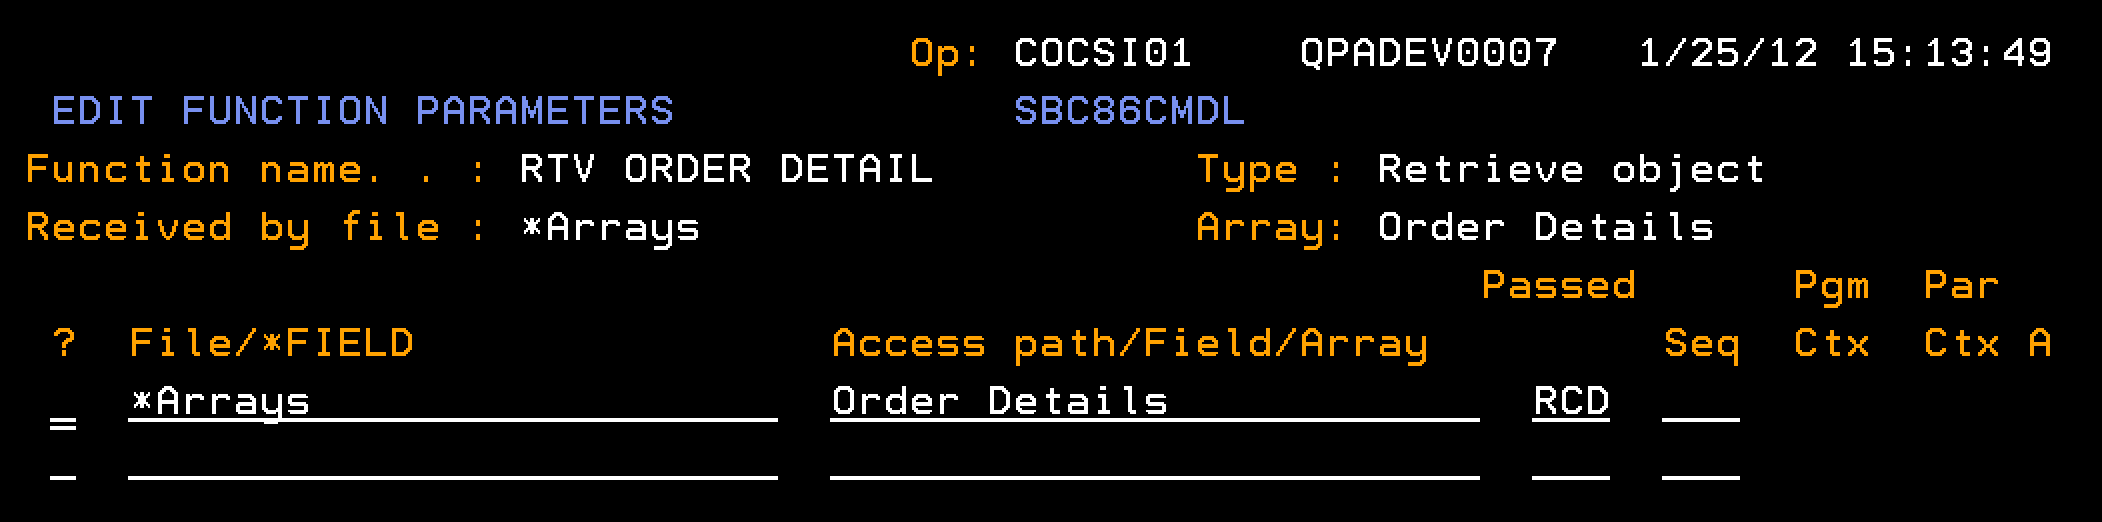
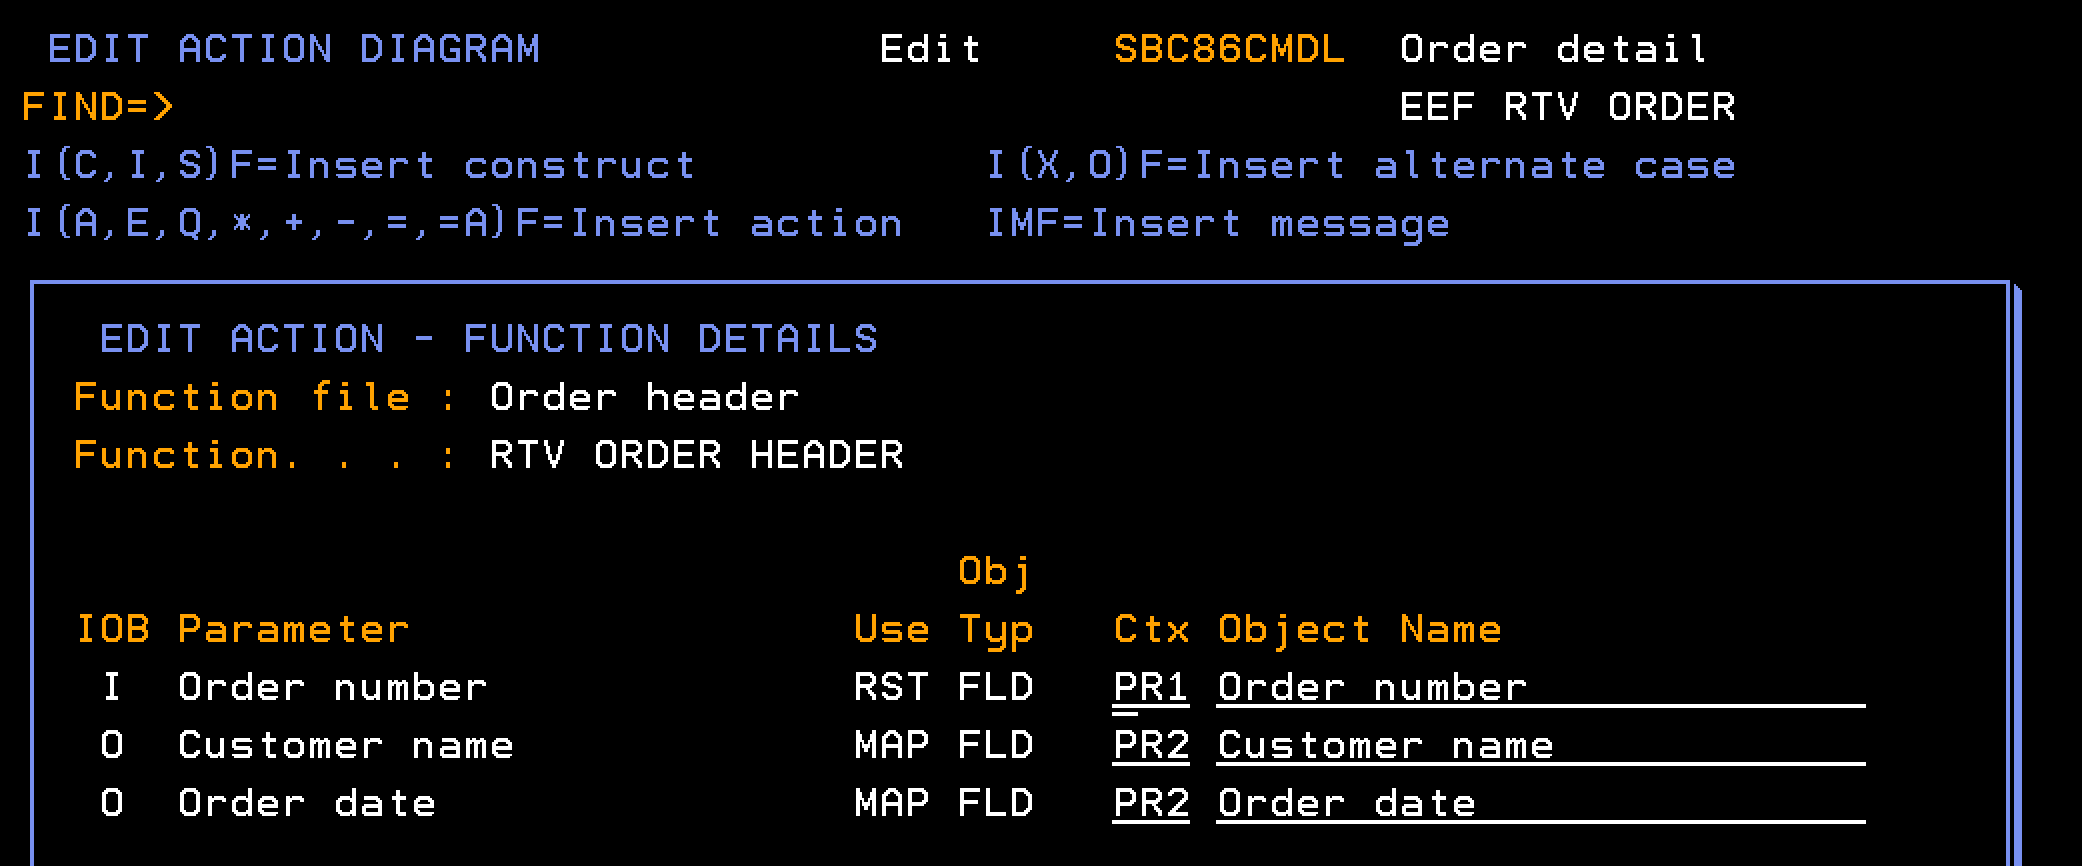
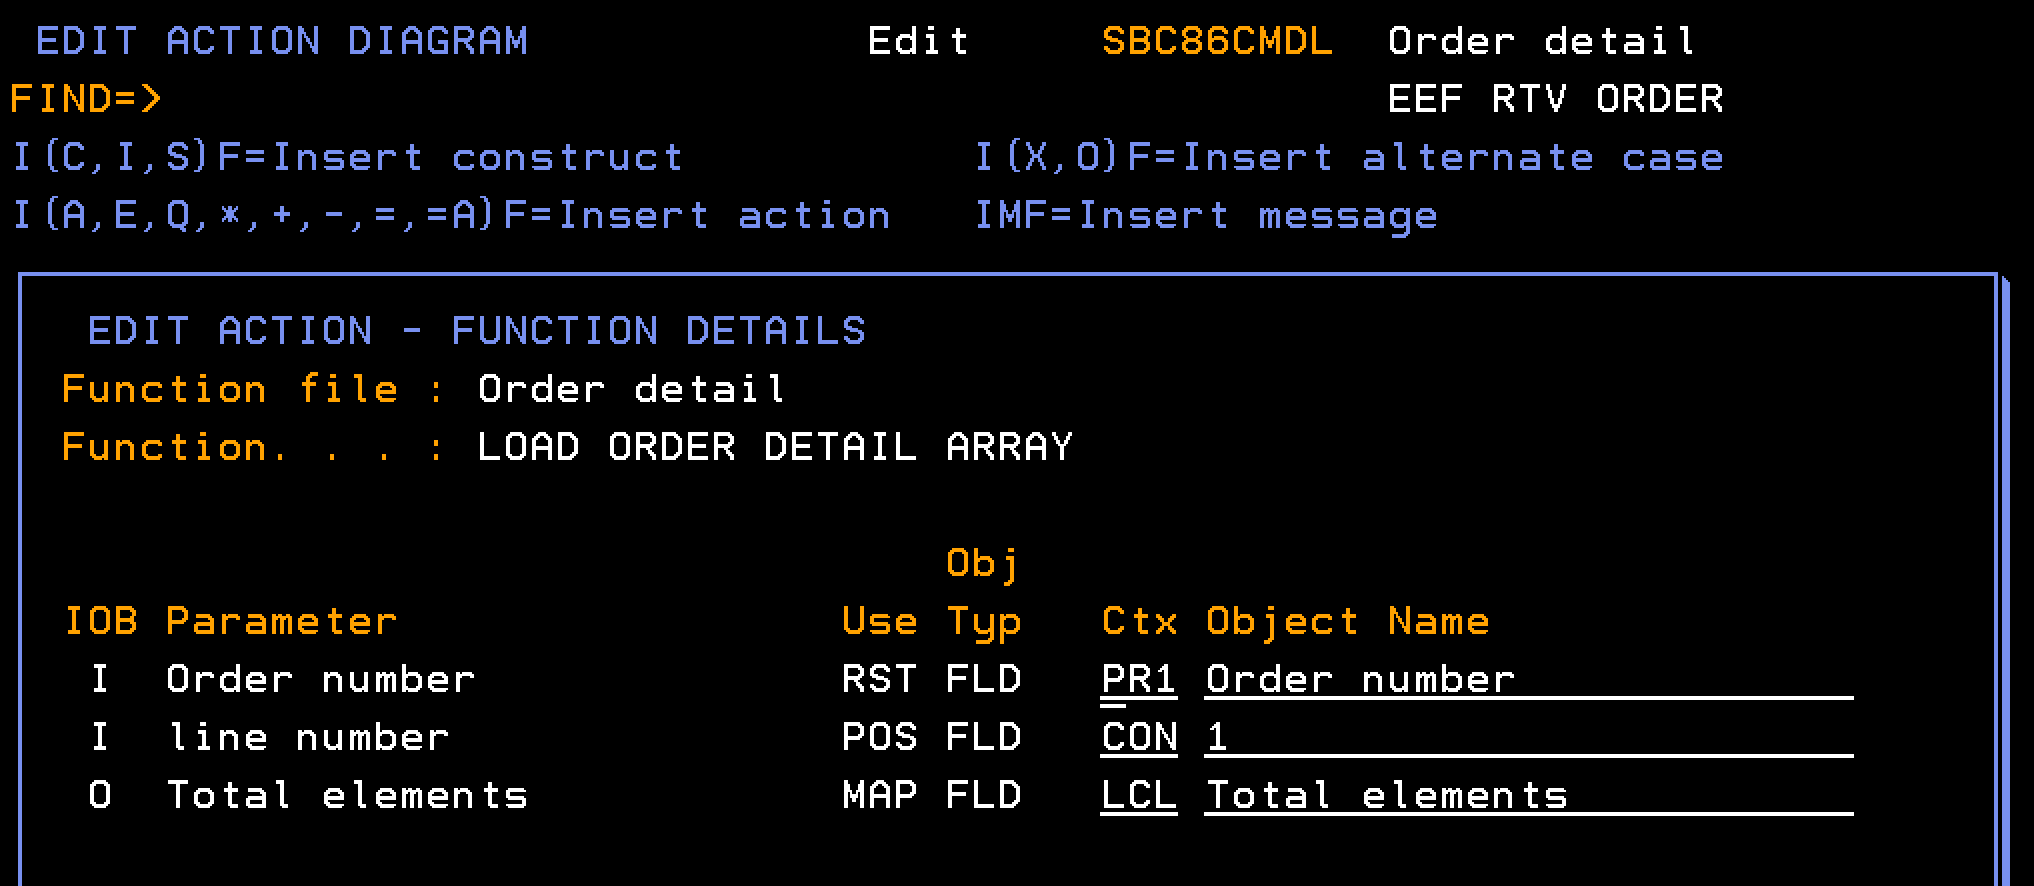
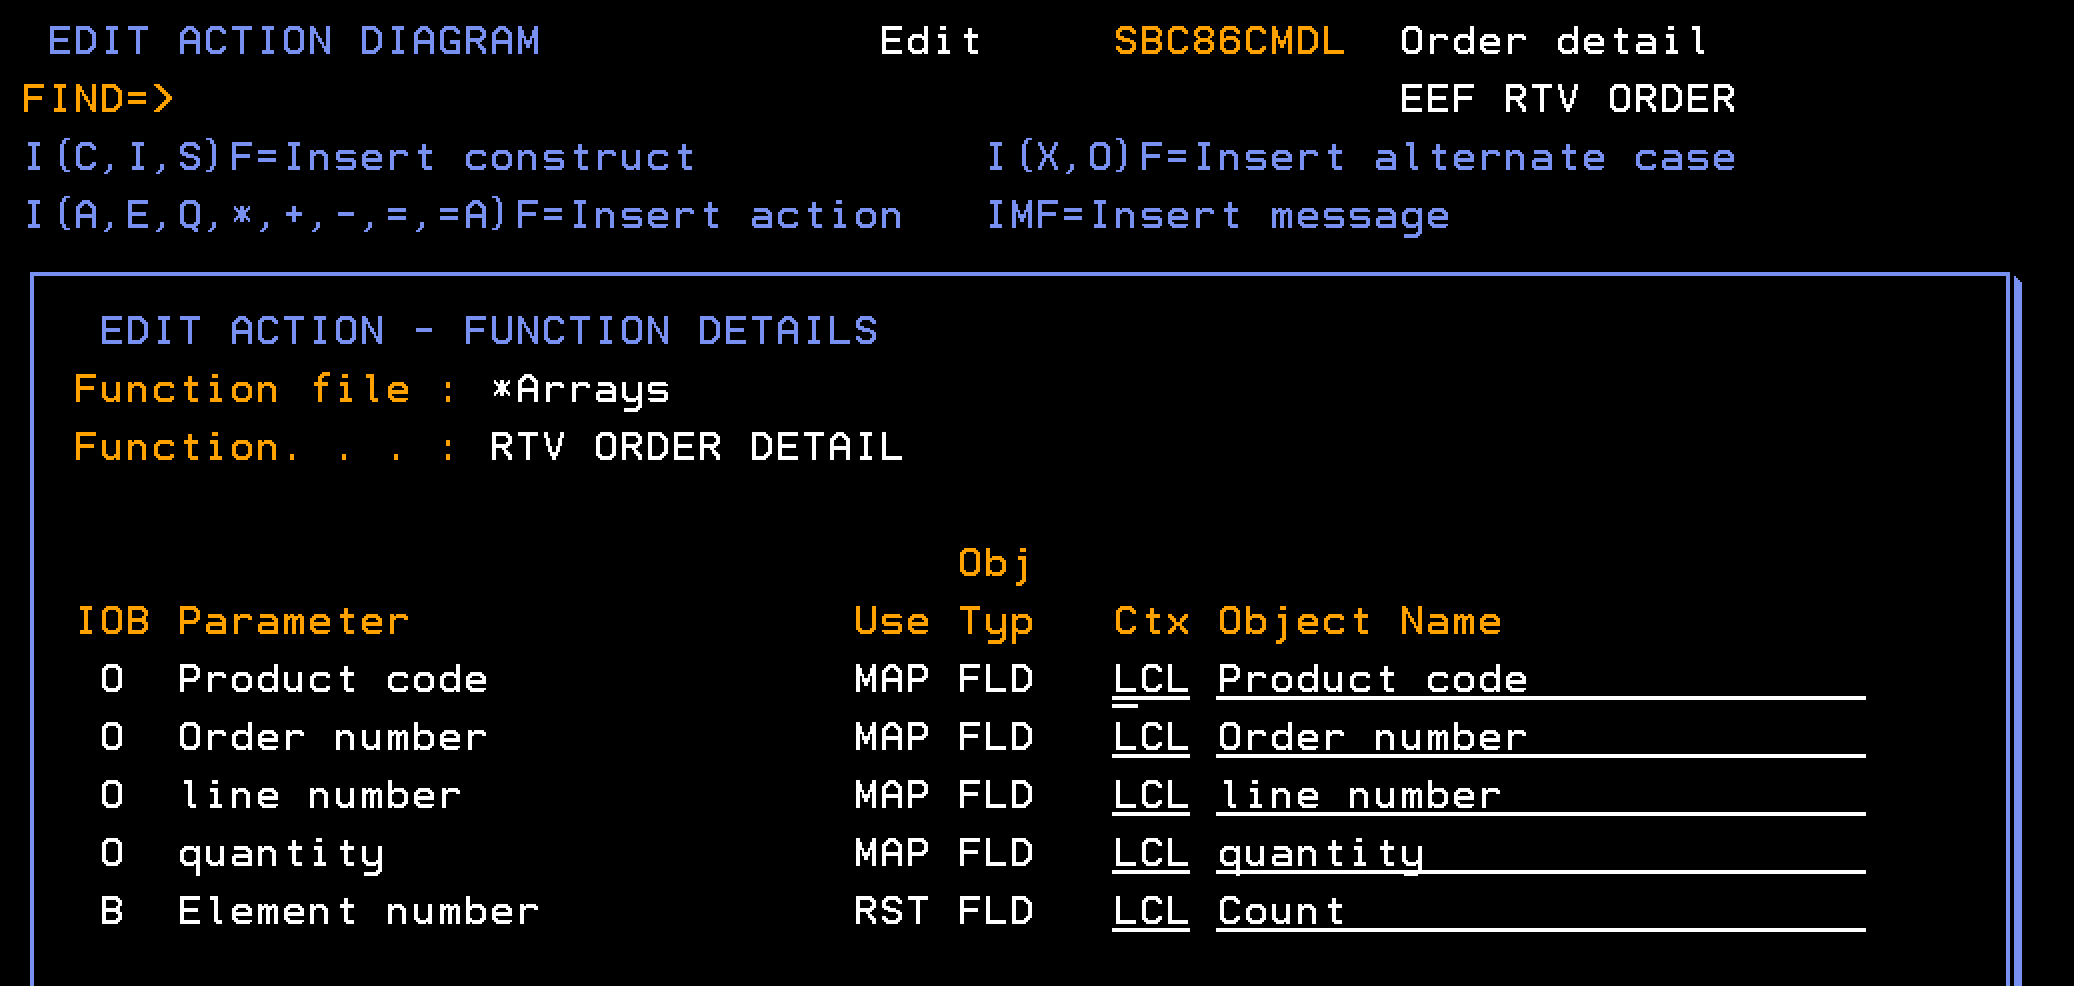
Note: The function EEF RTV ORDER (Order Detail) relies on four other internal functions, as listed in the following table.
|
Function Name |
Function Type |
Based over file |
|---|---|---|
|
RTV ORDER HEADER |
RTVOBJ |
Order header |
|
RTV ORDER DETAIL |
RTVOBJ |
*Arrays |
|
CRT ORDER DETAIL |
CRTOBJ |
*Arrays |
|
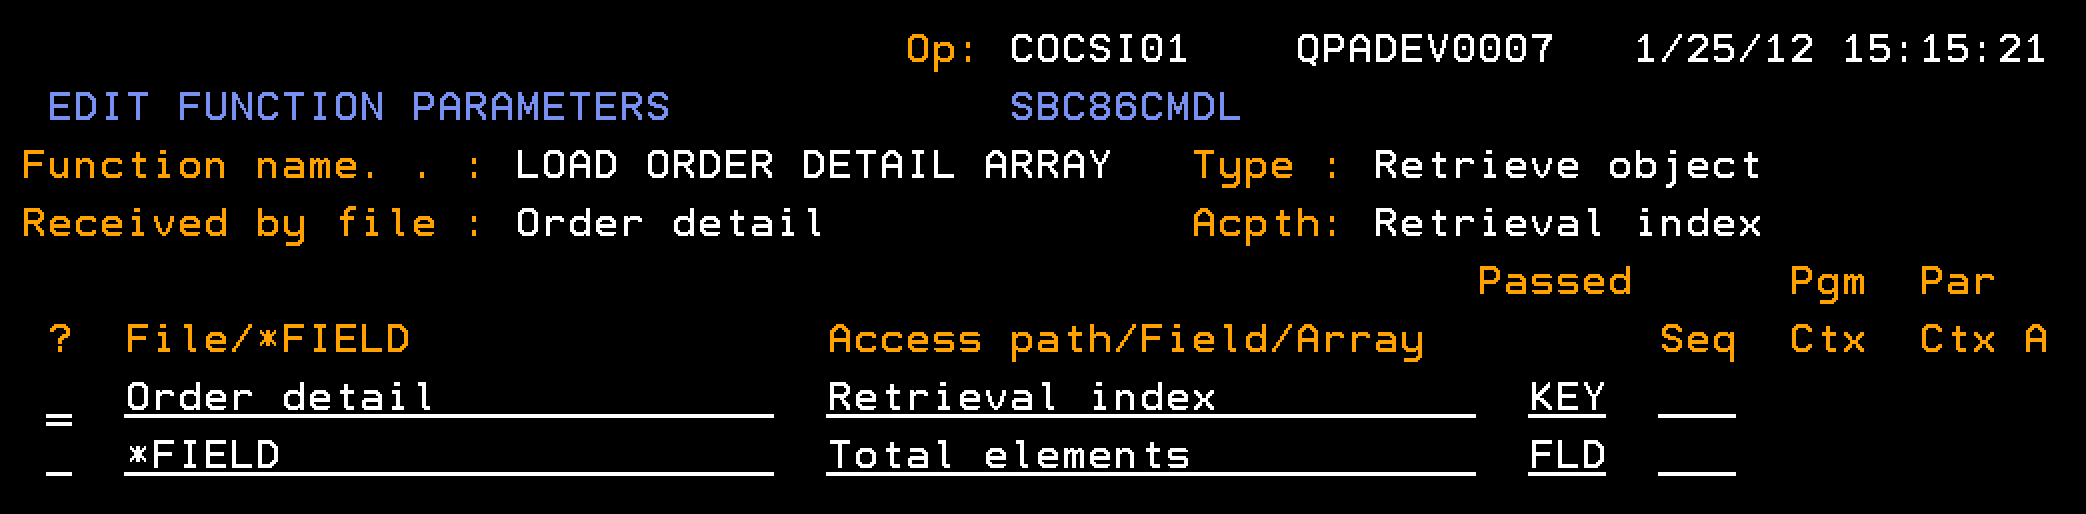
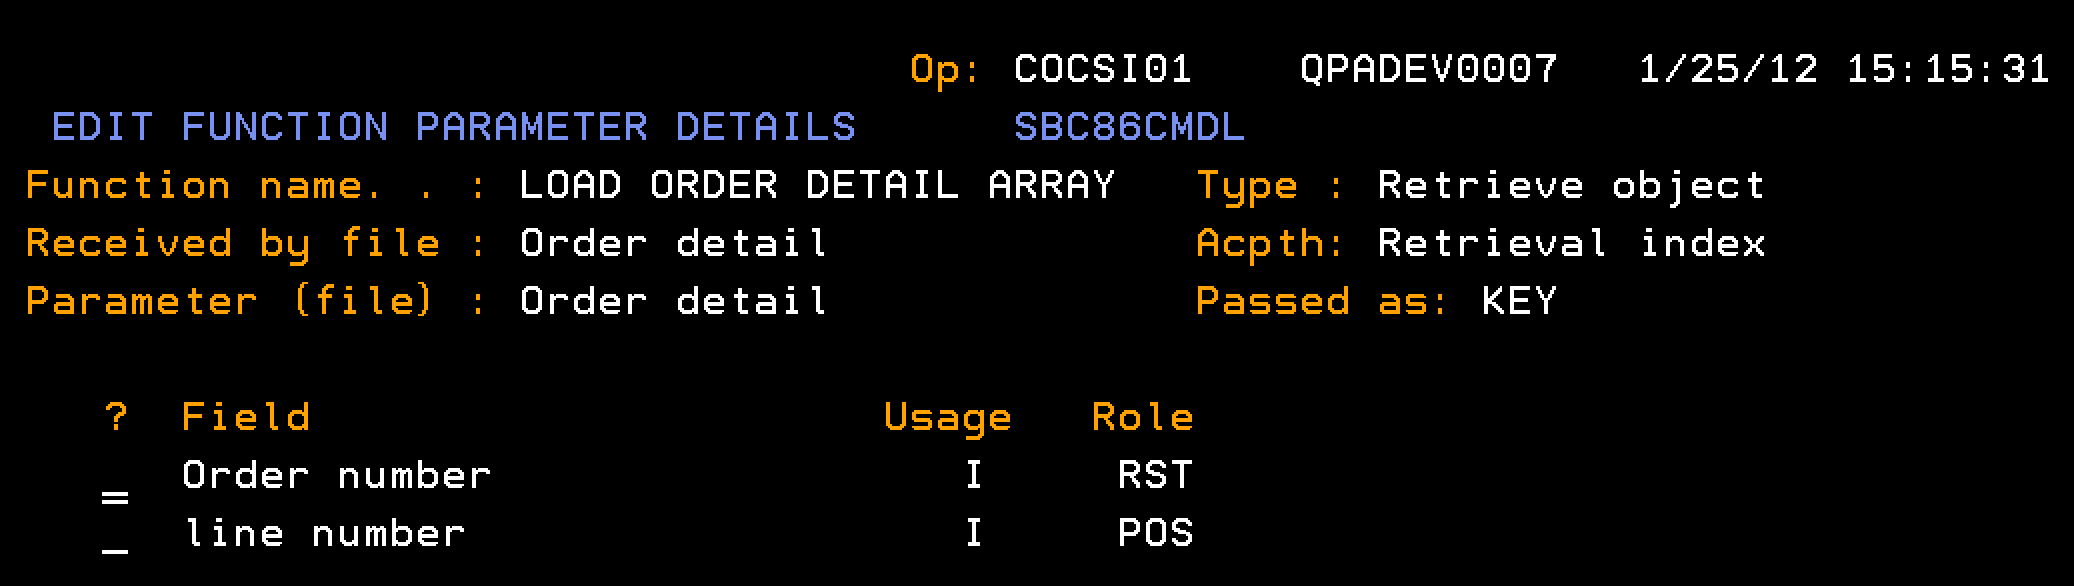
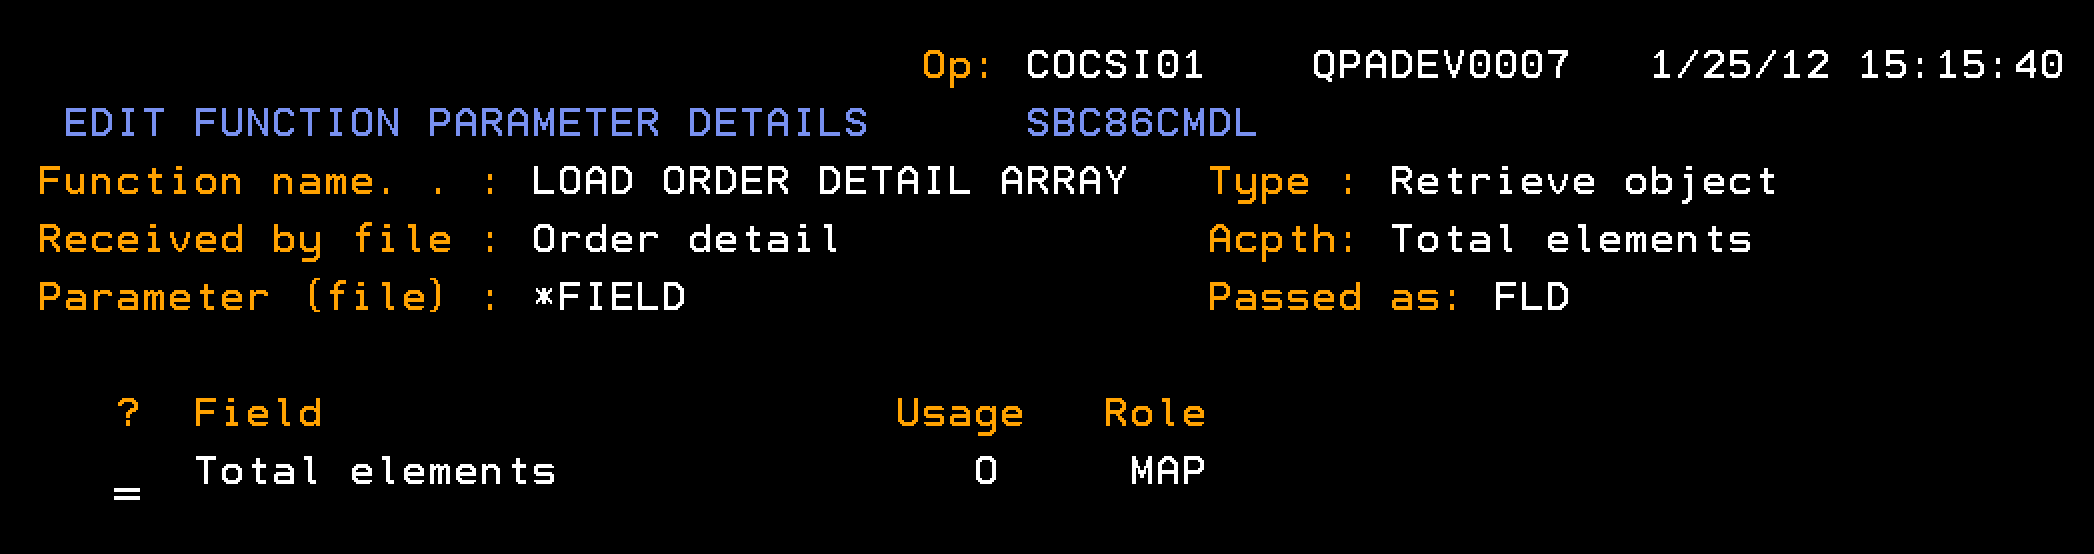
LOAD ORDER DETAIL ARRAY |
RTVOBJ |
Order detail |
|
EEF RTV Order |
EXCEXTFUN |
Order detail |
You need to build the required internal functions and the external function EEF RTV ORDER (Order detail):
Note: The file the functions is based over is shown in parentheses.
Follow these steps:
This section explains how you retrieve information about an order header record, given an order number.
Follow these steps:
This example shows User Points that are not empty.

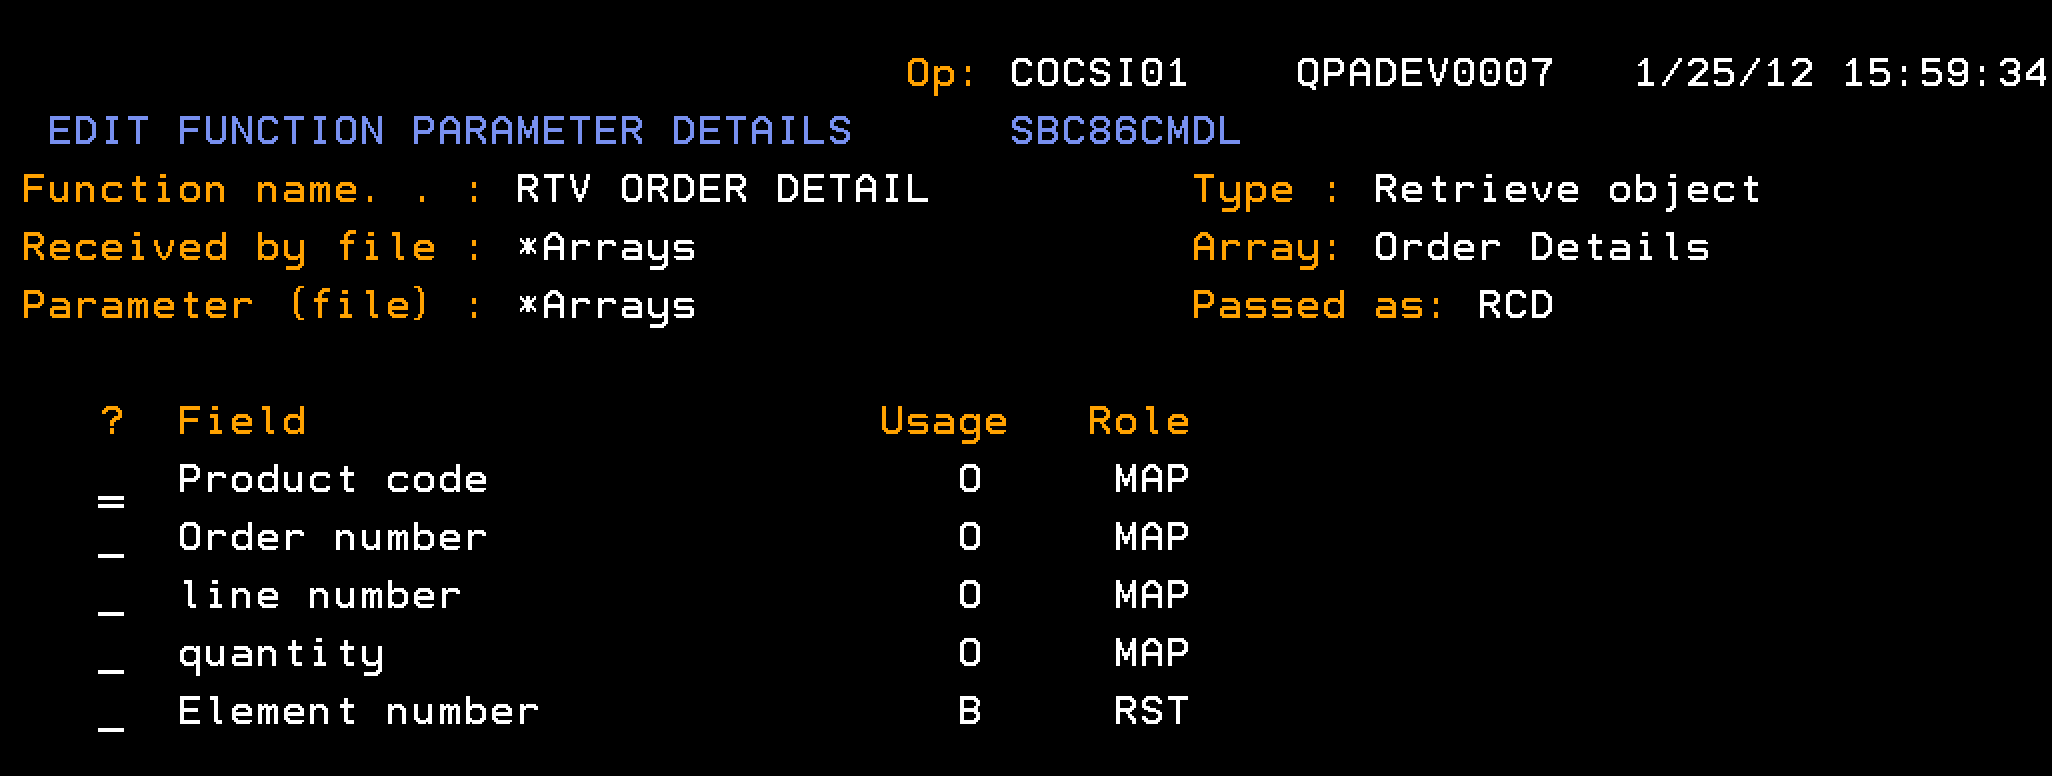
This section describes how you retrieve the data for a single element in the Order Details array. You need to configure the RTV ORDER DETAIL to retrieve the data for a single element in the Order Details array.
Follow these steps:
This section describes how you configure the CRT ORDER DETAIL to populate the data for a single element in the Order Details array.
Follow these steps:
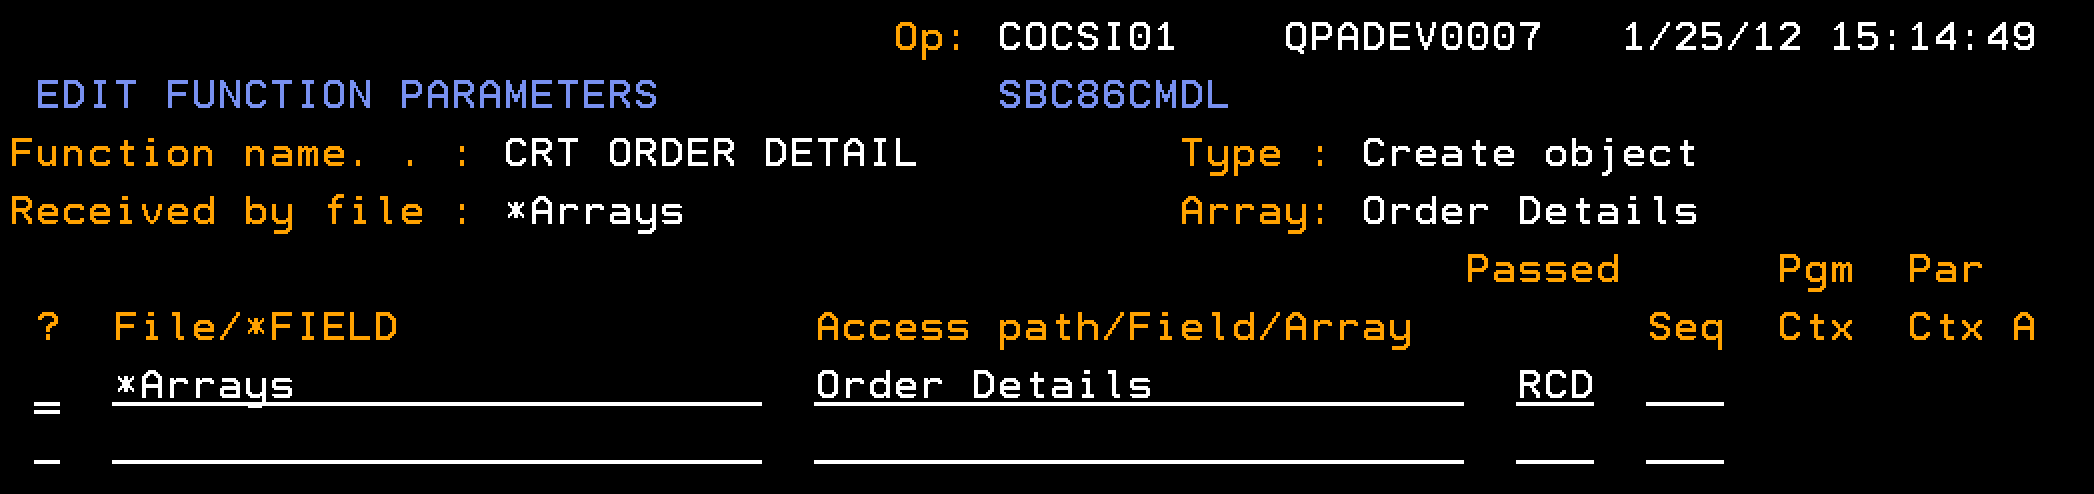
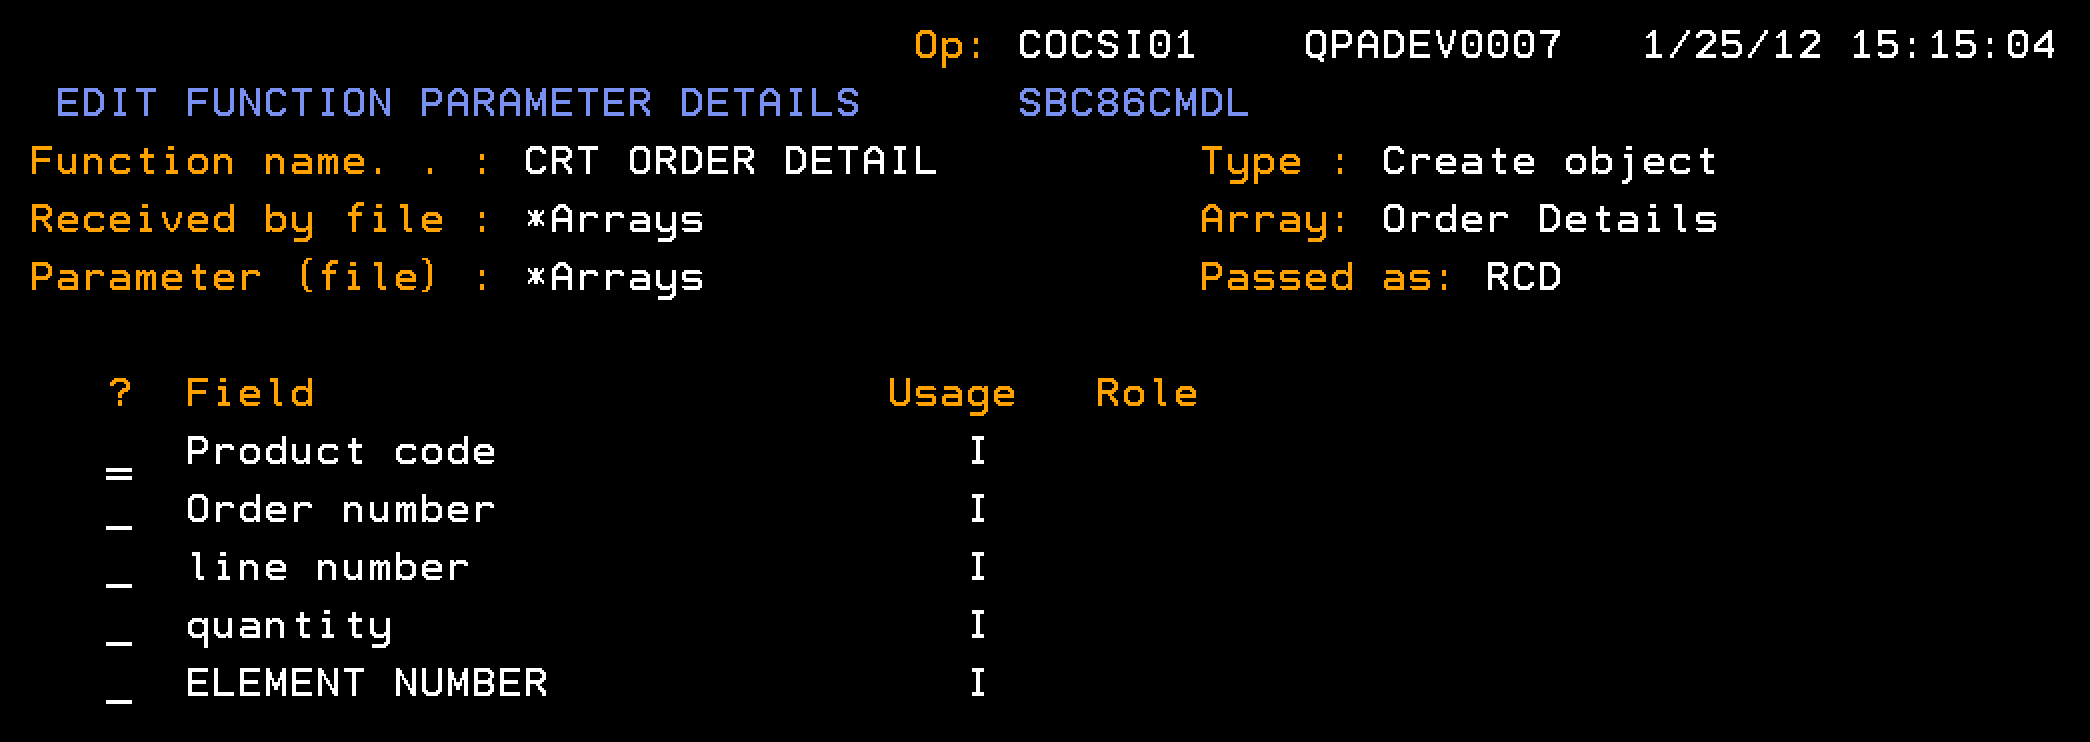
Note: The CRT ORDER DETAIL contains no user-added processing in the action diagram.
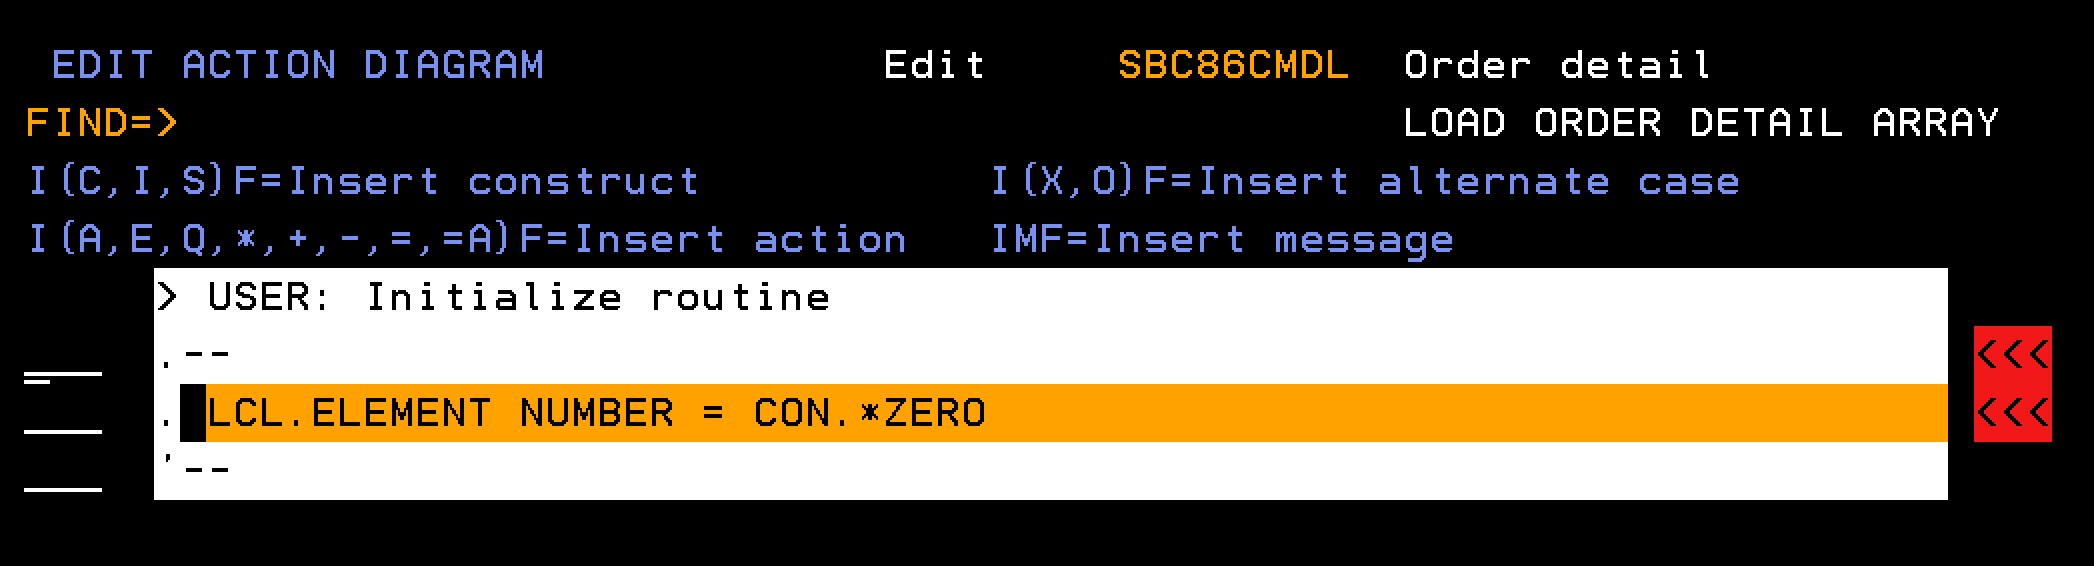
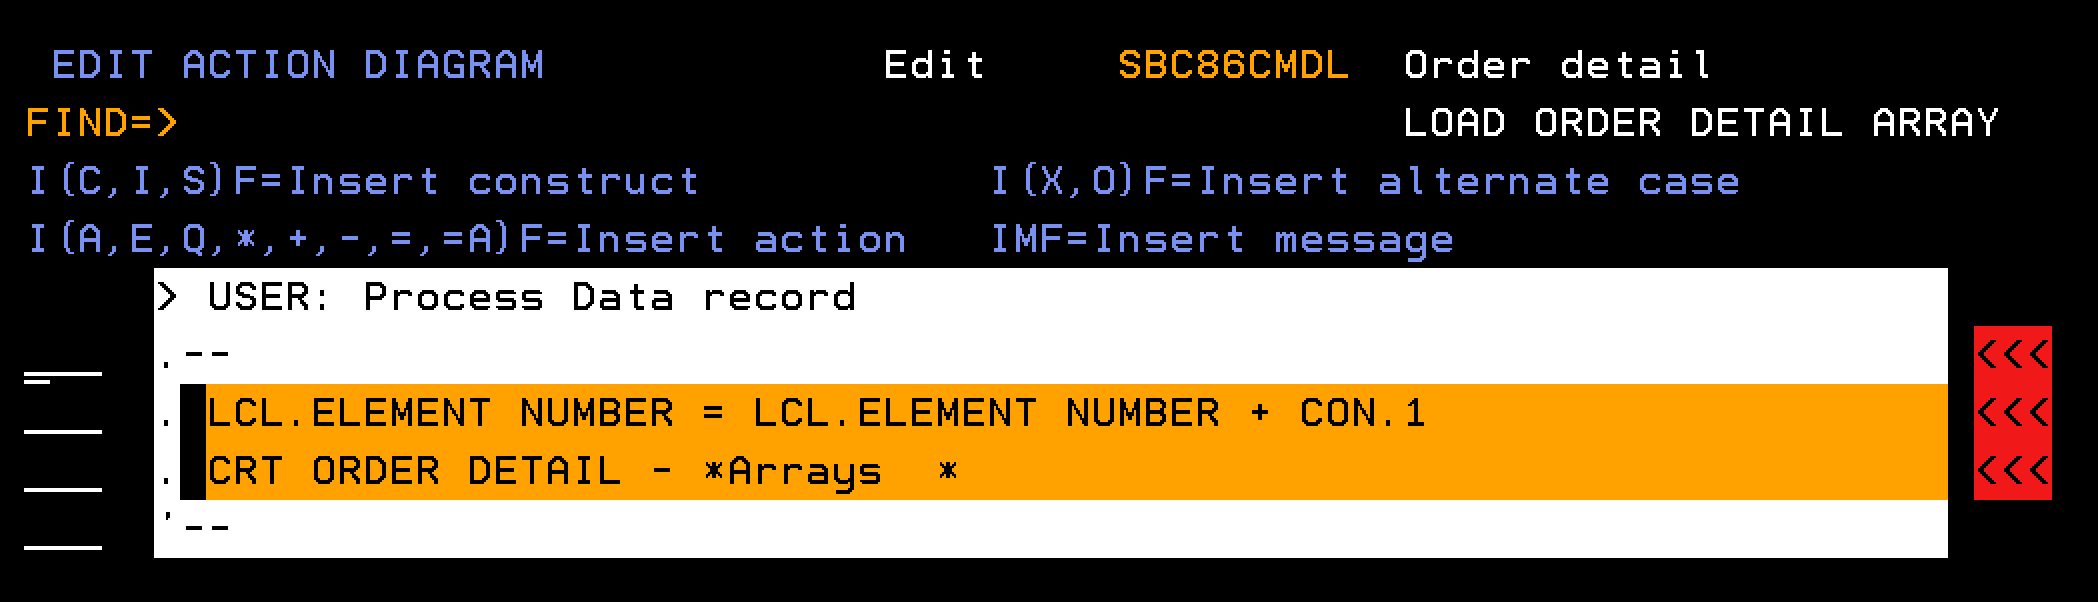
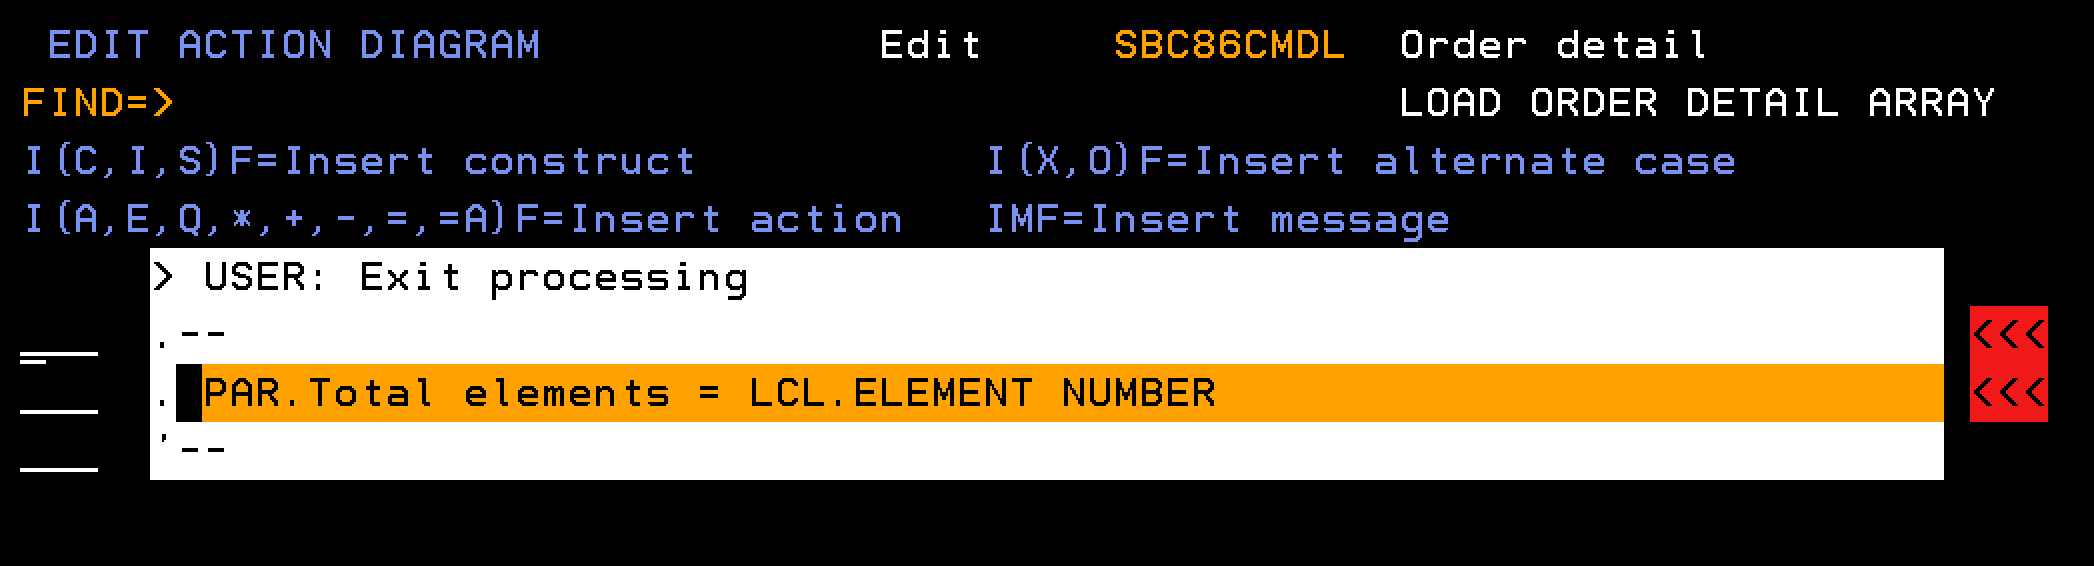
This section explains how to define a function to populate the Order Detail array. The processing runs through the database to find all order detail lines for a given order number. Each detail line is added as a single element in the Order Details array.
Follow these steps:
Note: Define the field Total elements as type NBR.

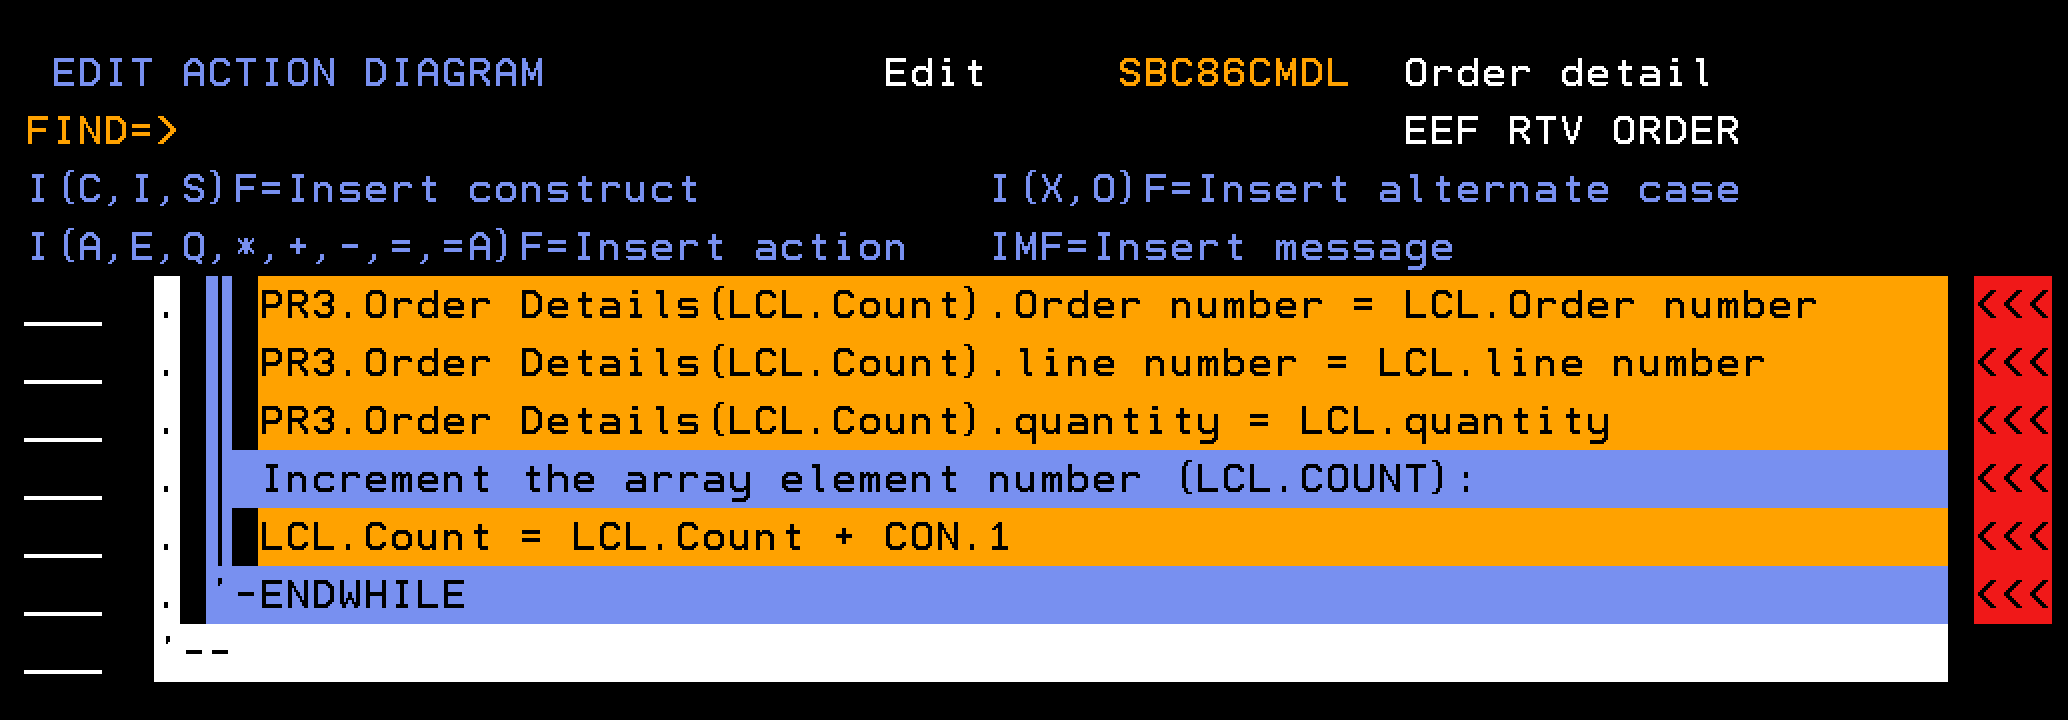
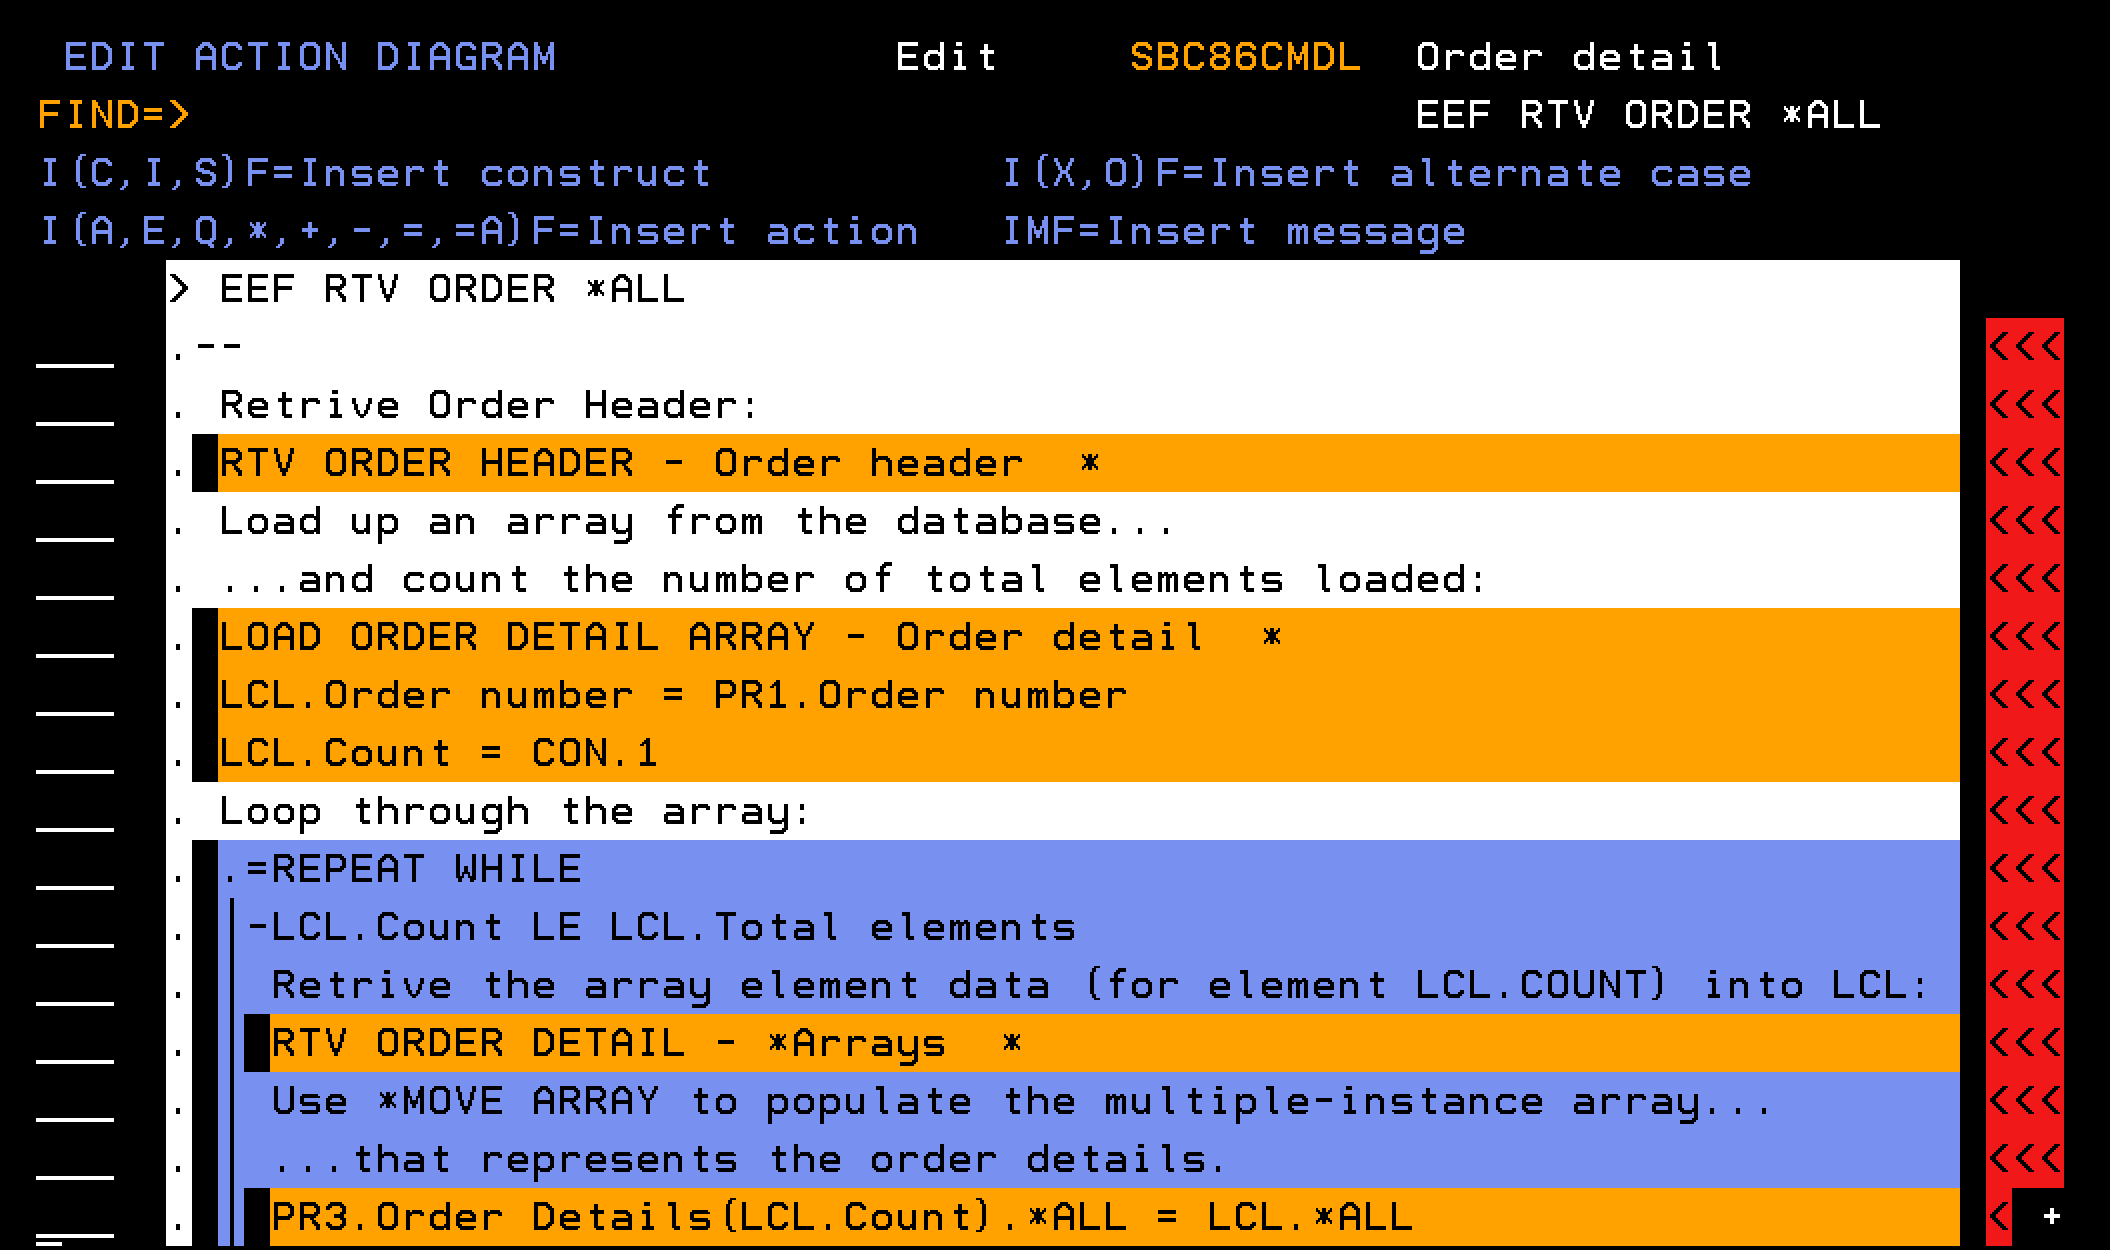
This section describes how you define the external function EEF RTV Order (Order detail) including the parameter interface and action diagram business logic. The EEF RTV Order (Order detail) retrieves information about an order. Given an input of an order number, the function retrieves information about the order header, and all of the order detail lines. The order detail lines are represented using a multiple-instance array parameter.
The key concept is to populate the multiple-instance array parameter (PR3) with order detail lines from the database. Typically, you can obtain database information using a function of type RTVOBJ. However, the RTVOBJ cannot directly access the (PR3) parameters of the EEF. A multiple-instance array parameter can only be defined on functions of Execute External Function and Execute User Program.
A RTVOBJ call might be placed in a loop to retrieve one order detail line at a time into the, LCL context for example, and then the information could be moved from the LCL context to an element of the multiple-instance array (PR3) on the EEF. However, multiple calls to a RTVOBJ based over a database access path is undesirable from a performance point of view. Moreover, if the order detail lines do not exist with some contiguous key or positioned, additional code will have to ensure that each order detail line is retrieved.
We address this issue as follows:
From the AD of the EEF call a RTVOBJ, named LOAD ORDER DETAIL ARRAY, based over a database access path (Order detail) one time, and for each order detail record, create an element in an array.
Note: The array has the same structure as the order detail record, but has an additional key field of Element number.
Once the Array is created, a loop in the EEF can step through the array and call a RTVOBJ, named RTV ORDER DETAIL, based over the Order Detailsarray to recall one element at a time to the LCL context.
The data in the LCL context that represents a single order detail record can then be populated into multiple-instance array parameter (PR3) of the EEF that represents the order detail lines. This move from the single-instance LCL context to a multiple-instance context can be achieved with the *MOVE ARRAY function.
This approach has the benefit that the processing is faster than multiple RTVOBJ (database) calls and the looping through the array in memory overcomes any gaps between order detail line numbers.
The EXCEXTFUN function type can be deployed as a *MODULE, which allows it to be bundled into Service Program and deployed as a web service. Thus a single invocation of the web service can retrieve all the information regarding the order header and all order detail lines.
Follow these steps:
Notes:
Indicates the input parameter for the Order number, passed as a field (FLD), from which the Header and Detail are retrieved.
Indicates the output parameter for the Order Header, passed as a record format (RCD), which is populated with the single-instance data for the Order Header.
Indicates the output parameter for the Order details array.
Note: This parameter is marked as being a multiple-instance parameter, so multiple order detail records can be contained within this one parameter. If the A(Pass as Array) field is marked as Y, before usages have been specified on the EDIT FUNCTION PARAMETER DETAILS panel for the fields of this parameter a warning message will be sent: Y2V0717 A (Pass as Array) cannot be set to 'Y'.However, you may leave the field set to Y and zoom into the parameter to specify usages.

Notes:
CA 2E automatically creates the EXCEXTFUN function type as PGM (Program), so you must change the type to MOD (Module).
Follow these steps:
The EXCEXTFUN has all the necessary configuration and details, so you must then generate and compile before you can use it.
With the EXCEXTFUN fully configured, you must compile the module.
Note: Before generating the module, your model must be set up to include PCML in the module. For more information, see the section “PCML in Module” in the Building Applications guide for details
Follow these steps:
Note: Depending on your processing speed, the compile can complete quickly or take several minutes.
This procedure completes your work on the EXCEXTFUN module. Next, you create a Service Program for use with the module.
In the CA 2E model, you define a Service Program (*SRVPGM) function type, which you will then use with the module. You can customize the source member name, which is then used for the final *SRVPGM object name.
Follow these steps:
Order srvpgm
Service Program
*NONE
A Service Program does not contain parameters or an action diagram, so you must add the module in the following procedure.
You now have your EEF RTV ORDER module and your Order srvpgm Service Program. Combine the two by adding the module to the Service Program.
Follow these steps:
Verify that the module is listed.
The combined Service Program and module are not usable until you generate and compile them in the following procedure.
The combined module and Service Program are not usable until you generate and compile.
Follow these steps:
Note: Depending on your processing speed, the compile can complete quickly or take several minutes.
This gives you a usable, compiled Service Program that includes the EEF RTV Order module you created. Next, create a Web Service Function that includes the compiled Service Program.
The CA 2E Web Service uses the Service Program you created in the previous procedures to create a Web Service Function. This function contains one-to-multiple operations, where each operation corresponds to a single procedure in a module in an ILE Service Program.
Follow these steps:
Order websrv
Web Service
*NONE
GetOrder
Order Detail
Order srvpgm
The result is a modeled Web Service Function, but it is not available to invoke until you complete the following procedure to deploy Web Service Function on your Web Server.
From the newly created Web Service Function, you can deploy a Web Service instance. Use the YCRTWS (Create Web Service Instance) command to install the web service to the IBM Web Services Server.
Notes:
Follow these steps:
*ADD
*YES
YourServerName (the actual name for you Web Server)
The Web Service Function is now available for users to call from your Web Server. Test the Web Service before notifying your users.
For detailed information on web service deployment see the Chapter Web Service Creation.
Note: Use the IBM Web Administration interface to start, stop, and test the deployed Web Service.
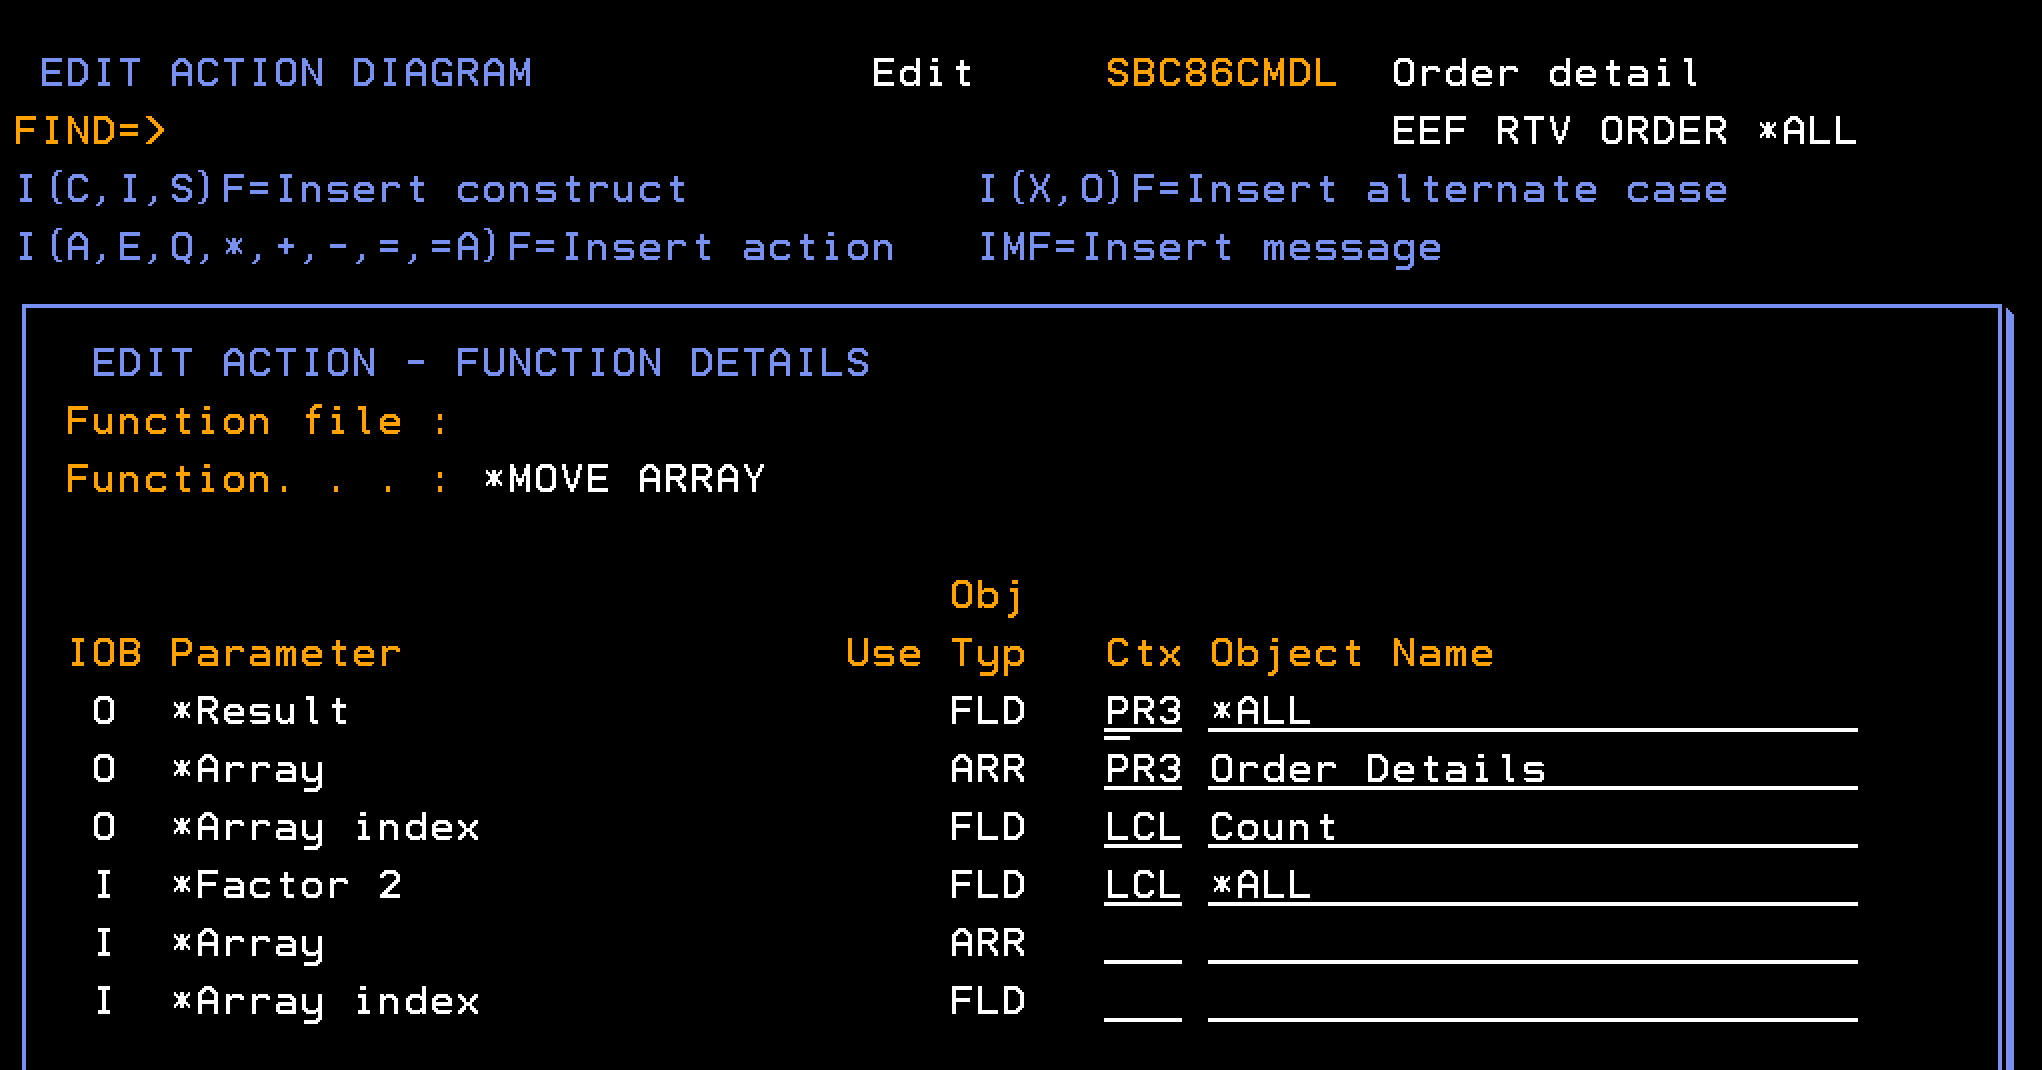
Four individual *MOVE ARRAY statements are used in the example code for EEF RTV Order (Order detail) to move data from a field in the LCL context to a field in a multiple instance array parameter. This is a good illustration of how you can use *MOVE ARRAY. However, you can use *MOVE ARRAY, *ALL support for a more efficient approach.
You can replace the multiple *MOVE ARRAY statements with a single *MOVE ARRAY statement, specifying *ALL for the *Result and *Factor fields. You do not have to change the action diagram if you then add or remove fields from the array; a simple regeneration and recompilation works.
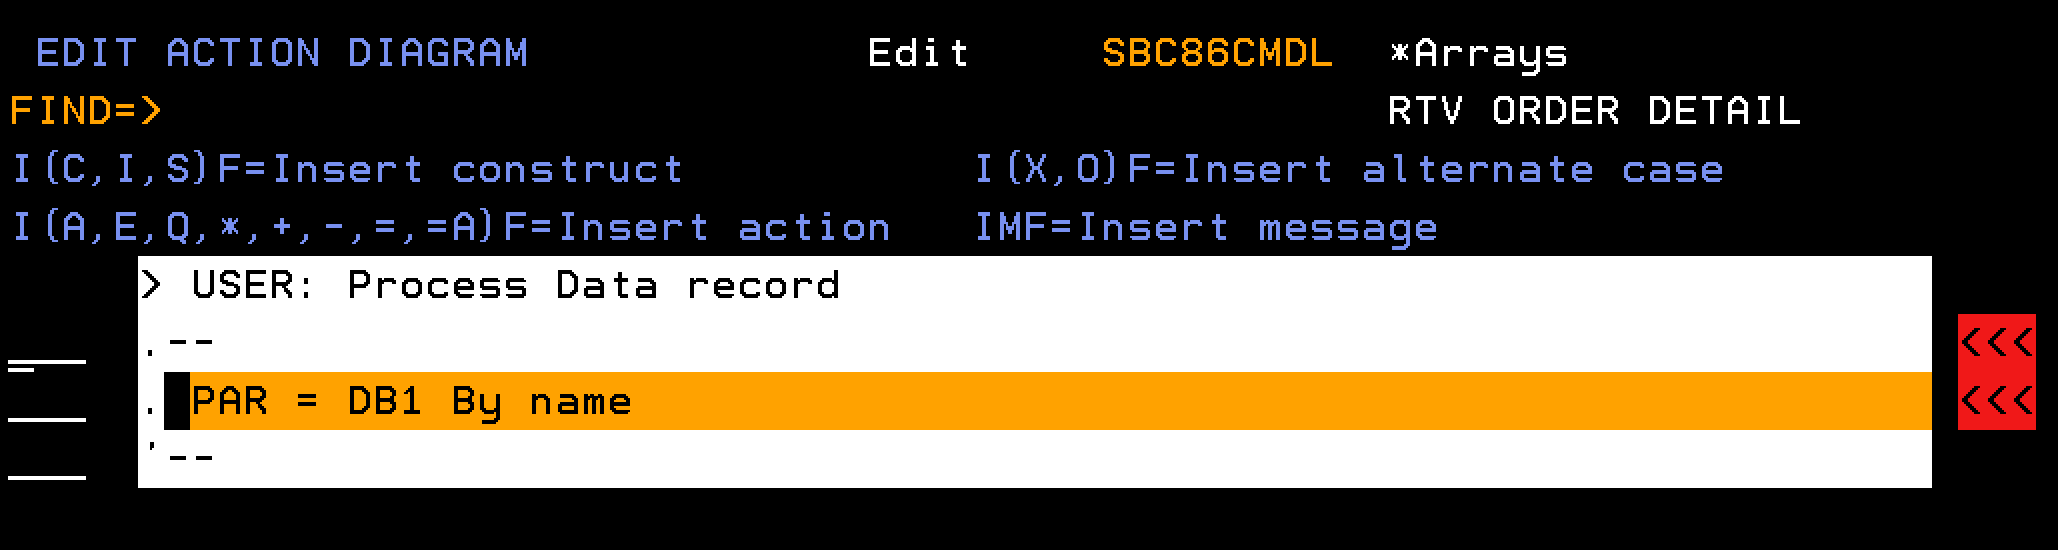
The following EDIT ACTION DIAGRAM panel shows how you can use *MOVE ARRAY (*ALL:)
The following EDIT ACTION DIAGRAM – FUNCTION DETAILS panel shows more detail on how you can use *MOVE ARRAY (*ALL:):
|
Copyright © 2014 CA.
All rights reserved.
|
|