

You can define a notification that is sent for a specific activity. An activity is an action that someone performs, such as resolving a ticket, sending a managed survey, running the Knowledge Report Card, and so on. Even daily activities such as returning a call, canceling or closing a record, increasing priority, or updating status are activities that can result in a notification being sent.
The following diagram shows how to setup notification for an activity:
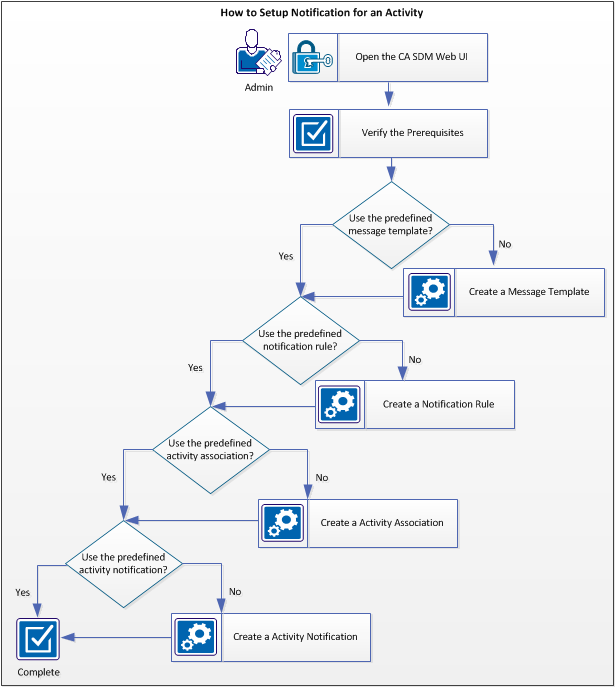
Follow these steps:
Log in to the web UI from the following servers, depending on your CA SDM configuration:
Verify the following prerequisites, before you being the setup:
The web_url field in the Change_Request and Workflow_Task tables holds a URL value that allows a user to access a particular change order or workflow task through the web interface. When used in email notifications, a user can click the URL and can go to the web interface without any further querying.
Before you can implement the URL hyperlinks in notifications, configure the system as follows:
Ensure that the contact to whom you want to send the notification, is assigned to that particular notification method.
Follow these steps:
The Contact Search page opens.
The contact detail page opens.
The notification method for the contact is verified.
A temporary email address is an address that is not associated with a contact in the system. Temporary email addresses are useful in circumstances such as the following one:
Recipients cannot reply to temporary addresses when their email address is not associated with a contact record or does not have permission to update the ticket.
Note: Temporary email addresses are always SMTP email addresses, and are supported only when the Preferred Method supports SMTP. For information about how to set up temporary email addresses, see the Online Help.
Follow these steps:
The Option List page opens.
The notification_allow_temp_address Options Detail page opens.
The notification_allow_temp_address Options Detail page opens.
Temporary email addresses are now allowed for manual notifications.
Create a message template that contains the values to use for the notification message. When you send multiple notification messages, you can use the message templates to simplify your workload.
Note: If multi-tenancy is installed, select the appropriate tenant from the drop-down list. The public (shared) option creates the object for all tenants.
Follow these steps:
The Message Template List page opens.
The Create New Message Template page opens.
Defines a unique identifier for this message template.
Specifies the object type associated with this template. For example, select Request/ Incident/ Problem for any notification related to a ticket.
Specifies the status of the template as either active or inactive. Set the status to Active to use the message template.
Specifies to send the notification associated with this template automatically, when the activity occurs. For example, you set up an initial notification, set up the objects to notify, and set up the message template, but you are not ready to turn on the notifications. In this case, you do not select Auto Notification. When you are ready to start automatic notifications, you select the check box. The notification becomes active and occurs as defined.
Indicates the relative importance of sending this notification. For example, select Emergency if you want to send the email notification to the contact immediately when the associated activity occurs.
Specifies the summary title of the message. You can use variables to insert the incident number in the message title. For example, @{call_req_id.type.sym} @{call_req_id.ref_num} @{type.sym}.
Specifies the content of the message. You can use variables to insert the analyst name, end-user name, and description into the message. For example,
@{call_req_id.type.sym} @{call_req_id.ref_num} @{type.sym}.
Assigned to: @{call_req_id.assignee.combo_name}
Customer: @{call_req_id.customer.combo_name}
Description: @{call_req_id.description}
Click on the following URL to view:
@{call_req_id.web_url}
You can use the ARTIFACT keyword to specify how artifacts are handled in outbound messages, message templates, notifications, and auto-replies. The ARTIFACT keyword uses the following values:
Specifies the HTML message that is displayed to the recipient. If the recipient receives the message on an external device, such as a cell phone or PDA, the message displays in plain text only. Click Edit HTML Message to open the HTML Editor.
Displays the message as it appears to the recipient.
Displays the message in the HTML source code.
The message template is created.
Create the notification rule to specify the contacts to be notified and under what circumstances.
Note: If multi-tenancy is installed, select the appropriate tenant from the drop-down list. The public (shared) option creates the object for all tenants.
Follow these steps:
The Notification Rule List page opens.
The Create New Notification Rule page opens.
Defines a unique identifier for this notification rule. For example, enter Ticket Description Update.
Defines the object to which the rule applies. For example, select Request/ Incident/ Problem for an activity related to a ticket.
Note: A notification rule without a condition notifies all contacts every time the activity occurs.
Note: Use the Update Contacts button that appears on each tab to search for and select more contacts to notify.
Displays the available organizations, vendors, and configuration items for the selected Object type that receive notification about tickets. For example, you can select Affected End User or Affected End User's Admin Org to notify.
Displays the individuals who are added to the notification rule, regardless of their association with the ticket.
Displays the users who are defined within the notification rule with the same classification, such as analyst or customer.
The notification rule is created.
Associate an activity with the object attribute to track the changes to the related object attribute. For example, associate Field Update activity with the object attribute of the Description field of an incident record. This enables you to send a notification whenever the description of the incident is updated. An object attribute can have only one activity notification.
Note: If multi-tenancy is installed, select the appropriate tenant from the drop-down list. The public (shared) option creates the object for all tenants.
Follow these steps:
The Activity Association List page opens.
The Create New Activity Association Type page opens.
Defines a unique identifier for this association.
Defines an internal code for the activity association.
Specifies the name of the object to which the attribute applies. For example, select Request/ Incident/ Problem.
Defines the object attribute to which the activity type is associated. For example, enter the object attribute of the Description field of an incident record.
Indicates the type of activity. For example, select Field Update to check when the selected object attribute is updated.
Determines if this activity association creates a log entry in the Audit Log.
The Activity Association Type Detail page opens.
The activity association is created.
Associate the activity with a notification. When the activity takes place, the associated notification is sent to the selected contacts.
Note: If multi-tenancy is installed, select the appropriate tenant from the drop-down list. The public (shared) option creates the object for all tenants. You cannot maintain different Manual Notify activity notifications per tenant, or copy a Manual Notify activity notification.
Follow these steps:
The Activity Notification List page opens.
The Create New Activity Notification page opens.
Defines a unique identifier for this activity notification.
Defines an internal code for the activity notification.
Specifies the object to which this activity applies.
The Update Activity Notification page opens.
Specifies if the activity notification is available only to internal employees or visible to end users.
Defines if the activity notification is active or inactive. Set the status to active to use the activity association.
Specifies if the activity log on a ticket is propagated to all related tickets. The activity log propagation is only valid for related incidents, problems, and change orders.
Note: If you use multi-tenancy, do the following actions:
Specifies the name of the object to which the activity applies.
Note: The Survey tab applies to all object types except Knowledge Documents, Knowledge Document Comments, and Knowledge Report Card. When specified from the Object Type list, the Emails tab appears instead of the Survey tab on the Update Activity Notification page. From the Emails tab, you can search for one or more email messages to associate with this notification or define a new one.
The Activity Notification Detail page opens.
The activity notification is created. If an error occurs on the outgoing mail server, email notifications are not sent and queue in the $NX_ROOT/site/mail_queue directory. When the mail server becomes active again, after an interval it processes and sends email. You can set the email retry interval variable to recycle the email that was queued when the mail server was busy.
Notification email messages that the outgoing mail server fails to send are resubmitted until you do one of the following actions:
Complete the following fields, as appropriate:
Indicates whether to activate or deactivate the survey. If selected, the survey is sent to the contact when the selected activity notification is triggered.
Specify a default survey using the search icon or specify your own in the text box.
Enter the title for the survey.
Enter a message for the contact. When a contact receives notification of a survey, the message includes a URL that they can access from their web browser to find and fill out the survey form.
You can define the time interval (in seconds) to retry failed attempts to send outgoing email to the mail server.
Note: CA SDM does not retry sending messages that the outgoing mail server accepts, but cannot be delivered. For these messages, the outgoing mail server retry capabilities and policies, if any, are in effect.
Retries are on a per-message basis. If the mail server is unavailable for a period, each message is retried when its own timer expires, rather than all the messages being sent at once. However, if you restart the outgoing mail daemon, all unsent messages attempt to be sent at that time, and if they all fail to be sent, their retry timers are all reset at the same time.
The setting (NX_EMAIL_RETRY_INTERVAL) in the NX.env file controls the retry interval. You can change the default retry interval setting on one or more servers.
Follow these steps:
NX_EMAIL_RETRY_INTERVAL=number_of_seconds
Defines the time interval (in seconds) to retry failed email attempts.
Specifies the number of seconds for each email retry interval. The default time is 600 seconds (10 minutes). The minimum value that you can use is 20 seconds. If you set a value that is less than the minimum of 20 seconds or more than 2000000 seconds, the default value of 10 minutes is used.
The change takes effect.
|
Copyright © 2013 CA.
All rights reserved.
|
|