

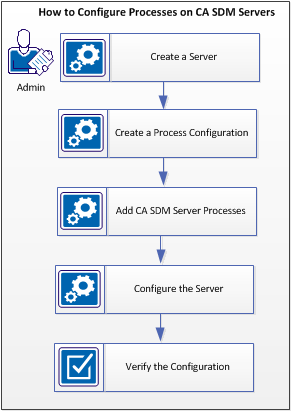
As an administrator, you can add or modify processes and daemons to enhance the performance of the CA SDM servers. You can configure object managers, web engines, web directors, and other processes for the CA SDM servers in your environment. You can add the processes across several servers to increase volume, performance, and enhance security.
The following diagram shows how to configure the processes on the CA SDM servers:
Follow these steps:
If you do not have any existing servers, add server records for all the servers that you want to install in your CA SDM deployment.
Follow these steps:
The Server List page opens.
The Create New Server page opens.
You added the server detail.
The following fields appear when you create a server:
Specifies the local host name of the server. The local host name is stored in the usp_servers table in local_host column.
Important! Ensure that host name is entered as case-sensitive in the usp_servers table.
Specifies the time zone where the server is located. The time zone is used for triggering events in the system if the Use End User Time Zone option is not selected, or if no time zone is specified for the service type.
Indicates the state of the server. Active status indicates that the server is a part of the CA SDM deployment.
Important! If you have inactivated any server, it is recommended not to start CA SDM services on that server. This action may result in unexpected behaviour.
Specifies the type of server that you want to configure. Following server types can be selected, depending on your CA SDM configuration:
Available only for advanced availability configuration. Indicates the state of the configured server. The default value of this field is No. The value is updated to Yes after you successfully run pdm_configure on that server. If you edit any of the automatically entered field values of a server record, the Configured field turns to No.
You can create a process configuration for your CA SDM installation, or can modify an existing configuration to suit your requirement.
Consider the following points while creating or modifying a process configuration:
Follow these steps:
The Configurations List page opens.
The Create New Configuration page opens.
Important! Enter only English characters for all the input fields for any localized language.
Specifies the name that you want to assign to the configuration you create.
Indicates whether the configuration is created for conventional configuration or for the advanced availability configuration type. Select Yes if the configuration is valid for advanced availability configuration type.
Note: Configurations that are created for one configuration type (advanced availability or conventional) cannot be implemented for the other configuration type.
Specifies the host name for the configuration. The host name is taken from the servers records configured under the Servers page. You can click the Search button to look up for the servers added to your CA SDM installation.
Specifies if the server configuration record is active.
Indicates that the configuration is applied on the selected CA SDM server. This field is read-only and is updated based on the configuration you select while executing server configuration utility (pdm_configure).
The configuration is saved. New tabs are enabled on the page to add object managers, web engines, web directors, and other processes.
Note: The host name and the advanced availability fields become read-only once you have saved the configuration.
Click Edit in List on the Configuration List page to modify the record status of a process configuration.
Note: You cannot modify the record status if the current configuration of a selected server is in use.
You can configure object managers, web engines, web directors, and other processes for the CA SDM servers in your environment. We recommend that you become familiar with the following information before configuring the CA SDM processes:
Important: Reconfigure the specific server by running the pdm_configure utility on the server after adding the CA SDM processes.
Object managers manage all the CA SDM objects. Each object manager has an associated name, which it uses to communicate with other objects. Enterprise systems with multiprocessor servers can add object managers to spread out the processing load. Depending on your configuration type, CA SDM installs a default object manager on the following servers:
Note: You cannot modify the default object manager, but can add extra object managers to any server.
Web engines help prepare web pages for the web client. All systems have one or more web engines. Each web engine connects to an object manager for processing all requests to CA SDM objects. Each web engine can run and be accessed directly. In direct access, every web browser enters the specific CGI interface for a specific web engine. With this approach, all clients can connect to one web engine and can overburden the web engine, while the other web engines go unused. To handle such heavy traffic, you can assign two or more web engines to a single web director. All requests that go to web engines are directed to the web director. The web director then redirects the client to the most available web engine.
Depending on your configuration type, CA SDM installs a default web engine on the following servers:
Web directors are optional, and are used when two or more web engines are installed on a single server. Web Director receives connection requests from users, selects a web engine to handle the request, and redirects the request to that web engine. This process is transparent to the end user who always accesses CA SDM with the same URL, regardless of the number of web engines configured. Web directors can be used for the following purposes:
The HTTPS protocol allows web transactions to be encrypted, providing maximum security for sensitive data, especially passwords. However, pages using SSL are ineligible for browser caching, which can have a negative impact on the performance.
After a user is authenticated, Web Director can move the session to a different web engine, which can be on a different HTTP server. This setup lets you configure SSL for a web engine, providing protection for your passwords while using HTTP protocol for transactions.
This setup can be useful in geographically dispersed organizations that want to locate groups of web engines physically closer to their end users.
Aliases are easily identifiable names you can create for object manager Slump names. You can create aliases for a specific object manager or a group of object managers. These aliases can be used in place of an object manager name while configuring CA SDM processes. Aliases are optional in CA SDM.
Applicable only to a conventional configuration type.
Knowledge daemons provide the knowledge base for CA SDM (knowledge documents, approval process, permissions, notifications, and so on). CA SDM configures the knowledge daemon by default on the primary server. You can move the daemon to a secondary server by changing the host name.
Applicable only to a conventional configuration type.
CA SDM configures the login user authentication daemon by default on the primary server. You can move the daemon to a secondary server by changing the host name.
Applicable only to a conventional configuration type.
CA SDM configures the LDAP virtual database daemon by default on the primary server. You can move the daemon to a secondary server by changing the host name.
Applicable only to a conventional configuration type.
The Repository daemon enables you to locate the attachment records saved in the repository directory. Using the CA SDM web UI, you can add the processes only for secondary servers. After you have added the process through the web UI, enable the specific option during the CA SDM configuration. For more information about enabling the processes, see the Server Configuration Online Help.
Applicable only to a conventional configuration type.
You can configure visualizer on a CA SDM server to use web services. Using the CA SDM web UI, you can add the processes only for secondary servers. After you have added the process through the web UI, enable the specific option during the CA SDM configuration. For more information about enabling the processes, see the Server Configuration Online Help.
Applicable only to a conventional configuration type.
REST Web Services enables you to configure the web UI for CA SDM to be able to communicate with external world. Using the CA SDM web UI, you can add the processes only for secondary servers. After you have added the process through the web UI, enable the specific option during the CA SDM configuration. For more information about enabling the processes, see the Server Configuration Online Help.
Applicable only to a conventional configuration type.
Using the CA SDM web UI, you can add the processes only for secondary servers. After you have added the process through the web UI, enable the specific option during CA SDM configuration. For more information about enabling the processes, see the Server Configuration Online Help. You can only add one support automation process for each secondary server. You can configure the following support automation servers:
Specifies the server on which support automation is installed. You can add the SA main server only to a secondary server.
The server on which the object manager for the support automation configuration resides. You can configure the dedicated object manager server on a secondary server.
Note: You can add a dedicated object manager server only if the SA Main Server is configured.
You can configure the message routing server on a secondary server to manage multiple Remote Control sessions and help improve the performance during assistance sessions.
You can configure the socket proxy server on a secondary server to take load off the main server during CPU-intensive operations of Support Automation, such as encryption/decryption.
You can add UNI Converter to any one of the servers running on the UNIX platform. You can add the UNI converter to the following servers:
You can add a TNG converter to any one of the servers running on the Windows platform. You can add the TNG converter to the following servers:
Note: If the Daemon Manager manages the TNG converter, it starts and stops with the other daemons. If you need the TNG converter to catch events after the CA SDM daemons are shut down, start and stop the TNG converter as a service.
Adding object managers to CA SDM servers improves the overall system performance. CA SDM installs a default object manager on all servers. You cannot modify the default object manager, but you can add more object managers on any CA SDM server to increase the server performance. Depending on your configuration type, CA SDM installs a default object manager on the following servers:
Follow these steps:
The Configurations List page opens.
The Configuration Detail page opens.
The Object Manager List page opens displaying the object managers that are configured for the server. The default object manager (if any) is also displayed in the list.
The Create new Object Manager page opens.
Important! Enter only English characters for all the input fields for any localized language.
Specifies the host name to which you want to add the object manager. You can click the Search button to look up for the servers added to your CA SDM installation.
For an advanced availability configuration type, the host name is read-only and is automatically populated based on the host name you specified while creating the configuration.
Specifies a display name for the object manager. The display name appears on the clients to indicate which object manager it is connected to.
Specifies the group name to which the object manager is added.
Important! Enter only English characters for the object group name for any localized language.
You can group object managers so that the groups can be assigned to provide service to specific groups of web engines. Users that require this feature often have web engines that are geographically separated from the primary server and want to collocate an object manager and the webengine. The users group the object managers that are assigned to the local webengines, and then assign the webengines to this group of object managers.
Specifies the mask for the object manager. The Accept mask feature tells the object manager from which clients it accepts connections.
For example, a web engine attempts to connect to an object manager with names such as web:seattle:1, web:seattle:2 or web:texas:1. You can specify an Accept mask like web:seattle.* to accept all seattle connections and reject others. You also specify a mask like web:.* to accept connections from web engines and reject connections from clients.
Specifies whether the object manager is active or inactive.
Note: Before setting the record status of an object manager to inactive, you must remove the link between the object manager and associated web engines.
The object manager that you added appears in the Object Managers list.
Web engines connect to an object manager for processing all requests to CA SDM objects. Web directors are optional, and are used when two or more web engines are installed on a single server. You can configure web directors on any server. Depending on the CA SDM configuration, CA SDM installs a default web engine on the following servers:
Follow these steps:
The Configurations List page opens.
The Configuration Detail page opens.
Note: If you are changing the configuration for the first time, then create a configuration first. When you want to make a configuration change, always create or copy an existing one. This process allows you to revert to the previous configuration, if needed.
The Web Engine/Web Directors List page opens displays the web engines and web directors that are configured for the server.
The Create New Web Engine/Web Director page opens.
Important! Enter only English characters for all the input fields for any localized language.
Specifies the host name for the web engine or web director. You can click Search to look up for the servers.
For an advanced availability configuration type, the host name is read-only and is automatically populated based on the host name you specified while creating the configuration.
Specifies if you are configuring a web engine or web director. Based on the option that is selected, the relevant fields are automatically populated.
Note: Ensure that you have selected the appropriate option. You cannot edit the process type after you have saved the configuration.
Specifies the web director that is assigned to the web engine. You can click Search to look up for the web directors added to the server.
Note: When implementing any web engine load-balancing scheme, SSL-Login, or both, at least two web engines must be assigned to the same web director.
Specifies the unique CGI name for the web engine. It is the name of an actual CGI executable when IIS or Apache is used as the HTTP server; it is a servlet parameter when Tomcat is used as the HTTP server.
Examples: (web engines) pdmweb1, pdmweb2, (web directors) pdmweb_d1, and pdmweb_d2.
Default: pdmweb.exe (The CGI name must be unique).
Specifies the port on which CA SDM web clients can connect. The CGI port number is the same port on which the tomcat server is running.
Default: 8080
Specifies the protocol for accessing the web engine.
Specifies whether the web engine or web director is active or inactive.
Note: Before setting the record status of a web director to inactive, remove the link between the web director and the associated web engines.
Specifies the object manager that you want to assign to the web engine.
Specifies that the default object manager is assigned to the web engine.
Specifies that the web engine can connect to any available object manager with more willingness value. Willingness value is the availability of the server to accept new clients. A willingness value of zero means that the web engine does not accept any sessions.
Allows you to specify an object manager for the web engine. Selecting this option provides you the option to add multiple object managers or aliases to the configuration.
The web engine or web director that you added appears in the Web Engines/Web Directors List.
Aliases are optional in CA SDM. You can create aliases for a specific object manager or a group of object managers. Before you create aliases, perform the following tasks:
For example, domsrvr:group1:11, domsrvr:seattle:12, domsrvr:seattle:13, domsrvr:Tacoma:11.
For example, you want the Java clients that are located in Washington to connect to object managers located in Seattle. You connect them to /domsrvr:seattle.*. Or, you can define an alias named SEATTLE and can assign it the value /domsrvr:seattle.*.
Important! If you have created aliases for an object manager group, ensure that you modify the respective aliases after modifying the object manager group.
Follow these steps:
The Configurations List page opens.
The Configuration Detail page opens.
The Alias List page opens and displays the aliases that are created for the server.
The Create New Alias page opens.
Important! Enter only English characters for all the input fields for any localized language.
Specifies the name for the alias you created.
Specifies the regular expression that is associated with the alias. The following format is used for an alias definition:
domsrvr:[[set the product group or family]:][<host_id><id>][.*]
Default: /domsrvr:.*
Specifies whether the alias is active or inactive.
The alias that you added appears in the Aliases List.
CA SDM enables you to configure support automation servers, visualizer, LDAP, KT, TNG/UNI, BopLogin repository daemons, and REST web services process to a server.
Follow these steps:
The Configurations List page opens.
The Configuration Detail page opens.
The Additional Process List displays the list of processes that are configured for the server along with the default processes, if any.
The Create New Process page opens.
Important! Enter only English characters for all the input fields for any localized language.
Indicates the CA SDM server process that you want to add.
Applicable only to a conventional configuration type.
Specifies the repository daemon that is configured for the server. Repository daemons support attachment repositories. CA SDM configures a repository daemon by default on the primary server. You can move the daemon to a secondary server by changing the host name.
Applicable only to a conventional configuration type.
Specifies the SA main server that is configured for the server. You can only configure one SA Main server.
Applicable only to a conventional configuration type.
Specifies the dedicated object manager for the support automation configuration. You can specify only one Dedicated Object Server either on primary or secondary server.
Note: You can add a dedicated object manager server only if the SA Main Server is configured.
Applicable only to a conventional configuration type.
Specifies the message routing server that is configured for the server. You can configure the message routing server on a secondary server to manage multiple Remote Control sessions and help improve the performance during assistance sessions.
Applicable only to a conventional configuration type.
Specifies the socket proxy server that is configured for the server. You can configure the socket proxy server on a secondary server to take load off the main server during CPU-intensive operations such as encryption/decryption.
Applicable only to a conventional configuration type.
Specifies the REST Web Services configures for the server. REST Web Services enables you to configure the web UI for CA SDM to be able to communicate with external world. Using the CA SDM web UI, you can add the processes only for secondary servers. After you have added the process through the web UI, enable the specific option during the CA SDM configuration. For more information about enabling the processes, see the Server Configuration Online Help.
You can add a TNG converter to any one of the servers running on the Windows platform. You can add the TNG converter to the following servers:
Conventional: Primary server, secondary server.
Advanced Availability: Application server.
Note: If the Daemon Manager manages the TNG converter, it is started and stopped with the other daemons. If you want the TNG converter to catch events after the CA SDM daemons are shut down, start and stop the TNG converter service.
Specifies the UNI converter that is configured to respond to UNIX events. These events can be filtered and configured to create tickets and trigger other work in the Service Desk. You can add UNI Converter to any one of the servers running on the UNIX platform. You can add the UNI converter to the following servers:
Conventional: Primary server, secondary server.
Advanced Availability: Application server.
Applicable only to a conventional configuration type.
Specifies the visualizer that is configured for the server.
You can configure visualizer on a CA SDM server to use web services. Using the CA SDM web UI, you can add the processes only for secondary servers. After you have added the process through the web UI, enable the specific option during the CA SDM configuration. For more information about enabling the processes, see the Server Configuration Online Help.
Note: You can configure only one Visualizer Tomcat Server on a Secondary Server.
Specifies the server that hosts the process you added. You can click the Search button to look up for the servers.
Specifies whether the process you added is active or inactive.
The process that you added are displayed in the Additional Process List page.
|
Copyright © 2013 CA.
All rights reserved.
|
|