

A business structure is a customized, logical representation of your enterprise in a Unicenter Service Desk environment. This scenario describes how an administrator can create a business structure for an enterprise to manage and track contacts, groups, and assets that are spread across distributed locations. After you create a business structure, you can generate reports to analyze requests by site, organization, or group.
Example
The fictional company Forward, Inc. uses a request processing system for multiple offices that are spread across geographical locations. The company plans to implement Unicenter Service Desk to analyze the number and types of requests that are generated from its various business segments.
The following diagram illustrates an example of a high-level business structure using the fictional company Forward, Inc.
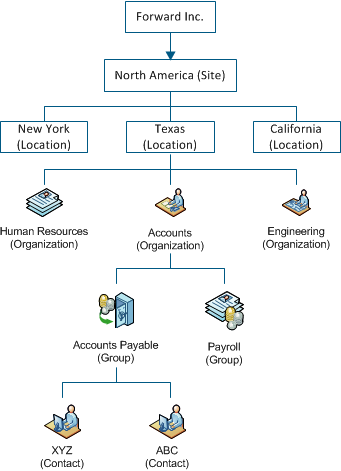
To facilitate effective tracking and decision making, the organization must track the following elements:
Creating a business structure allows the management team at Forward, Inc. to perform the following actions:
To create a business structure, you define a logical hierarchy of sites and organizations within the business and then associate contacts and groups to their respective sites and organizations.
The following diagram shows how an administrator can define the objects in a typical business structure:
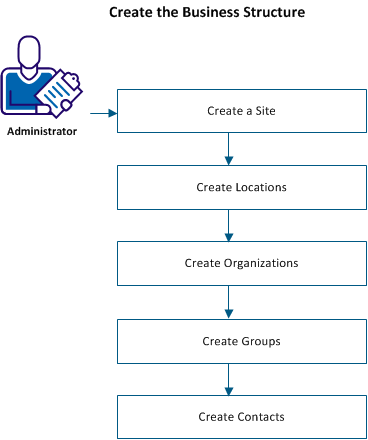
Follow these steps:
A site is a geographical region where your organization has one or more locations.
For example, North America can be a site, with locations (offices) in New York, California, and Texas.
Note: If multi-tenancy is enabled, select the appropriate tenant from the drop-down list.
Follow these steps:
The Create New Site window opens.
The site record is created and saved.
A location is a physical place such as an office address. For example, the addresses for New York, California, and Texas offices can be locations under the site North America.
Creating locations helps you manage contacts and resources in that location. After you create a location, you can assign it to a site.
Follow these steps:
The Create New Location page opens.
Specifies the physical address of the location.
Automatically assigns the tickets (requests, change orders, and issues) to members in this location.
Select the request areas that you want to auto-assign to members of the location.
Select the change categories that you want to assign to members of the location.
Select the issue categories that you want to assign to members of the location.
Select the groups that you want to update for auto assigning tickets.
Important! After updating the request areas and categories, enable the automatic assignment for each request area and category individually.
The location details are saved.
An organization refers to an internal department or division or an external company. You can assign organizations to tickets, Configuration Item (CI) classes, and contacts.
For example, you can define CIs for organizations to specify the hardware, software, and services that the organization uses.
Note: If multi-tenancy is enabled, select the appropriate tenant from the drop-down list.
Follow these steps:
The Create New Organization page opens.
Displays the address of the location to which you associate the organization. The fields are automatically populated when you assign location to the organization.
Displays the Configuration items (for example, equipment, software, and services) that the organization uses. You can associate one or more configuration items with the organization. Associating the CI items to the organization helps administrators to keep track of the resources used by the organizations in various locations.
The organization details are saved.
A group is a collection of contacts that represent a specific area of responsibility. Defining groups lets you assign the responsibility for resolving a ticket when that responsibility is shared among several individuals. For example, a Dallas Human Resources group is responsible for dealing with the personnel issues in the Dallas office of your organization. When an employee in that office has a problem, you can assign the problem to the Dallas Human Resources group for resolution.
Note: If multi-tenancy is enabled, select the appropriate tenant from the drop-down list. The public (shared) option creates the object for all tenants.
Follow these steps:
The Create New Group page opens.
Defines the contact information and method for notifying the group.
Assigns the group to a location.
Specifies the functional or administrative organization, department, cost center, or vendor information.
Specifies the environment (for example, equipment, software, and services).
Adds or removes contacts.
Lists service contracts that have been associated with the group.
Lists auto assignments of tickets that are based on the group membership.
Lists remarks and special handling types, such as VIP or security risk types. You can click Update Contact's Special Handling to search for special handling members.
The group record is saved and the group detail page opens. The following buttons are now available for configuring the group:
On the Contact Details, Environment tab, click this button to display the Configuration Item Search window for the group. You can specify search criteria for the assets you want to consider on this page. You can create new configuration item and search assets using the Update window of Contacts respectively.
On the Members, Service Contracts, Auto Assignment, Members tab, this button displays the contacts. You can add and remove contacts for this group.
A contact is a person who uses your system regularly, such as an analyst or customer. After you have created the business structure and groups, you create contacts and map them to their respective location and organization.
You can create contacts using the following ways:
Use this method if you want to create contacts using the CA SDM Scoreboard.
Use this method if your CA SDM installation is configured to access a Lightweight Directory Access Protocol (LDAP) server and CA SDM has the necessary options installed.
If you do not want to use an active directory such as LDAP for your contacts information, you can create the contacts manually in CA SDM.
Note: If multi-tenancy is enabled, select the appropriate tenant from the drop-down list.
Follow these steps:
The Create New Contact window opens.
Specifies the tenant that is associated with the contact (for multi-tenancy installations).
Specifies a unique identifier for the contact. If the default user authentication is being used, the value in this field is used as the password when the user logs in.
Specifies the user name of the contact. The contact uses this value to log in to the system.
Specifies the level of support that is received by the contact.
Specifies the data partition for this contact. This value determines the records that this contact can access.
Specifies the access type. The access type determines the system functions the contact can access.
Indicates whether the contact is available for ticket assignments.
Indicates whether the contact receives a confirmation when saving a record from the self-service interface.
(Analyst Contact Type Only) Specifies the tenant group that the analyst is responsible for.
Defines the contact information and method for notifying the contact.
For example, you may want to notify this contact using the Email method for normal level activities, but you may want to use the Pager_Email notification method for emergency level activities.
For example, you may assign a Regular workshift (five-day week, eight-hours a day) to the normal level notification, but a 24 hour workshift to the emergency level notification.
Specifies the location of the contact.
Specifies the functional or administrative organization, department, cost center, or vendor information of the contact.
Specifies the environment of the contact, such as equipment, software, and services.
Assigns a contact to a group (a collection of contacts with a common area of responsibility).
Assigns the contact to one or more roles.
Displays any service contracts that have been associated with the contact.
Lists the special handing contacts and lets you search for and associate a contact to a special handling type, such as a visitor or security risk type.
Lists events that are associated with the contact, such as self service and knowledge activities.
Lists the activity log for the contact.
The contact information is saved.
If your product installation is configured to access a Lightweight Directory Access Protocol (LDAP) server and has the necessary options installed, you can create and update contacts using data from the LDAP database. This makes it easy to synchronize contacts with network user data.
Follow these steps:
The LDAP Directory Search page opens.
The LDAP Entry List page displays the records that match your search criteria.
The Create New Contact page appears and is partially populated with LDAP information.
Defines the contact information and method for notifying the contact.
Specifies the address of the location to which you associate the organization.
Specifies the functional or administrative organization, department, cost center, or vendor information of the contact.
Specifies the environment of the contact, such as equipment, software, and services.
Assigns a contact to a group (a collection of contacts with a common area of responsibility).
Assigns the contact to one or more roles.
Displays any service contracts that have been associated with the contact.
Lists special handing contacts. You can also search for contacts or associate a contact to a special handling type, such as a visitor or security risk type.
Lists events that are associated with the contact, such as self service and knowledge activities.
Lists the activity log for the contact.
The contact information is saved.
You have successfully created a business structure and associated contacts and groups with it. You can now generate reports to analyze requests by site, organization, or group.
|
Copyright © 2013 CA.
All rights reserved.
|
|