Configuring and Administering CA XCOM Management Center › Super Admin Process Servers › Configure Servers
Configure Servers
You can use the Process Servers page to add new servers to the Servers database.
To add new servers
- Log in to CA XCOM Management Center.
The Home page appears.
- Click Admin.
The Admin page appears.
- Click Process Servers under Super Admin Functions.
The Process Servers page appears.
- Click Add New Servers.
The Add New Servers page appears.
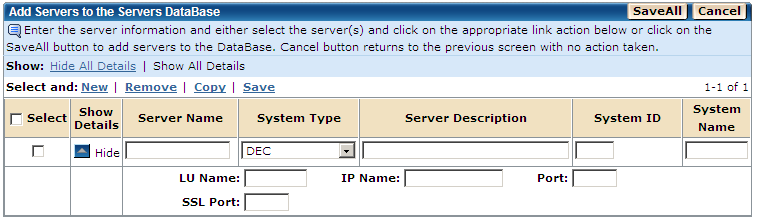
- Enter details for a new server.
- To add more than one server at a time, either click New to display another empty row or select a row and click copy to copy the row information to a new row.
- To remove servers from the table displayed on the screen, select the rows to be removed and click Remove.
- Repeat Steps 5 and 6 for each new server.
- Select the servers that you want to be added and click Save.
The new servers are added to the Servers database and a confirmation message is displayed.
Notes:
- The group name must be a combination of alphanumeric and special characters @ # $ _ starting with an alphabetic character.
- If the servers already exist in the Servers database, an error message is displayed.
- You can use the Hide/Show icon on the second column to hide/show the extra information for a row. You can also use the Hide All Details or Show All Details link to hide or show the details for all the rows respectively.
The Add New Servers page also lets you use the following options:
- Click SaveAll to save all information you entered on this page in the Servers database.
- Click Cancel to cancel the current action and return to the previous page.

