

|
|
|
To check the CA XCOM Gateway onward transfer
You will receive email notification about the CA XCOM Gateway upload and the CA XCOM Data Transport delivery status.
The easiest way is to check if file is delivered. Check the location shown as the file name under Remote System Parameters.
In our example, this is C:\temp\delivered.txt.
When a file is uploaded, CA XCOM Gateway increments the Files Pending Download count.
Example
![]()
When CA XCOM Gateway delivers the file, the Files Pending Download count is decremented.
Some records appear, as follows:
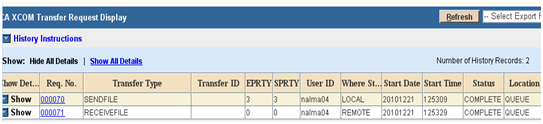
Notes:
Note the file name, which is set by CA XCOM Gateway. While configuring the Policy Transfer XML, we had set this to ANY.
Some records appear, as follows:

Notes:
Note the file name, which is the file delivered by CA XCOM Gateway.

Example
C:\Program Files\CA\XCOMGW\Logs
12-21-2010/12:52:55.701/GMT+05:30 INFO [nalma04] XCOMA2039I C:\sample.txt uploaded successfully
12-21-2010/12:52:55.721/GMT+05:30 INFO [nalma04] XCOMA6119I Process cycle execution starts
12-21-2010/12:52:55.721/GMT+05:30 INFO [nalma04] XCOMA6120I Process cycle transfer schedule execution starts
12-21-2010/12:52:59.997/GMT+05:30 INFO [] XCOMA5041I Policy PolicyWithOnwardTransfer, returns SubmissionHandle=6 for the transfer <transfer xml stripped….>
12-21-2010/12:53:30.962/GMT+05:30 INFO [] XCOMA2037I 0a12819c-4da8-45f8-85ad-51e8fdbb03c3 downloaded successfully
| Copyright © 2011 CA. All rights reserved. | Tell Technical Publications how we can improve this information |