Configuring Policies for Onward File Transfer › Build Policy Transfer XML Using the CA XCOM Data Transport GUI
Build Policy Transfer XML Using the CA XCOM Data Transport GUI
This section explains how to build the Policy Transfer XML using the CA XCOM Data Transport GUI.
Notes:
- Although you can use the RECEIVEFILE action, we strongly recommend that you always use SENDFILE, SENDJOB, or SENDREPORT instead. This and subsequent sections of this chapter therefore assume the use of the SENDxxxx actions. The RECEIVEFILE action reverses the roles of the local and remote machines, so that the file is sent from the remote machine to the local machine. When using RECEIVEFILE, all information provided below that relates to the local machine will instead apply to the remote machine and vice versa.
- In the Policy Transfer XML, the CA XCOM Data Transport server that is used by CA XCOM Gateway to transmit the files must have access to the CA XCOM Gateway realm storage area. Typically it is the CA XCOM Gateway-allied CA XCOM Data Transport server, but it can be another CA XCOM Data Transport server that has networked file access to the realm storage area. For SENDFILE, SENDJOB, and SENDREPORT actions, this will be the local machine.
- For SENDFILE, SENDJOB, and SENDREPORT actions, the CA XCOM Data Transport server where you want to deliver the files becomes the remote machine.
To build the Policy Transfer XML
- Start the CA XCOM Data Transport GUI (Programs, CA, CA XCOM Data Transport, GUI)
- Click the Schedule Transfer Tab.
The Schedule Transfer page appears. This page allows you to build transfers.
- Click the Edit Transfer Record link.
The Edit Transfer Record page appears.
- Select the Send File, Send Report, or Send Job action.
You need to enter the mandatory fields, such as Local File Name, Remote System, and Remote File Name.
- (Mandatory) In the Local System Parameters for Server section, complete the following field:
- File Name
-
CA XCOM Gateway automatically overrides this field with the name of the file uploaded, whenever it initiates the distribution of a file. You can therefore provide any value here. Typically it is set to ANY.

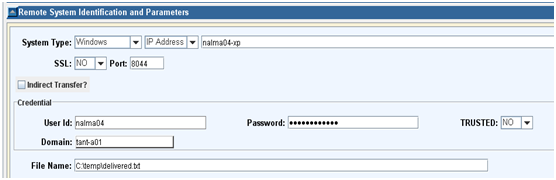
- (Mandatory) In the Remote System Identification and Parameters section, complete the following fields:
- Remote System Identification
-
Select the remote system to which you want deliver the file.
- Credential
-
Provide the credentials of a user on the remote system.
- File Name
-
Enter the file name on the remote system.
- (Optional) Complete the remaining transfer parameters as required; for example: email notification, trace, encryption at test, and misc options.
- Click the Update button in the top right hand corner.
- The main Schedule Transfer page appears, displaying the transfer record that is now ready.
- If you want the file to be delivered to multiple destinations, repeat all these steps to add more transfer records.
- Provide a configuration file name and save the XML file.
- When you open the file in any xml editor or text editor, it looks like this:
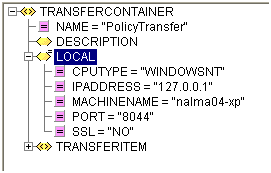
The XML file contains the TRANSFERCONTAINER->LOCAL element. This represents the local CA XCOM Data Transport system through which CA XCOM Gateway schedules onward transfers.
- Update the IPADDRESS and PORT attributes if required.
Important! Remember that this CA XCOM Data Transport server needs to be able to access the CA XCOM Gateway realm storage area to extract the file.
Now you need to edit this XML file to add local authentication.
- Go to Add Local Authentication.

