Installation Guides › Policy Server Installation Guide › Installing the Administrative UI › Installation Road Map
Installation Road Map
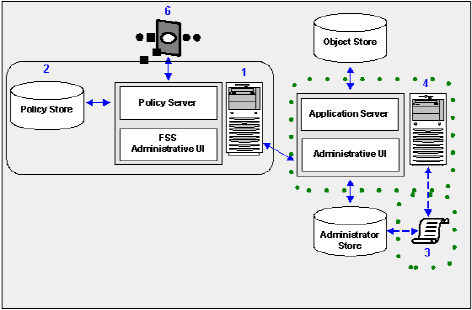
The following diagram illustrates a sample SOA Security Manager installation and lists the order in which you install and configure each component.
- The components surrounded by a solid line represent the Policy Server, policy store, and a non-registered FSS Administrative UI. A Policy Server must be installed and a policy store must be configured to register the Administrative UI. Do not continue with the installation process if a Policy Server and a policy store are not yet part of your environment.
Note: The FSS Administrative UI is installed with the Policy Server. Unless you need to generate WS-Security SAML assertion tokens, you may safely leave the CA SiteMinder Federation Security Services on the Policy Server machine without registering it with the Policy Server.
- The components surrounded a green dotted line represent the directory XML file and the Administrative UI, which you configure and install at this point in the installation process.
Note: Once you have installed and registered the Administrative UI, you can prepare for a SOA Agent installation, as illustrated by step 6.
The following sections in the documentation detail how to:
- Configure a directory XML file.
- Install the Administrative UI, which includes configuring a directory XML file, an administrator user store, and an object store.
- Register the Administrative UI with the Policy Server.
- Prepare for a SOA Agent installation.

