

|
|
|
To add a new project:
|
Value |
Enter |
|---|---|
|
Project ID |
Proj01 |
|
Project Description |
Temporary description. |
|
Project Start Date |
12/10/2003 |
|
Project End Date |
01/01/2004 |
The area on the right of the dialog should look like this after you enter these values:
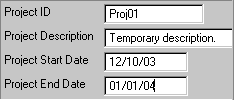
For now, you only enter Temporary description. in the Project Description field because the field extends past the right edge of the dialog, and if you type anything longer, you will not be able to see what you are typing. Since Project Description was defined as an optional attribute, you can leave it blank if you prefer.
After you finish entering data, you modify the panel layout so that you can see more of the description so that it does not run off the right edge.
![]()
|
Value |
Enter |
|---|---|
|
Project ID |
Proj02 |
|
Project Description |
Temporary description. |
|
Project Start Date |
03/01/2001 |
|
Project End Date |
04/04/2001 |
|
Value |
Enter |
|---|---|
|
Project ID |
Proj03 |
|
Project Description |
Temporary description. |
|
Project Start Date |
05/05/2004 |
|
Project End Date |
06/05/2004 |
Note: None of the panels inherited from the Pattern Libraries have Cancel buttons on them. If you click the close window button, any pending actions are discarded. If you click Apply, those changes are completed before the window closes.
| Copyright © 2012 CA. All rights reserved. | Tell Technical Publications how we can improve this information |