Product: CA Plex
Release: 7.1
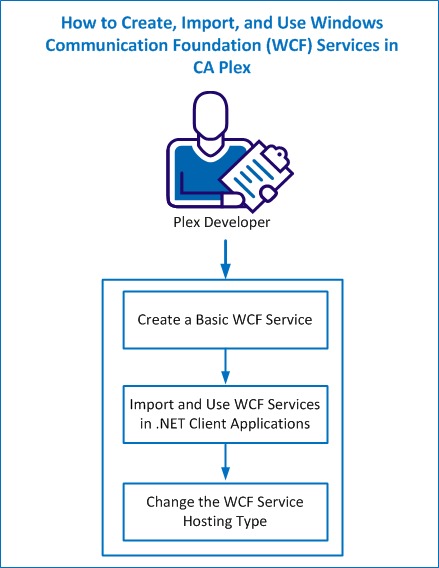
This scenario describes how as a CA Plex Developer, you can create, import, and use Windows Communication Foundation (WCF) services in your CA Plex application. The Plex WCF Service Generator plug-in lets you generate WCF Services from Service Connectors modeled in your application.
This Knowledge Base Article constitutes a portion of the official CA product documentation for this CA product. This Knowledge Base Article is subject to the following notices, terms and conditions.
As a CA Plex Developer, you can create, import, and use Windows Communication Foundation (WCF) Services in your CA Plex.
The following diagram illustrates how you can create, import, and use WCF Services from your application:
Install the following prerequisites in your machine to create, import, and use WCF Services in the CA Plex:
Note: Install Visual Studio in the following scenarios:
If you are writing client code in other environments and languages, then Visual Studio is not required.
Example:
Your client code could be Java that is developed within the Eclipse IDE.
Ensure to meet the following conditions for creating the WCF services on your Plex applications:
Note: This best practice applies for any Plex server application that is generated for either .NET or Java. However, this best practice is important for applications that you want to model services for System i applications.
This example details how you can build and deploy the WCF sample model that is located in the \Samples\Dot NET WCF support directory. However, you can adapt the same process to deploy any of the Plex generated applications that meet the prerequisites.
Complete the following tasks to create a basic WCF service process:
Follow these steps:
Note: For more information about the SalesSystem.mdl sample model, refer the Dot NET Support and Code Libraries sample model.
Note: You create the object model hierarchy similar to creating an EJB or COM Connector interface within Plex. For more information about the Plex Connector modeling capabilities, see the online help.
The following diagram shows the basic triples that are required to model a Plex Connector interface.

Note: In this example, no Service-specific triples have been added yet. You can add implementation triples to generate this as a COM object, an EJB, a WCF service, or even some other form of service object. You can review the object hierarchy in the Plex Object Browser.
The following diagram shows the implementation triples that are required to be added at Package level in the SalesSystem sample model.

The PkgTypeSys and PkgLanguageSys triples define the Package that is generated as a WCF service to the WCF generator.
The PkgServiceHostTypeSys triple defines the type of service hosting to generate around your WCF Service components. You can use the following possible values of this triple:
Generates a managed application host for your WCF Service. After the WCF service is generated and built, an executable (.exe) file is created for you to double-click and start your WCF service.
Generates a WCF service suitable for deployment in Microsoft Internet Information Server (IIS). After the WCF service is generated and built, you can host it inside of IIS or in the Visual Studio ASP.NET Development Server.
Does not create any host wrapper for your WCF service. This option lets you deploy your WCF service in a custom host environment. You can run WCF services generated without host code under the WCF Service Host utility (shipped as part of the Microsoft .NET Framework).
Generates a Windows Service application host for your WCF service. After the WCF service is generated and built, an executable (.exe) file is created for you to install as a Windows Service, which you can start to run your WCF service. Various support batch files are also generated to simplify the installation of this service.
Generates a WCF service suitable for hosting under the Windows Activation Services (WAS) environment (not currently supported).
Note: The WAS option is not implemented yet and generates your WCF service in the same way as the None option.
In this sample, a host type of None has been selected, which means although you cannot run the WCF service stand-alone, you can still run it through tools shipped with the .NET Framework and through Visual Studio.
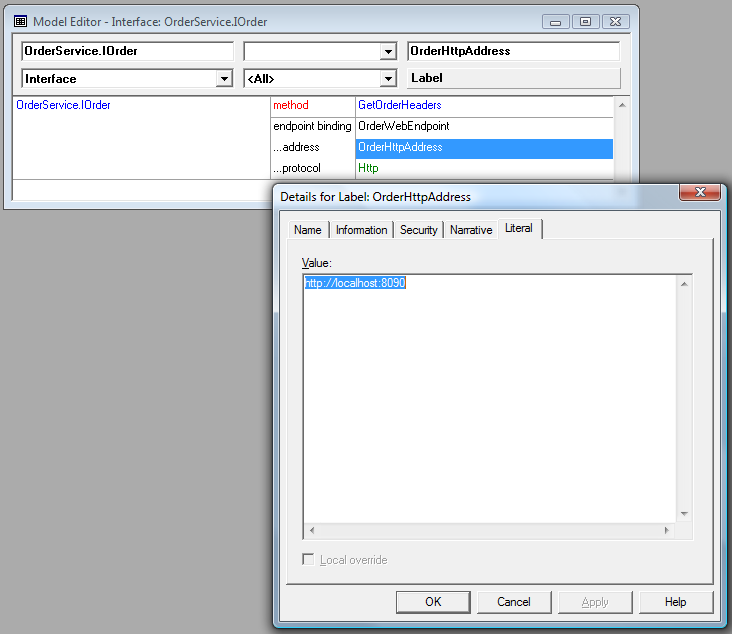
The following diagram shows an example of the use of this new triple, and the two continuations that are associated with it.

The endpoint binding name defines the location where clients can connect to your WCF service after it is hosted. The specific endpoint information consists of the protocol and address of the endpoint, which are represented by two continuation triples defined against the endpoint name.
Defines the basic calling mechanism that clients use to call your WCF service. You can use the following possible values:
Http—Uses for making calls through HTTP as SOAP messages (wsDualHttpBinding).
Msmq—Uses for making calls through MSMQ (netMsmqBinding).
NamedPipes—Uses for making calls through Named Pipes (netNamedPipeBinding).
Tcpip—Uses for making calls through TCPIP (netTcpipBinding).
Defines the literal stored against this Label object contains an address to which the WCF Service can be contacted.
Note: The address can be an absolute address (example, an entire address, including protocol, machine name, and port numbers) or relative address (example, just a sub address that is combined with the default base address where the service is deployed).
Note:
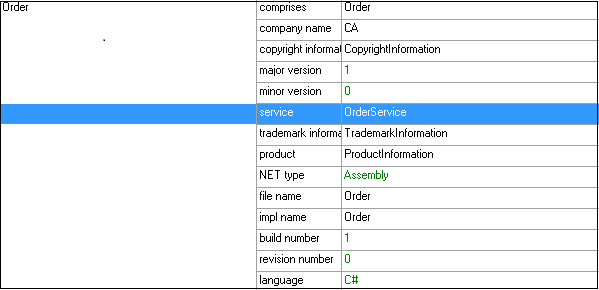
Note: The Code Library must be implemented with a language of C# when creating WCF service objects.
Your generated WCF service contains a copy of the Plex runtime, which the WCF uses to run. This runtime uses a configuration file named Plex.ObRun.dll.config. The Plex .NET Runtime uses the runtime settings information contained in this file when running the WCF service. The template version of this file is located in the \...\ob.Net\<configuration> directory, where <configuration> is either ‘Release’ or ‘Debug’. The configuration option is dependent on which compile option you take during the WCF service generate and build process.
Note: These settings should be same as you used in Step 1 when you ran your original application.
Note:
You see a list of options that are used for deployment.
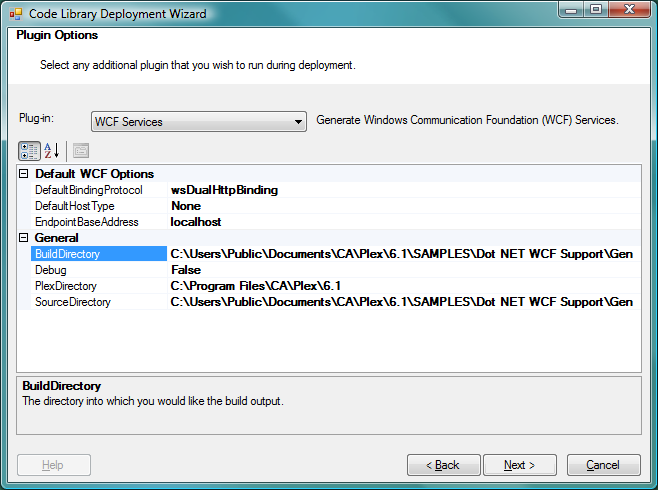
Defines the default protocol that is used for any endpoint that does not have a ProtocolSys triple defined against it.
Note: The value is string based.
Example: You can specify a custom protocol binding to be used for your endpoints in this field.
Default value: wsDualHttpBinding.
Defines the default WCF host type to generate for each Service Connector you are generating that does not have a PkgServiceHostTypeSys triple. You can choose the same as you choose for a triple.
Defines the base address where service endpoints without AddressLbl triples can be contacted. This base address can also be used for all endpoints where you may have specified a relative address in the AddressLbl literal.
A directory named .\Services\Wcf is created within which, a sub-directory that is named after the Services Connector Package is created.
This directory contains all the source and other support files for the WCF implementation of the Service Connector. Depending on the service host type selection for your service connector, the source is generated accordingly.
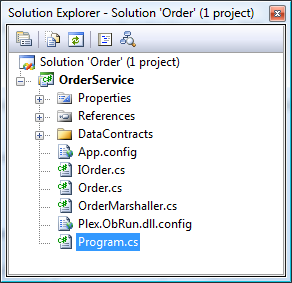
Example: The following diagram shows the output for the SalesSystem sample model, where the service host type was set to None.

The WCF services and their associated Visual Studio projects are created and then the Code Library Wizard compiles these projects. Based on your host type selection, the code library is compiled and the output of the compile process. The actual output created by the compile process resides in the .\bin subdirectory under the main WCF project directory.
The Visual Studio solution file, which is available in the .\Services\Wcf directory, contains the service that you have generated.
The files that are generated for your WCF service displays in the Solution Explorer.
You can see the following line of code or lines if you have configured multiple endpoints:
<endpoint address ="http://localhost:8090" binding="wsDualHttpBinding" name="OrderWebEndpoint" contract="OrderService.IOrder" />
Note: The Plex.ObRun.dll.config file, which is part of this project is a copy of the file that you configured in step 4. The WCF service uses this file to make calls into the Plex runtime. Ensure to configure this file correctly so that your application runs properly. When you encounter runtime errors, your probable diagnosis must be the configuration file.
The two processes, WCF Service Host and WCF Test Client tool are launched.
The WCF Service Host main window displays the running services.
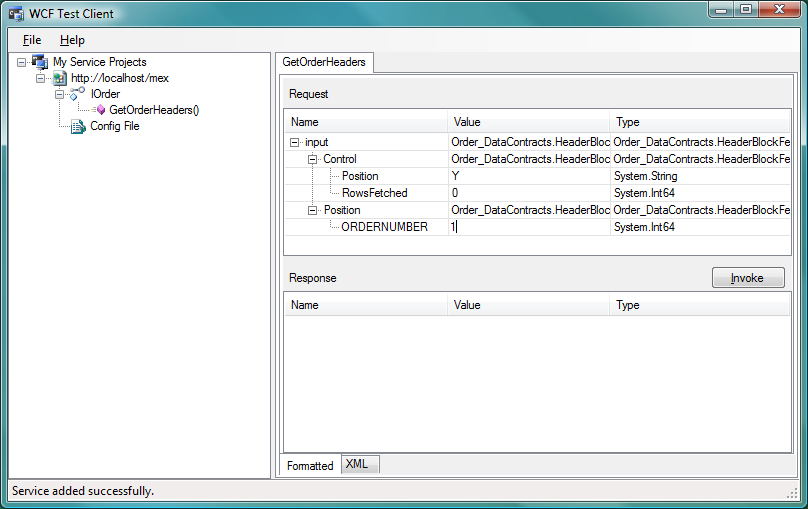
The WCF Test Client tool (second process), appears after the WCF service is started.
Note: This tool queries the WCF service through the metadata exchange endpoint (also known as the ‘mex endpoint’) exposed for the service and displays the WCF service details and all the operations that can be called on it.
A parameter entry page appears on the right-hand side of the screen displaying the input parameters for the operation you selected. These parameters are based on the Data Contracts generated for the operation, and were derived from the function in the Plex model. The endpoint operation calls your CA Plex server function with these parameters.
This selection initializes the inner-classes that contain the actual input fields that you pass to the operation.
The following WCF Test Client interface displays when you are ready to call your service.
The call results display in the Response window.
After you confirm that the WCF service works as expected, you can create client applications that consume your service. The following section details creating client applications that call WCF services.
The pre-requisite to create client applications is to have an understanding of creating C# applications using the Visual Studio project templates.
Example:
Complete the following tasks to show how a sample project that ships under the Visual Studio Clients directory are created:
Follow these steps:
Note: Ensure that the project targets the .NET Framework 3.5 or above.
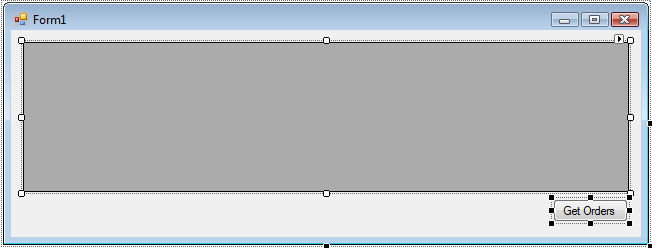
After the project is created, a form named Form1.cs appears in the design view.
Hint: You can copy the metadata exchange endpoint address by selecting the running service in the WCF Service Host application, right-clicking on the service, and selecting Copy Metadata Address from the popup menu.
The Visual Studio queries the service and displays the operation endpoints that it exposes.
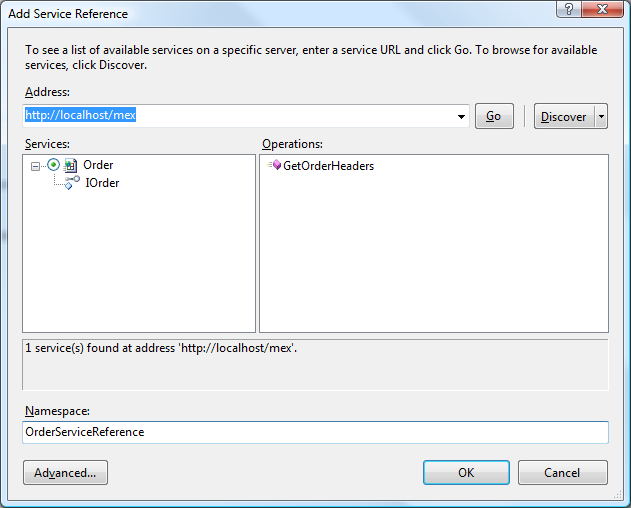
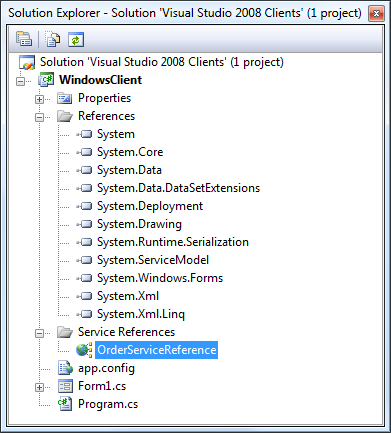
After you created the client WCF stub code, the OrderServiceReference node appears under the Service References section of your project. This contains the client code that your program needs to interact with and call operations on your running WCF service.
Add the following code to the top of the Form1.cs source file, immediately after the using statements.
// Add a reference to the namespace that contains the service client stub.
using WindowsClient.OrderServiceReference;
Now change the btnGetOrders_Click method as follows:
private void btnGetOrders_Click(object sender, EventArgs e)
{
// Create an instance of the WCF Service via the client stub.
OrderClient myOrderClient = new OrderClient();
// Create the input DataContract for the operation we wish to call.
HeaderBlockFetch_Input input = new HeaderBlockFetch_Input();
// WORKAROUND: This gets around the inner-class initialization issue.
HeaderBlockFetch_Input._Control control = new
HeaderBlockFetch_Input._Control();
HeaderBlockFetch_Input._Position position = new
HeaderBlockFetch_Input._Position();
// Set up the input parameters for the call.
control.Position = "Y";
position.ORDERNUMBER = 1;
// WORKAROUND: This gets around the inner-struct issue.
input.Control = control;
input.Position = position;
// Call the operation on the service stub.
HeaderBlockFetch_Output output = myOrderClient.GetOrderHeaders(input);
// Do whatever you want with the output.
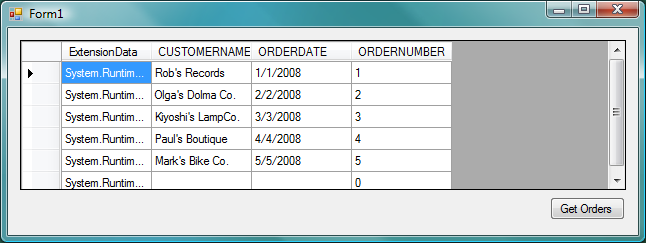
dgvOrders.DataSource = output.FetchedData;
}
The DataGridView control populates the results of the call.
Note:
After you create the client applications that call the WCF services, you can change the WCF service hosting type. The following section details how you can host your WCF services using the different hosting types.
The basic steps for developing WCF services with different host types remain the same; however, configuring and running the WCF services after they are generated differs for each host type.
Follow these steps:
Note: For a detailed description of each hosting type, the files that they generate, and how to deploy and run each WCF host type, see the following sections:
The WCF Services that use the Application hosting type are hosted by a basic .NET managed application that runs as a console executable program. The following diagram shows the example that is used in creating a basic WCF service, which is generated as a managed application.
The Program.cs file contains a main entry point for the WCF Service Host process. The Main() method that is contained within this source file starts up the WCF service, when the process starts. After the process starts, the WCF service manages connection to the service from client programs.
Follow these steps:
A console window displays the information that the WCF service is ready to be called.
Note: You can also run the WCF service using the Visual Studio debugger.
Note: For more information, see the Import and Use WCF Services in .NET Client Applications section.
The WCF services that use the IIS hosting type generate in an IIS-friendly project that differs slightly from the other project types. You can review the major differences by looking at the project in the Visual Studio Solution Explorer.
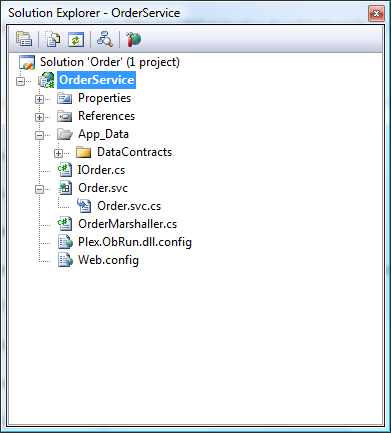
The following list outlines the major differences between the IIS and other hosting types:
Follow these steps:
Note: You can run this host type using the Visual Studio ASP.NET Development Server that ships with Visual Studio.
An instance of the ASP.NET Development Server starts to run the application in.
After the WCF service is hosted in the ASP.NET Development Server, Internet Explorer points to the root directory of the web application.
The browser displays some basic information about the deployed service instance.
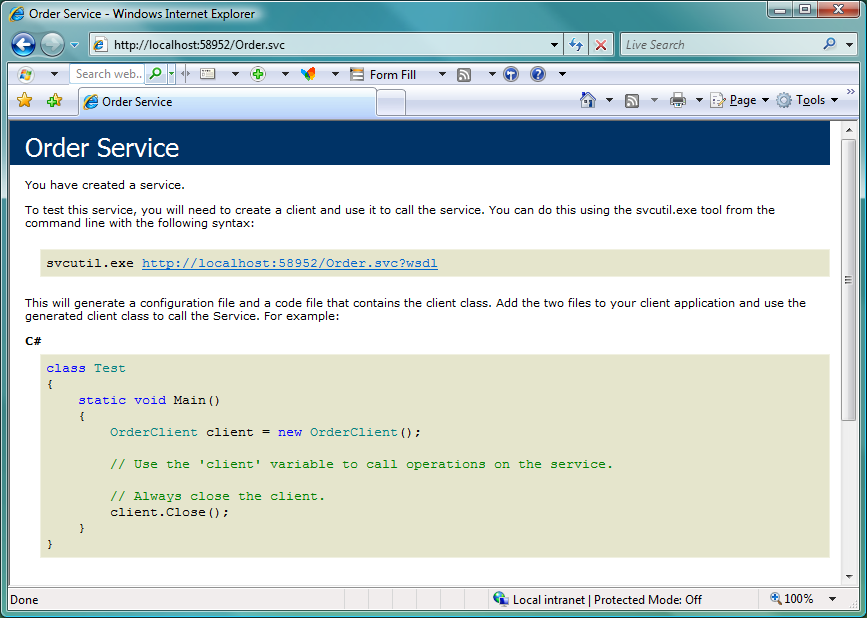
Note: The ASP.NET Development Server starts the WCF service on a unique port number. In this example, the port number is 58952. You can use this port when calling any operations on the WCF service or when querying the metadata exchange endpoint associated with the service.
Note: Since the ASP.NET Development Server instance has allocated a non-used port, use this port for the metadata exchange endpoint when importing the service for use. For more information, see the Import and Use WCF Services in .NET Client Applications section.
The WCF services that are hosted using the Windows Service hosting type generates a host wrapper that compiles as an executable. This executable can be installed and run as a Windows Service. You can review the major differences by looking at the project in the Visual Studio Solution Explorer.
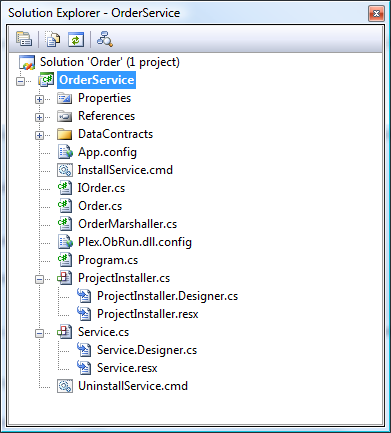
The following list outlines the major differences between the Windows Service and other hosting types:
Follow these steps:
The following image shows a successful installation, after you press any key to exit the install batch process.
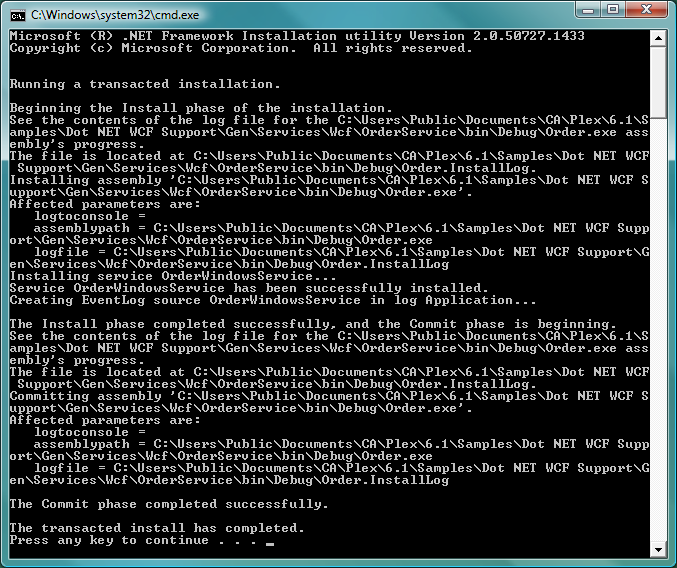
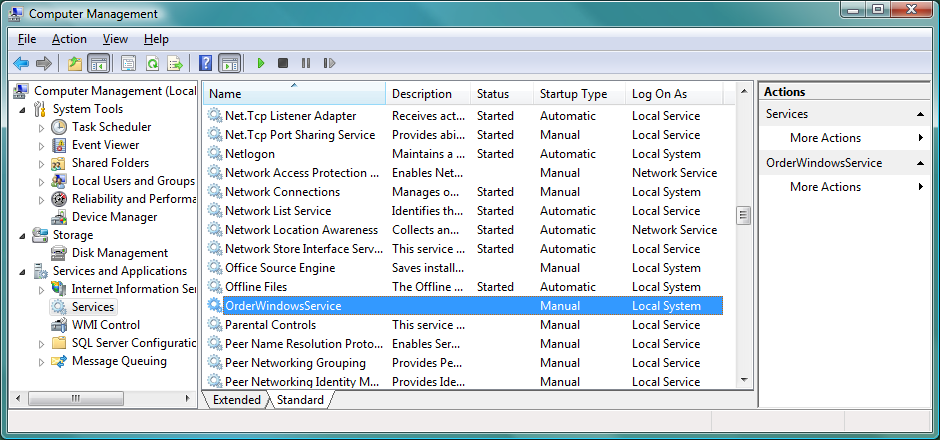
The Windows Service starts and is now ready to accept client requests.
Note: For more information, see the Import and Use WCF Services in .NET Client Applications section.
The basic code that is outlined in importing and using WCF Services in .NET Client Applications enables you to make calls through WCF to your Plex server applications. However, one of the primary considerations while creating client-based applications that access your services is the error handling.
Symptom:
There can be many reasons when a call to a Plex-generated server application fails. Here are some of the scenarios:
Solution:
You can handle the first three types of errors by checking whether the Environment<*Call status> flag has a value of <*Call status.*Error> returned by the runtime. The Plex-generated function can then test the environment field after the call and decide if the call was successful or not.
You can handle the last type of error at function level in the Action Diagram code. In the Plex Pattern and Class libraries, any error that is returned from a database is returned to the calling program by copying the Environment<*View status> field into the Environment<*Returning status> field. In turn, this is returned to the calling function, which can check the value in the Environment<*Returned status> after the call to decide if the call was successful or not.
Note: The WCF supports the concept of Fault Contracts to define any abnormal return from an operation call. A fault contract defines the type of exception a client can expect to get back if an error occurs in the server. The fault contract is then translated back into the client as a technology-specific exception. The Plex WCF runtime defines a fault contract that is used against every operation generated only a WCF service interface called PlexRuntimeException. By monitoring this exception in client code, a caller can validate that a call was successful and if it was not, can decide on the best course of action.
Troubleshooting Information
The Plex-specific runtime information is hidden from the caller. The PlexRuntimeException class contains a number of properties that a client application can use to diagnose an error. The properties are:
Defines a string that represents a user-friendly error message that is raised by the Plex runtime.
Defines a string that represents any Environment<*Returning status> set in the Plex function that is called by an operation.
Defines a boolean value that represents the Environment<*Call status> set by the Plex .NET runtime during execution of the Plex function called by an operation.
Best Practice
As a best practice, use the exception handling when calling operations on the WCF services. Ensure to enclose every operation call with a try/catch block that monitors the exceptions raised, based on the WCF fault contracts that are defined on an interface. You can add error handling to the C# code while importing and using WCF Services in .NET Client Applications.
Follow these steps:
// Add a reference to the WCF runtime namespace (for exception handling).
using System.ServiceModel
private void btnGetOrders_Click(object sender, EventArgs e)
{
// Create an instance of the WCF Service via the client stub.
OrderClient myOrderClient = new OrderClient();
// Create the input DataContract for the operation we wish to call.
HeaderBlockFetch_Input input = new HeaderBlockFetch_Input();
// WORKAROUND: This gets around the inner-class initialization issue.
HeaderBlockFetch_Input._Control control = new
HeaderBlockFetch_Input._Control();
HeaderBlockFetch_Input._Position position = new
HeaderBlockFetch_Input._Position();
// Set up the input parameters for the call.
control.Position = "Y";
position.ORDERNUMBER = 1;
// WORKAROUND: This gets around the inner-struct issue.
input.Control = control;
input.Position = position;
try
{
// Call the operation on the service stub.
HeaderBlockFetch_Output output= myOrderClient.GetOrderHeaders(input);
// Do whatever you want with the output.
dgvOrders.DataSource = output.FetchedData;
}
catch (FaultException<PlexRuntimeException> ex)
{
// Report the Message, Environment<*Call status> and
// Environment<*Returned status> as passed back from the server.
// These values are held in the Detail portion of the FaultException.
String title = "Plex Function Call Exception";
String message1 = "Message: " + ex.Detail.Message;
String message2 = "\nEnvironment<*Call status>: " +
ex.Detail.CallStatus.ToString();
String message3 = "\nEnvironment<*ReturnedStatus>: " +
ex.Detail.ReturnedStatus;
// Show the message.
MessageBox.Show(message1 + message2 + message3, title);
}
}
The Plex .NET runtime fully supports the calling of Plex-generated Java and System i functions. However, set a generation option in your Plex build file to generate the necessary C# parameter interface classes suitable for marshalling input and output parameters to those functions.
Follow these steps:
[Service generation options]
Create C# interface classes=1
This generates the _ObIn and _ObOut classes for each function that want to call using the WCF service.
The rest of steps to create the WCF service remain the same.
Note: You can retain the build file option that is switched on. You get the _ObIn and _ObOut classes for any non-C# function you generate, though it is not called using the WCF. If you switch this option off and if you add another method to the WCF service, then repeat the steps to generate the necessary parameter interface class.
This Documentation, which includes embedded help systems and electronically distributed materials, (hereinafter referred to as the “Documentation”) is for your informational purposes only and is subject to change or withdrawal by CA at any time. This Documentation is proprietary information of CA and may not be copied, transferred, reproduced, disclosed, modified or duplicated, in whole or in part, without the prior written consent of CA.
If you are a licensed user of the software product(s) addressed in the Documentation, you may print or otherwise make available a reasonable number of copies of the Documentation for internal use by you and your employees in connection with that software, provided that all CA copyright notices and legends are affixed to each reproduced copy.
The right to print or otherwise make available copies of the Documentation is limited to the period during which the applicable license for such software remains in full force and effect. Should the license terminate for any reason, it is your responsibility to certify in writing to CA that all copies and partial copies of the Documentation have been returned to CA or destroyed.
TO THE EXTENT PERMITTED BY APPLICABLE LAW, CA PROVIDES THIS DOCUMENTATION “AS IS” WITHOUT WARRANTY OF ANY KIND, INCLUDING WITHOUT LIMITATION, ANY IMPLIED WARRANTIES OF MERCHANTABILITY, FITNESS FOR A PARTICULAR PURPOSE, OR NONINFRINGEMENT. IN NO EVENT WILL CA BE LIABLE TO YOU OR ANY THIRD PARTY FOR ANY LOSS OR DAMAGE, DIRECT OR INDIRECT, FROM THE USE OF THIS DOCUMENTATION, INCLUDING WITHOUT LIMITATION, LOST PROFITS, LOST INVESTMENT, BUSINESS INTERRUPTION, GOODWILL, OR LOST DATA, EVEN IF CA IS EXPRESSLY ADVISED IN ADVANCE OF THE POSSIBILITY OF SUCH LOSS OR DAMAGE.
The use of any software product referenced in the Documentation is governed by the applicable license agreement and such license agreement is not modified in any way by the terms of this notice.
The manufacturer of this Documentation is CA.
Provided with “Restricted Rights.” Use, duplication or disclosure by the United States Government is subject to the restrictions set forth in FAR Sections 12.212, 52.227-14, and 52.227-19(c)(1) - (2) and DFARS Section 252.227-7014(b)(3), as applicable, or their successors.
Copyright © 2014 CA. All rights reserved. All trademarks, trade names, service marks, and logos referenced herein belong to their respective companies.