Product: CA Plex
Release: 7.1
This scenario describes how as a CA Plex Developer, you can deploy .NET ClickOnce in your CA Plex application.
In earlier releases, you can select an entry function for a Code Library. When you compile a C# Code Library containing an entry function, an executable is created for it, which calls the specified function. You can now model your application deployments completely through Code Libraries without having to create an executable through the Generate and Build window.
With CA Plex 7.1, you need not create an executable for the C# function. However, you can still call it using the CA Plex .NET Runtime Bootstrap executable, named PlexRuntimeLauncher.exe. This executable is shipped with CA Plex r7.1. You can use this executable to call both .NET Client and Server functions.
This method is useful if you want to call Plex generated C# functions through a scheduler or a scripting environment.
This Knowledge Base Article constitutes a portion of the official CA product documentation for this CA product. This Knowledge Base Article is subject to the following notices, terms and conditions.
As a CA Plex Developer, you can deploy .NET ClickOnce in your CA Plex application. You can now model your application deployments completely through Code Libraries without having to resort to creating executables through the Generate and Build window.
In addition, you can deploy the ClickOnce in Microsoft Visual Studio, using the code library project files that are generated through the Code Library Wizard. ClickOnce is a Microsoft deployment technology that enables you to create self-updating Windows-based applications that can be installed and run with minimal user interaction.
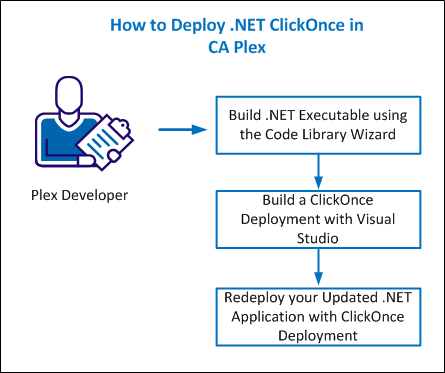
The following diagram illustrates how you can deploy .NET ClickOnce in your application:

You must have the following prerequisites to deploy the .NET ClickOnce:
In this section, you define an entry function of your application, so you can create a C# Visual Studio project file (.csproj) to create an executable (.exe) for the code library using the Code Library Wizard.
Example:
You can now build a .NET executable using the predefined sample model that is located in the \Dot NET ClickOnce\ folder. The sample model has two predefined entities that scope two functions. These entities and the functions they contain are organized into package objects. The P_Tier1 and P_Tier2 packages are associated with two separate code library objects, as shown in the following screen:
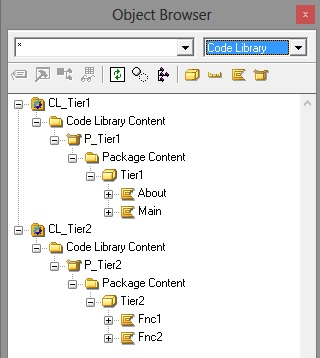
Based on this design, if you build functions with the Code Library Wizard, you get two assembly DLLs. For more information about the code library objects, see the Code libraries and .NET section from the CA Plex User Guide.
In 7.1, you can specify an entry function for a code library. In other words, you can specify an executed function when you run the code library, after it is built into an Assembly. To define the specific function as the code library’s entry function, use the CDL entry function FNC triple.
Follow these steps:

Note: Now you are ready to generate and build the application. Use the Code Library Wizard to build your functions, so you can generate the function source code from within Plex.
The packages are promoted.
The source is generated.
The compilation starts and you can see the .exe is built in addition to the assembly for code library CL_Tier1.
The Windows explorer pops-up displaying the build target folder.
Note: Now you have the CL_Tier1.dll assembly containing the main application logic and CL_Tier1.App.exe, an executable created for the code library with an associated configuration file.
Note: The two assemblies CL_Tier1.dll and CL_Tier2.dll, and one .Exe file CL_Tier1.App.exe is displayed in the windows explorer pop-up that was launched.
You have now generated, built, and run CA Plex .NET Client application with multiple assemblies with an entry executable using the Code Library Wizard.
In this section, you use Microsoft Visual Studio 2010 to build a ClickOnce deployment application. If you are using the latest version of Visual Studio, the images or menu options may differ from this example.
Before you start, create and share a C:\deploy folder, so you can access the folder with \\localhost\deploy.
Example:
Use the Microsoft Visual Studio 2010 or later to create a ClickOnce deployment application.
Follow these steps:
The following three.csproj files that were created using the Code Library Wizard are listed in the folder. Use these project files to create a ClickOnce deployment of the application
This file automatically creates a solution file.
The Save File As dialog opens.
The Add Existing Project dialog opens.
The Visual Studio Solution Explorer displays the three projects as shown in the following screen:
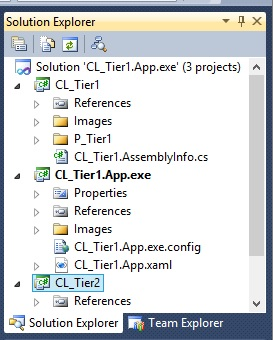
Important! Adding reference is mandatory for successful deployment of ClickOnce with the application.
The Add Reference dialog opens.
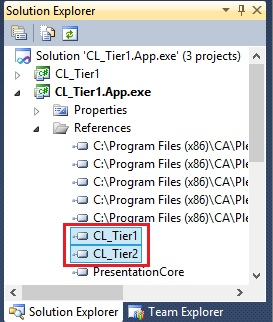
The Visual Studio Solution Explorer opens listing the newly added references when you expand the References under the CL_Tier1.App.exe project.
The Publish Wizard opens.
After the successful deployment, Visual Studio opens Windows Explorer and displays the packaged application.
Add the following extra options to customize and publish your ClickOnce deployment.
Follow these steps:
The project properties dialog opens.
The Prerequisites dialog opens.
The Application Updates dialog opens.
The Publish Options dialog opens.
In this section, change the application in the Plex model, recreate the ClickOnce deployment, and run the already deployed application.
Follow these steps:
Tier2 FNC function FNC Fnc3.

Tier2.Fnc3 FNC is an FNC UIBasicShell.

The Panel Designer dialog opens.
The Event Mappings dialog opens.
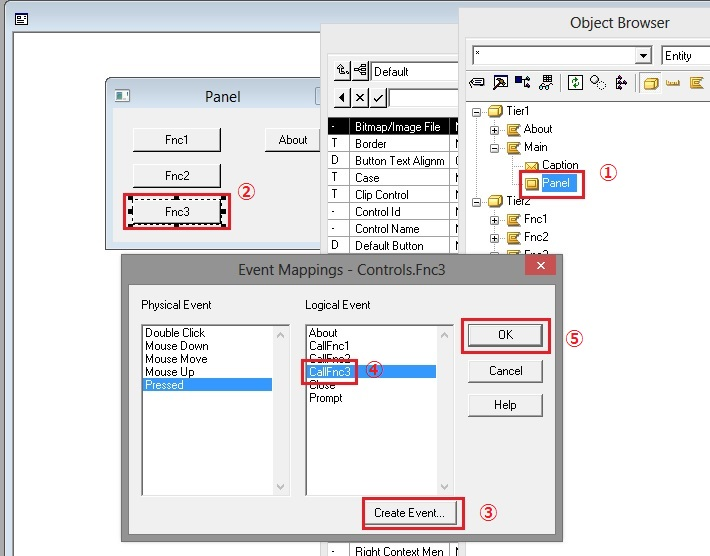
You now have the recompiled assemblies Tier1.dll and Tier2.dll.
All your customized settings are saved while building a ClickOnce deployment and are available for you now.
The Visual Studio opens Windows Explorer and displays the directory that the packaged application has deployed to.
Note: This occurs because you have customized and enabled an option to check for updates each time before the application runs.
Note: If you have Windows 8 installed, you might get an extra security pop-up. Choose to run the application to continue with the redeployment.
After the successful installation, the updated application is ready for use.
You have now changed the .NET application functionality and then redeployed your updated application with ClickOnce.
This Documentation, which includes embedded help systems and electronically distributed materials, (hereinafter referred to as the “Documentation”) is for your informational purposes only and is subject to change or withdrawal by CA at any time. This Documentation is proprietary information of CA and may not be copied, transferred, reproduced, disclosed, modified or duplicated, in whole or in part, without the prior written consent of CA.
If you are a licensed user of the software product(s) addressed in the Documentation, you may print or otherwise make available a reasonable number of copies of the Documentation for internal use by you and your employees in connection with that software, provided that all CA copyright notices and legends are affixed to each reproduced copy.
The right to print or otherwise make available copies of the Documentation is limited to the period during which the applicable license for such software remains in full force and effect. Should the license terminate for any reason, it is your responsibility to certify in writing to CA that all copies and partial copies of the Documentation have been returned to CA or destroyed.
TO THE EXTENT PERMITTED BY APPLICABLE LAW, CA PROVIDES THIS DOCUMENTATION “AS IS” WITHOUT WARRANTY OF ANY KIND, INCLUDING WITHOUT LIMITATION, ANY IMPLIED WARRANTIES OF MERCHANTABILITY, FITNESS FOR A PARTICULAR PURPOSE, OR NONINFRINGEMENT. IN NO EVENT WILL CA BE LIABLE TO YOU OR ANY THIRD PARTY FOR ANY LOSS OR DAMAGE, DIRECT OR INDIRECT, FROM THE USE OF THIS DOCUMENTATION, INCLUDING WITHOUT LIMITATION, LOST PROFITS, LOST INVESTMENT, BUSINESS INTERRUPTION, GOODWILL, OR LOST DATA, EVEN IF CA IS EXPRESSLY ADVISED IN ADVANCE OF THE POSSIBILITY OF SUCH LOSS OR DAMAGE.
The use of any software product referenced in the Documentation is governed by the applicable license agreement and such license agreement is not modified in any way by the terms of this notice.
The manufacturer of this Documentation is CA.
Provided with “Restricted Rights.” Use, duplication or disclosure by the United States Government is subject to the restrictions set forth in FAR Sections 12.212, 52.227-14, and 52.227-19(c)(1) - (2) and DFARS Section 252.227-7014(b)(3), as applicable, or their successors.
Copyright © 2014 CA. All rights reserved. All trademarks, trade names, service marks, and logos referenced herein belong to their respective companies.