This example shows you how to create a simple connector named My_MultiTable_Connector that combines two database tables into the user account class.
This example uses a schema named Multi_Table schema that contains an Employees table and an Address table.
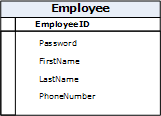
The Employees table is the main table for employee records. The table uses EmployeeID as its primary key as shown in the following diagram:

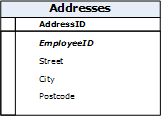
The Addresses table is a separate table of addresses that uses EmployeeID as a foreign key as shown in the following diagram:

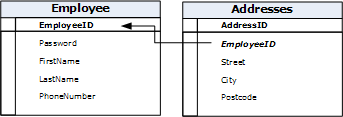
The following diagram shows the relationship between the tables:

Example: Create a compound class for multitable support
This example combines the Employees table and Addresses table in the Multi_Table schema so that they are jointly accessible from the user's endpoint account in the Identity Manager User Console account management screens.
To create a compound class for multitable support
The Map Class dialog appears.
The Custom Types dialog appears.
Connector Xpress creates a compound class called Address and adds it to the mapping tree. Connector Xpress sets the Address compound class to Unmanaged by default.
Connector Xpress creates an account attribute named Addresses, adds it to the mapping tree, and selects the multivalued attribute check box on the Attribute details dialog. Connector Xpress also creates a direct association from the Address class to the User Account class and adds a node named with User Account to the Mapping tree. The Addresses attribute and direct association incorporates the Address compound class into the User Account class.
Note: The Address class has the is compound value metadata flag set to true on the Map Compound Class and Attributes dialog. This flag specifies that the class is a compound class.
The Map Compound Class and Attributes dialog appears.
The Direct Association with User Account dialog appears.
Connector Xpress matches this attribute with the User Account naming attribute.
Note: The Employee ID attribute in the Address class serves as the association attribute. The attribute has a association type metadata property (Assoc Type=COMPOUND_PARENT) set that defines it as the attribute linking this compound class to its parent class. To display this property on the Attribute Detail dialog, display the extended metadata properties.
The Attributes Summary dialog appears.
Example: Results of combining the Employees and Addresses table
The following diagram shows the results of combining the Employees table and Addresses table:

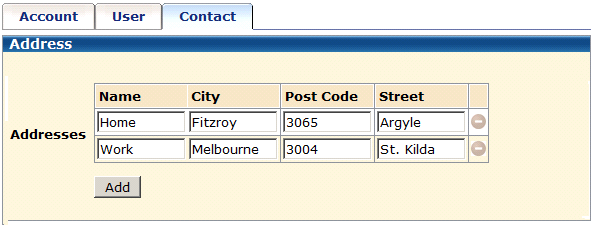
Example: Generated account screens
This example shows how the account management screens look after you import the My_MultiTable_Connector-RoleDef.Xml file into Identity Manager:

| Copyright © 2011 CA. All rights reserved. | Email CA Technologies about this topic |