Upgrade Guide › WebSphere Version › Upgrade on a Single WebSphere Node › How to Migrate a Single Node Installation to WebSphere 7 › Reinstall the Identity Manager Server on a WebSphere Node
Reinstall the Identity Manager Server on a WebSphere Node
To install the new version of Identity Manager Server on a WebSphere node
- Install WebSphere v7 and the required FixPacks and JDK.
- Check that you have removed all unnecessary Websphere files or they may prevent the upgrade from succeeding.
- Stop the following items:
- WebSphere 7
- Any previous installation of WebSphere
- SiteMinder services if installed
- Start the Identity Manager installation program.
- Windows: From your installation media, run the following program:
ca-im-release-win32.exe
- UNIX: From your installation media, run the installation program. For example, for Solaris:
ca-im-release-sol.bin
release represents the current release of CA Identity Manager.
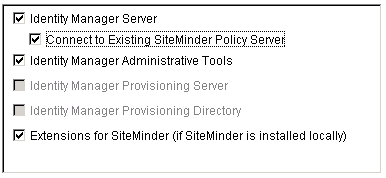
- Select the option to install the Identity Manager Server.
- Supply the details for the websphere 7 that you created.
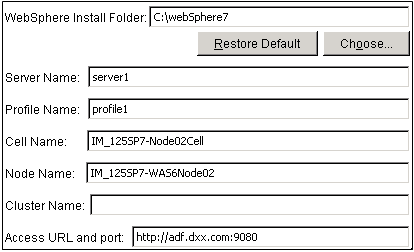
The WebSphere section includes these fields:
- WebSphere Install Folder
-
The folder or directory where WebSphere is installed. You find this location in the Windows or UNIX file system.
- Server Name
-
You find this name in the WebSphere console.
- Profile Name
-
You find this name in the Windows or UNIX file system at the path:
was_home/profiles/Deployment_Manager_Profile/config/cells/
- Cell Name
-
The deployment manager's cell which can be found in the WebSphere console.
- Node Name
-
A node that contains the Server Name you supplied on this screen. You find this name in the WebSphere console.
- Access URL and port
-
The fully-qualified system name and port number used by WebSphere.
- For database credentials, provide the same values that existed at the previous installation.
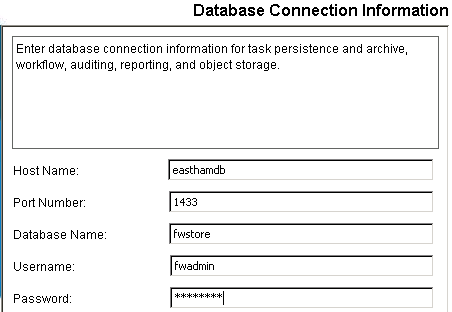
Important! If you are upgrading from CA Identity Manager r12 and you have different database stores for task persistence, workflow, audit, and reports, update the data sources to point to the separate stores.
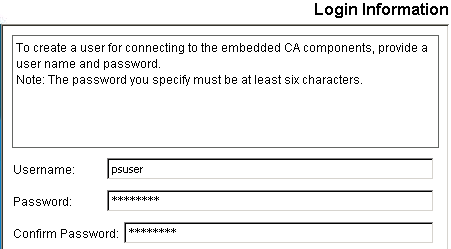
- Create a user on the Login Information section using a password you can recall.
- Review the summary of your upgrade choices and click Install.
The installer will install the components you selected and gradually update the progress bar.

- When the installation completes, inspect the Install Complete message. If you see errors on the screen, note the path for the logs, which explain the errors.
If you are upgrading from CA Identity Manager r12, continue by upgrading the workflow database.

