To store your custom reports and ensure that they do not get overwritten during an upgrade, create a subfolder for them under the CA Clarity folder located in the Business Objects Infoview folder. When you upgrade CA Clarity PPM, standard reports in the CA Clarity folder are overwritten by the upgrade, but the contents of a subfolder you create and place under the CA Clarity folder are not overwritten.
If you need more that one subfolder for custom reports, you can create as many as you need and name the subfolders to indicate the type of custom reports stored in them (for example, PMO Reports).
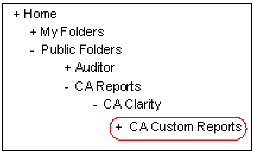
The following figure shows an example of a custom reports subfolder and demonstrates where to place it in the InfoView folder hierarchy.
You can name the folder to indicate what type of custom reports it contains (for example, PMO Reports).
Note: The folder name along with the report name becomes part of the executable name used in the report definition.
Use the following process to create a new user-defined report:
Use the following process to create a user-defined report from a stock report:
| Copyright © 2010 CA. All rights reserved. | Email CA Technologies about this topic |