Introducing CA ARCserve Backup Agents and Options › Using Options › Tape Library Option › Installing and Configuring the Option › Configure CA ARCserve Backup Virtual Libraries
Configure CA ARCserve Backup Virtual Libraries
After you start or stop and restart the Tape Engine, CA ARCserve Backup should automatically detect and configure your libraries with a default set of options. This section describes how to:
- Configure a CA ARCserve Backup virtual library.
- Modify the options for an existing CA ARCserve Backup virtual library.
Before you can configure your system to use a virtual library, perform the following prerequisite task:
- Verify that Windows detects your hardware by accessing Computer Management Console and selecting Device Manager.
The following graphic illustrates a sample Device Manager view:
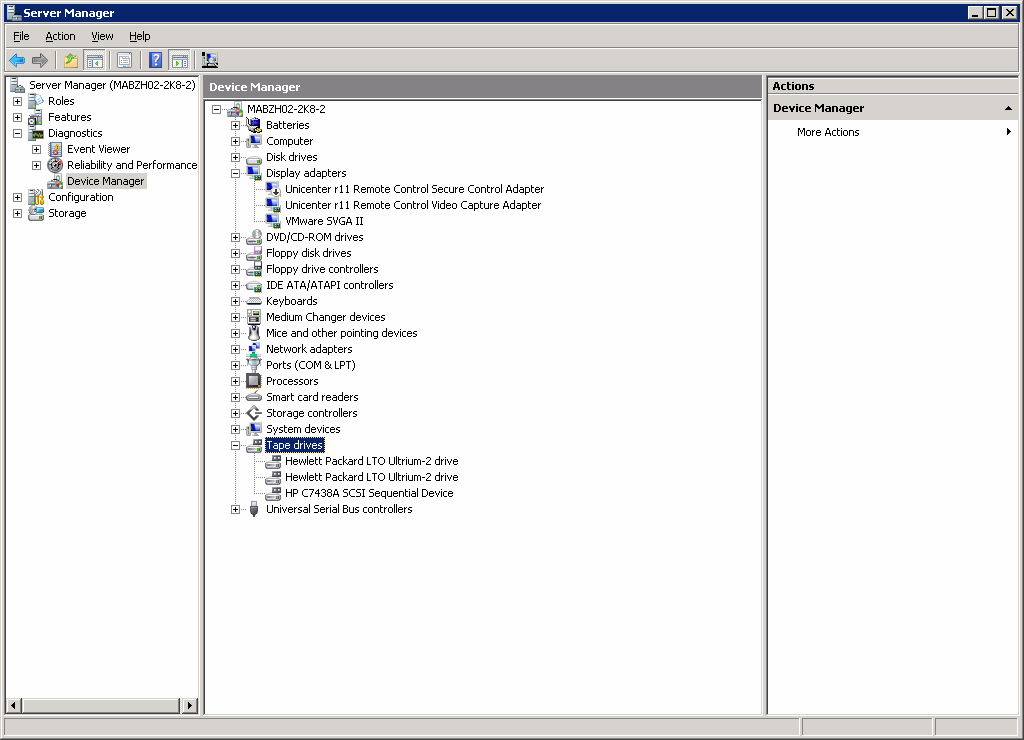
The library should be listed under Medium Changers and the Drives are usually listed under Tape drives. If there are no available Windows drivers for the Tape drives, they will be listed under Other devices. CA ARCserve Backup does not require device specific Windows drivers.
To configure CA ARCserve Backup virtual libraries
- From the Administration menu in the Navigation Bar on the CA ARCserve Backup Manager Console, select Device Configuration.
The Device Configuration Welcome dialog opens.
- Select Virtual Library and click Next.
Note: If the Tape Engine is currently running, you are asked to stop it. Click Yes to continue.
- Select the library from the Available Libraries list that you want to divide into CA ARCserve Backup virtual libraries and click New.
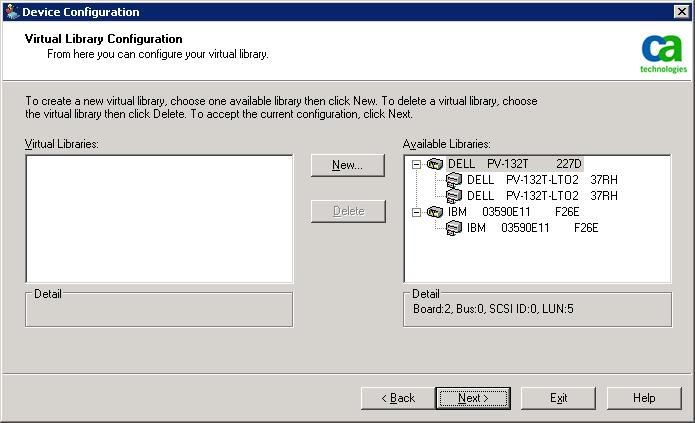
The New Virtual Library Properties dialog opens.
- Select the drive or drives and the slot range that you would like to assign to the drive and click OK.
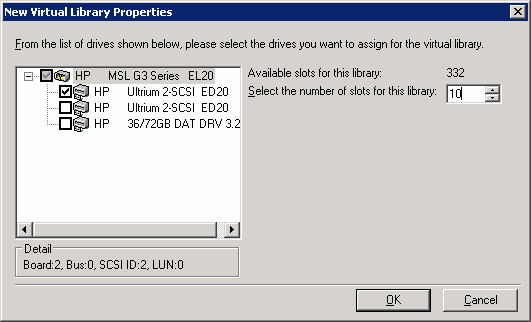
You have successfully created a CA ARCserve Backup virtual library.
- Repeat Steps 5 and 6 to configure as many CA ARCserve Backup virtual libraries and drives as necessary for your library.
- Click Next.
You have successfully saved your CA ARCserve Backup virtual library configuration.
Notes:
- If you need to modify your configuration, select one of the CA ARCserve Backup virtual libraries and click Delete to reconfigure the library. When you delete a CA ARCserve Backup virtual library, Device Configuration prompts you to remove all the virtual libraries, and reconfigure.
- If your hardware configuration changes, you must reconfigure your CA ARCserve Backup virtual libraries for CA ARCserve Backup to work properly. If you must disconnect a library that was configured into CA ARCserve Backup virtual libraries, you should delete the CA ARCserve Backup virtual libraries before disconnecting.

