This section describes the steps that you must perform to upgrade earlier software versions to the current release. Upgrade procedures differ depending on the software version you are upgrading:
Before you begin, ensure you have read the information in Upgrade CA ARCserve Backup from a Previous Release.
When upgrading CA ARCserve Backup from r11.5 to r15 in an MSCS cluster environment, the following procedure must be performed to protect your clustered backup data. If you are not already using CA ARCserve Backup r11.5 in a cluster environment, you do not need to perform this procedure. The procedure supports the following CA ARCserve Backup r11.5 upgrade scenarios in an MSCS cluster environment:
This upgrade procedure is assuming that you are operating in a two-node cluster environment, with Node A representing the initial Active Node and Node B representing the initial Passive Node.
To upgrade CA ARCserve Backup from r11.5 to r15 in an MSCS cluster environment
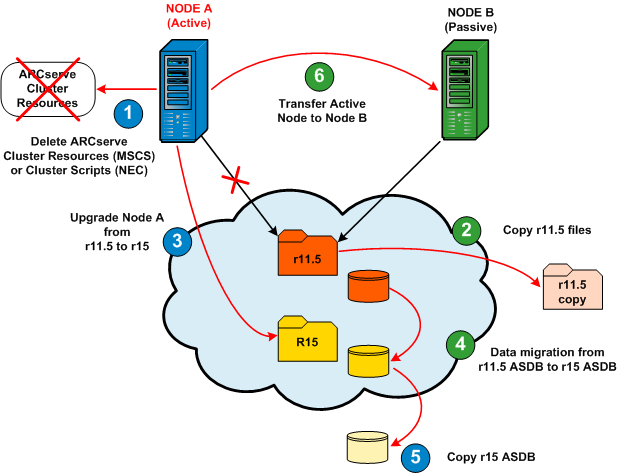
On Node A:
The following diagram provides a graphic overview of the initial tasks being performed for Node A during this upgrade procedure.
The Cluster Administrator dialog appears.
Note: Cluster Administrator is a utility provided by Microsoft and is accessed from the Administrative Tools group of the Start menu.
The ARCserve cluster resources for r11.5 are deleted.
A backup copy of the CA ARCserve Backup r11.5 files is located in another location from the original files.
Important! During the upgrade installation, you will be prompted to specify the installation path location for r15. Do not specify the same location where the r11.5 is currently located. To avoid difficulties during the upgrade and possible loss of information (job scripts saved in the queue), you must select a different location for the CA ARCserve Backup r15 installation.
Results:
Note: For primary server upgrades, the CA ARCserve Backup database engine must be manually started prior to migrating the data.
Note: When CA ARCserve Backup services start, the corresponding status indicates Started.
In the CA ARCserve Backup installation directory, locate and double-click servermigration.exe.
The Server Data Migration dialog opens.
The specified CA ARCserve Backup data is migrated from r11.5 to r15.
When the SQLE instance is stopped, the corresponding status will become blank and no longer indicate Started.
A backup copy of the SQLASDB directory is located in another location from the original directory.
The Cluster Administrator dialog opens.
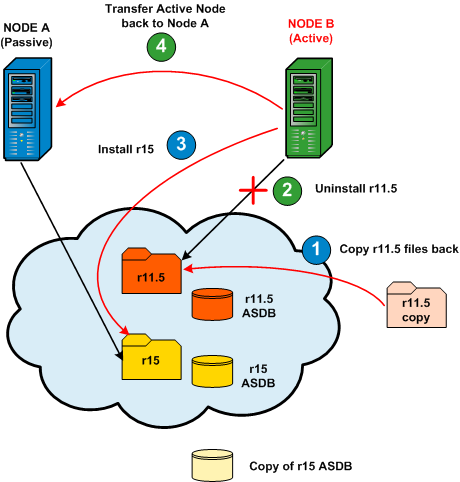
On Node B:
The following diagram provides a graphic overview of the initial tasks being performed for Node B during this upgrade procedure.
The CA ARCserve Backup r11.5 files are now located back in the original location.
CA ARCserve Backup r11.5 is uninstalled.
Important! During the CA ARCserve Backup r15 new installation on Node B, do not select the "Overwrite DB" option to prevent overwriting the ARCserve database that was migrated during the r15 upgrade to Node A.
CA ARCserve Backup r15 is installed on Node B. Do not set up new ARCserve cluster resources at this time.
Node B is now the passive node and Node A is the active node.
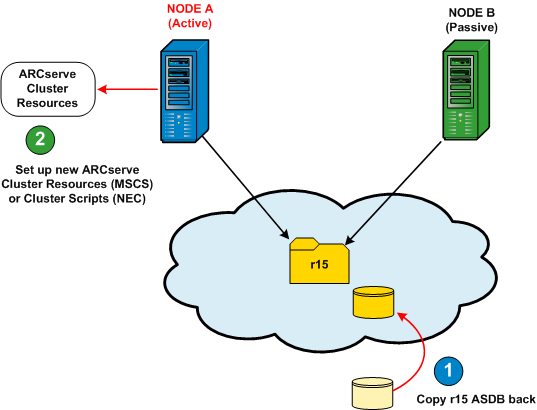
On Node A:
The following diagram provides a graphic overview of the final tasks being performed for Node A during this upgrade procedure.
The backed-up copy of the SQLASDB directory replaces the SQLASDB directory created during the CA ARCserve Backup r15 installation.
The new ARCserve cluster resources (ARCserve HA, ARCserve ASDB, ARCserve Registry, and ARCserve Share) are created.
To ensure that all CA ARCserve Backup services start properly on the CA ARCserve Backup server, you must execute the cstop and cstart scripts on the CA ARCserve Backup server before you open the CA ARCserve Backup Manager Console. The cstop and cstart batch files are stored in the CA ARCserve Backup installation directory on the CA ARCserve Backup server. For more information about using cstop and cstart, see the Administration Guide.
Note: CA ARCserve Backup does not support recovering the CA ARCserve Backup database when the last backup of the CA ARCserve Backup database was completed before you upgraded to this release. As a best practice, you should back up the CA ARCserve Backup database as soon as possible after the upgrade is complete. For information about backing up the CA ARCserve Backup database, see the Administration Guide.
| Copyright © 2010 CA. All rights reserved. | Email CA about this topic |